
Exchange Server SE — DAG On-Premises
Exchange Server vẫn là lựa chọn của nhiều tổ chức khi cần kiểm soát hoàn toàn data mail — dù xu hướng migrate lên Microsoft 365 ngày càng phổ biến. Lab này mình dựng Exchange Server SE on-premises với DAG 2 node trên domain anhlx.lab, HAProxy làm Layer 4 load balancer, để đi sâu vào các thành phần core: transport pipeline, Client Access Front End, DAG replication, và failover mailbox database. Kịch bản cuối bài: user1 gửi mail cho user2 qua OWA, trace từng hop qua Message Tracking, rồi shutdown EX01 để xem DAG tự failover.
Mục lục
- 1. Topology & IP Plan
- 2. Active Directory — DC01 & DC02
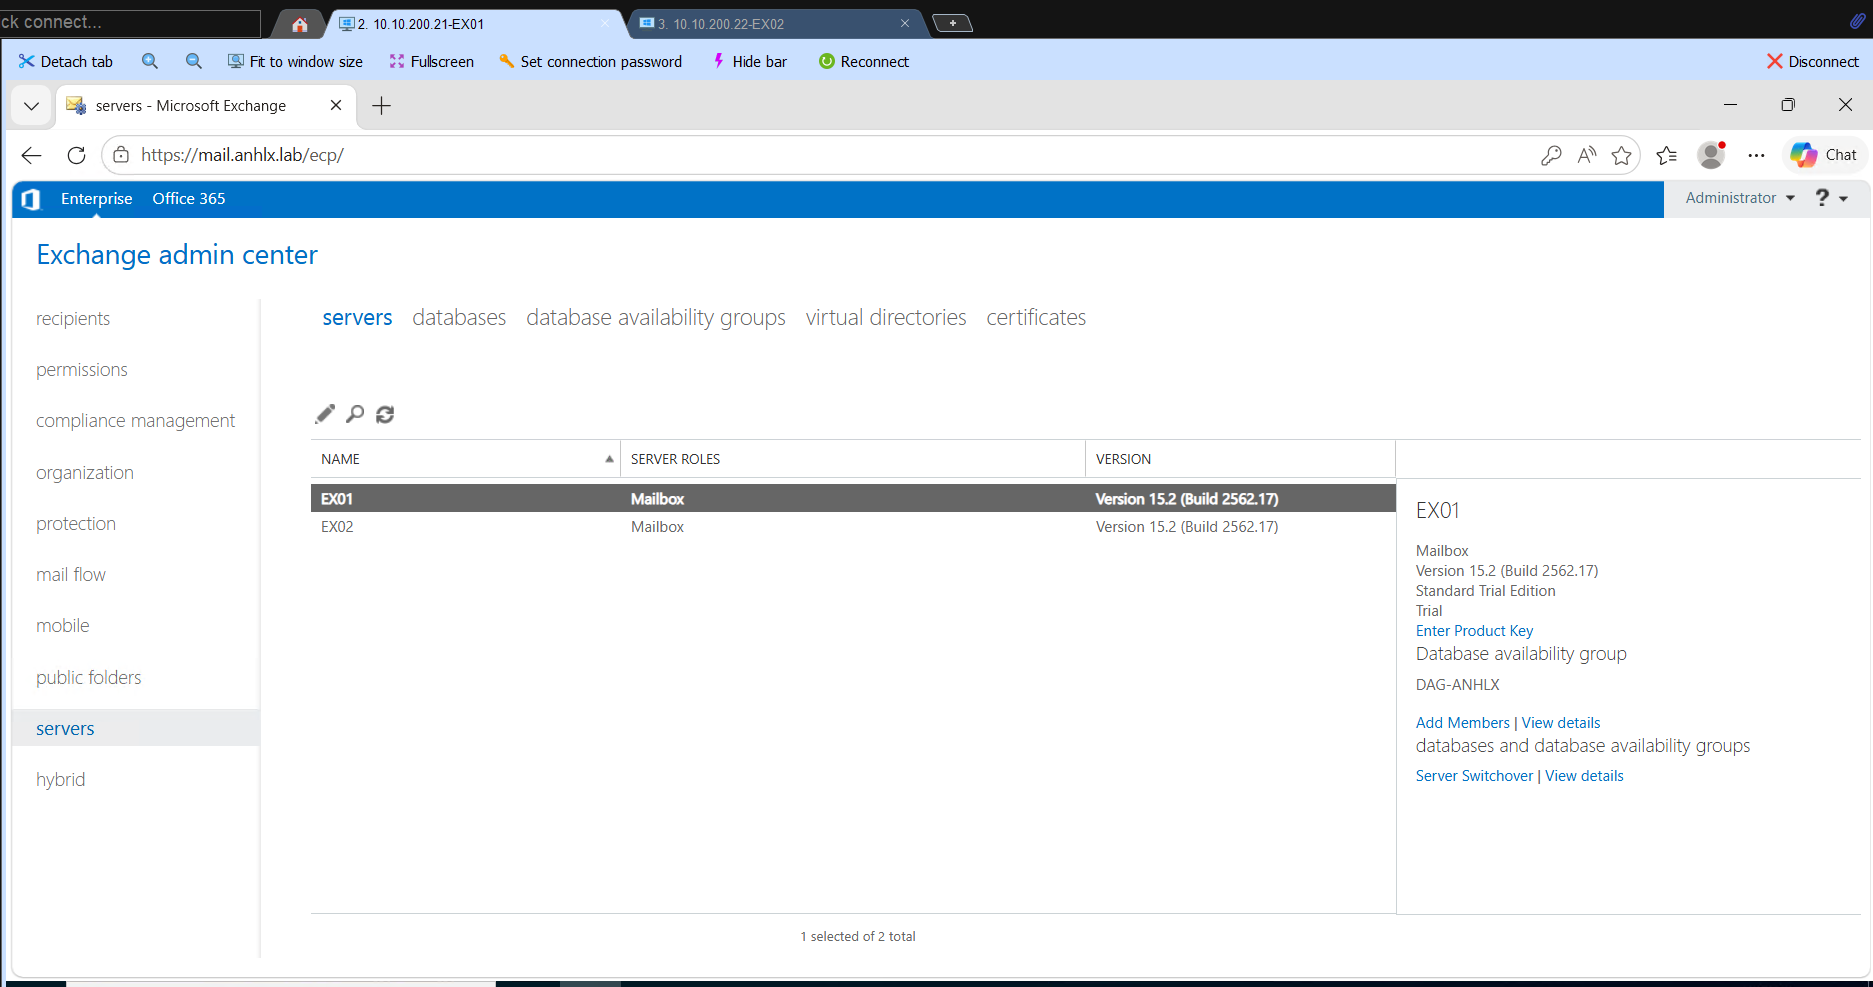
- 3. Cài Exchange Server SE
- 4. Cấu hình DAG
- 5. Mailbox Database & DAG Copies
- 6. Virtual Directories & Certificate
- 7. HAProxy Pair — LB01 & LB02
- 8. Tạo Mailbox & Test Mail Flow
- 9. Test DAG Failover
- Lời kết
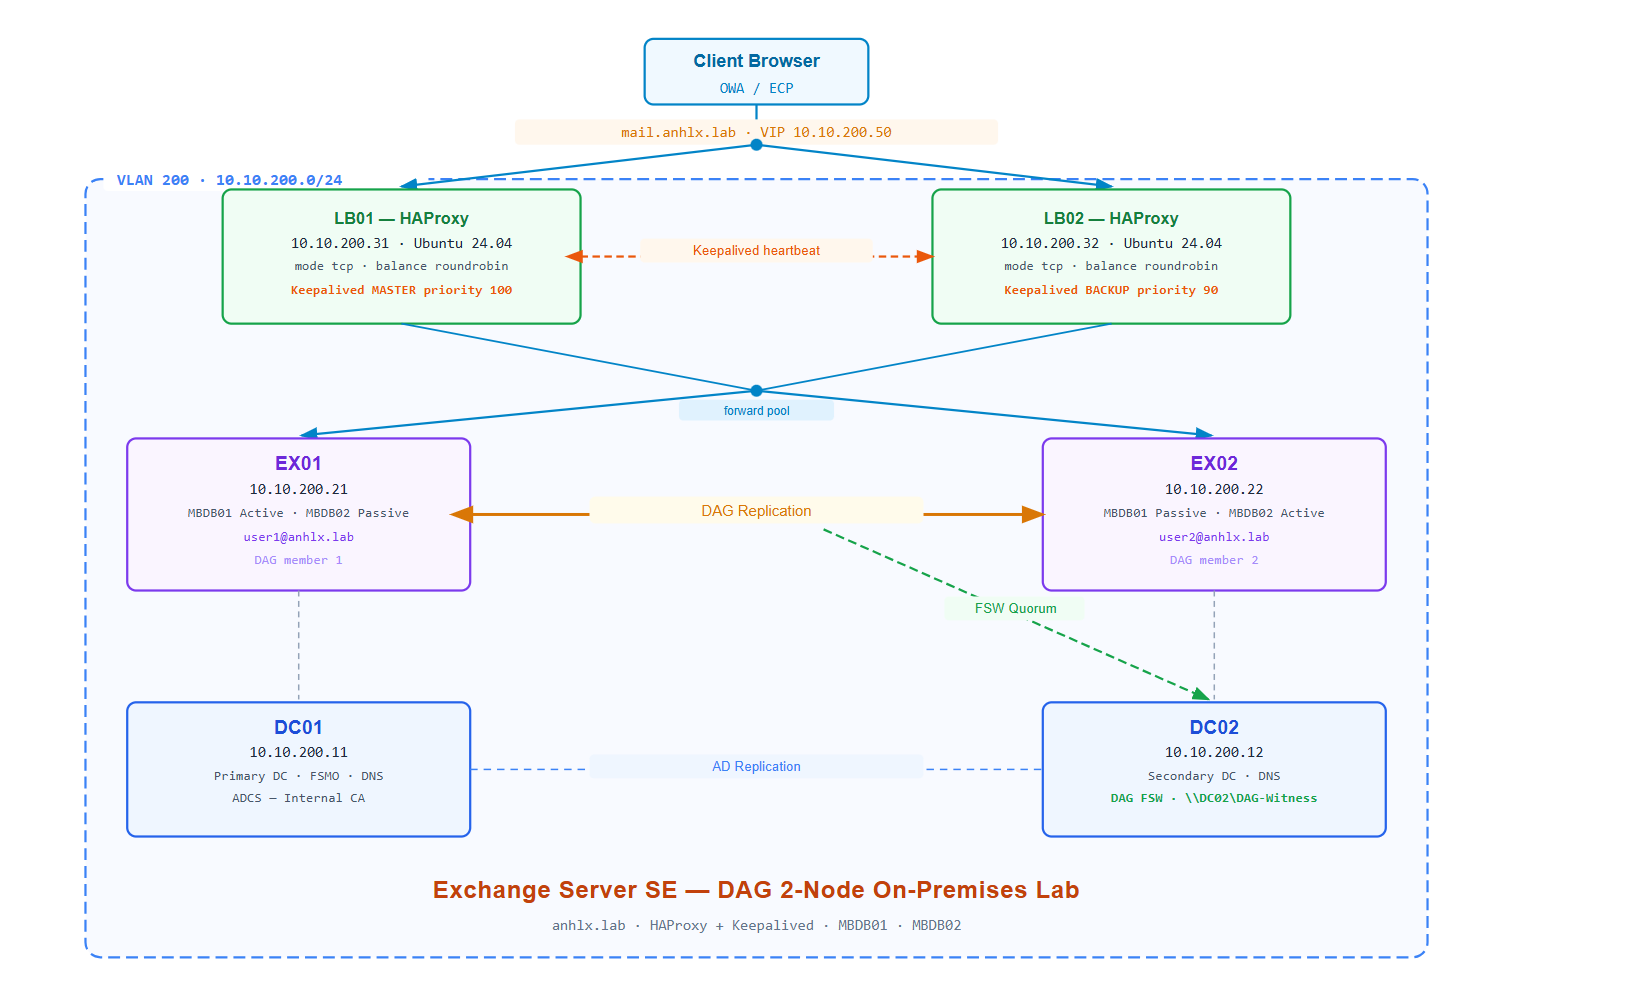
1. Topology & IP Plan
Mình dùng 6 VM trên ESXi, tất cả trong VLAN 200 (10.10.200.0/24).
| VM | Hostname | IP | Role | vCPU | RAM | Disk |
|---|---|---|---|---|---|---|
| 1 | DC01 | 10.10.200.11 | Primary DC, DNS, FSMO, ADCS | 8 | 8GB | C: 200GB · E: 500GB |
| 2 | DC02 | 10.10.200.12 | Secondary DC, DNS, DAG FSW | 8 | 8GB | C: 200GB · E: 500GB (DAG FSW) |
| 3 | EX01 | 10.10.200.21 | Exchange Mailbox — DAG member 1 | 8 | 16GB | C: 200GB · E: 500GB (Mail Data) |
| 4 | EX02 | 10.10.200.22 | Exchange Mailbox — DAG member 2 | 8 | 16GB | C: 200GB · E: 500GB (Mail Data) |
| 5 | LB01 | 10.10.200.31 | Ubuntu 24.04, HAProxy + Keepalived MASTER | 1 | 1GB | 100GB |
| 6 | LB02 | 10.10.200.32 | Ubuntu 24.04, HAProxy + Keepalived BACKUP | 1 | 1GB | 100GB |
VIP     : 10.10.200.50  →  mail.anhlx.lab  (Keepalived quản lý, nằm trên LB01 khi healthy)
LB pair : LB01 MASTER (priority 100) ←keepalived→ LB02 BACKUP (priority 90)
DAG     : EX01 + EX02
FSW     : \\DC02\DAG-Witness
MBDB01  : active=EX01, passive=EX02  →  user1@anhlx.lab
MBDB02  : active=EX02, passive=EX01  →  user2@anhlx.lab
DAG quorum: EX01(1 vote) + EX02(1 vote) + FSW on DC02(1 vote) = 3 phiếu. Cần 2 để duy trì quorum — khi EX01 down, EX02 + FSW = 2/3, DAG vẫn active.
2. Active Directory — DC01 & DC02
2.1 Cài AD DS trên DC01
Mình cài AD DS và DNS, tạo forest mới anhlx.lab với Forest/Domain functional level Windows Server 2016 — đây là mức tối thiểu Exchange Server SE yêu cầu.
Đặt IP tĩnh
10.10.200.11, DNS trỏ về127.0.0.1trước khi promote.
Install-WindowsFeature AD-Domain-Services, DNS -IncludeManagementTools

Install-ADDSForest `
  -DomainName "anhlx.lab" `
  -DomainNetbiosName "ANHLX" `
  -ForestMode "WinThreshold" `
  -DomainMode "WinThreshold" `
  -InstallDns `
  -SafeModeAdministratorPassword (ConvertTo-SecureString "<SafeModePassword>" -AsPlainText -Force) `
  -Force
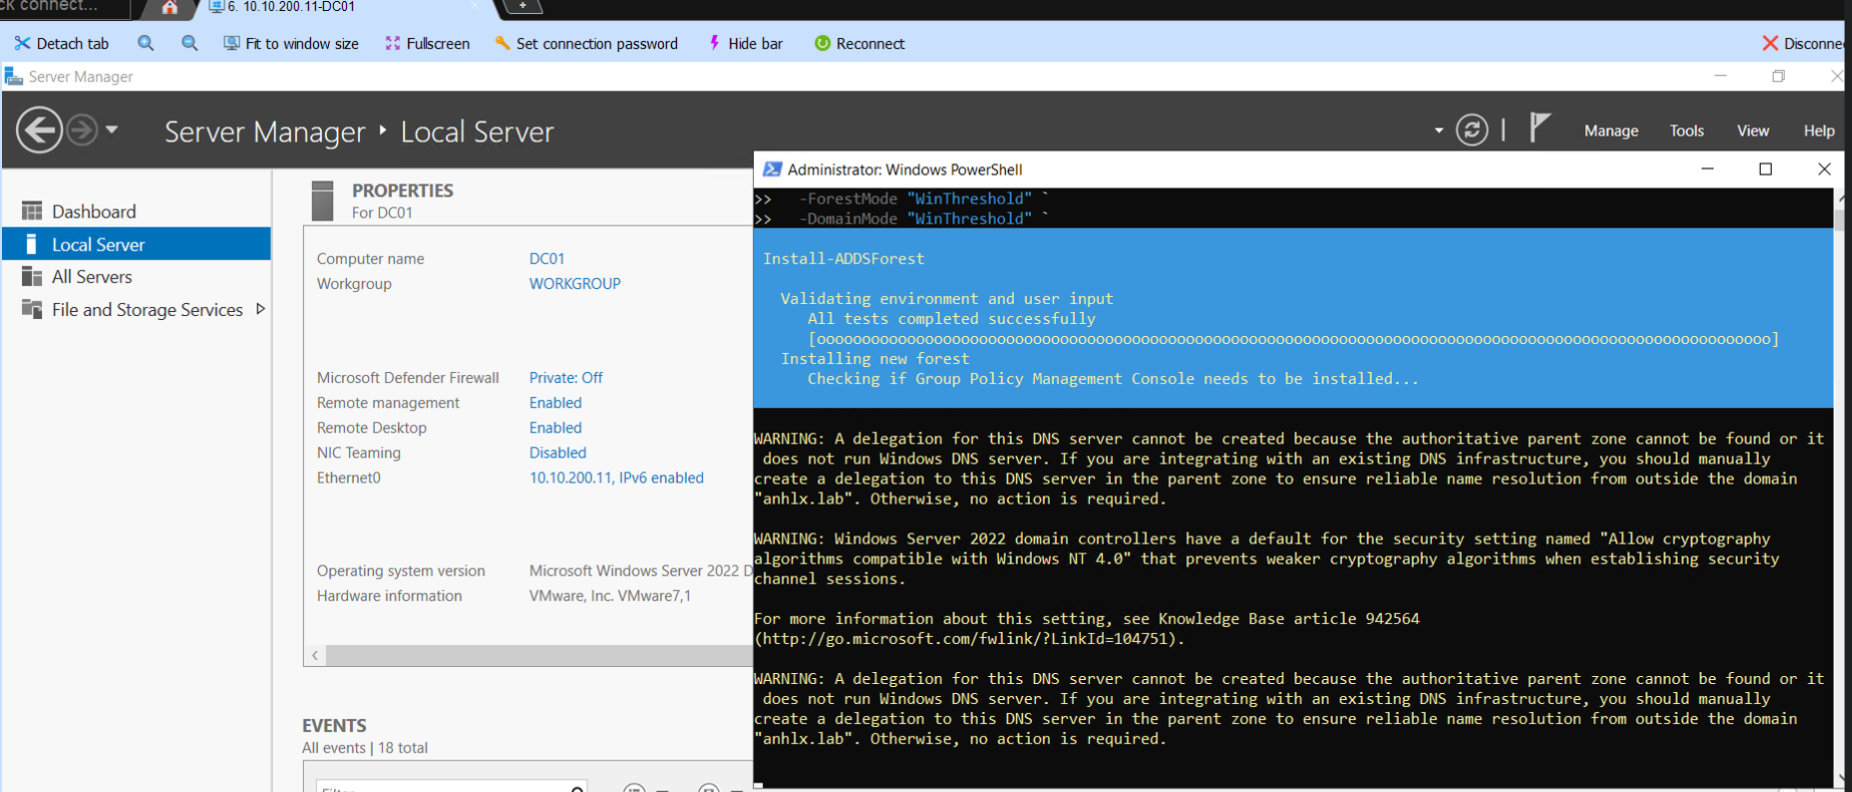
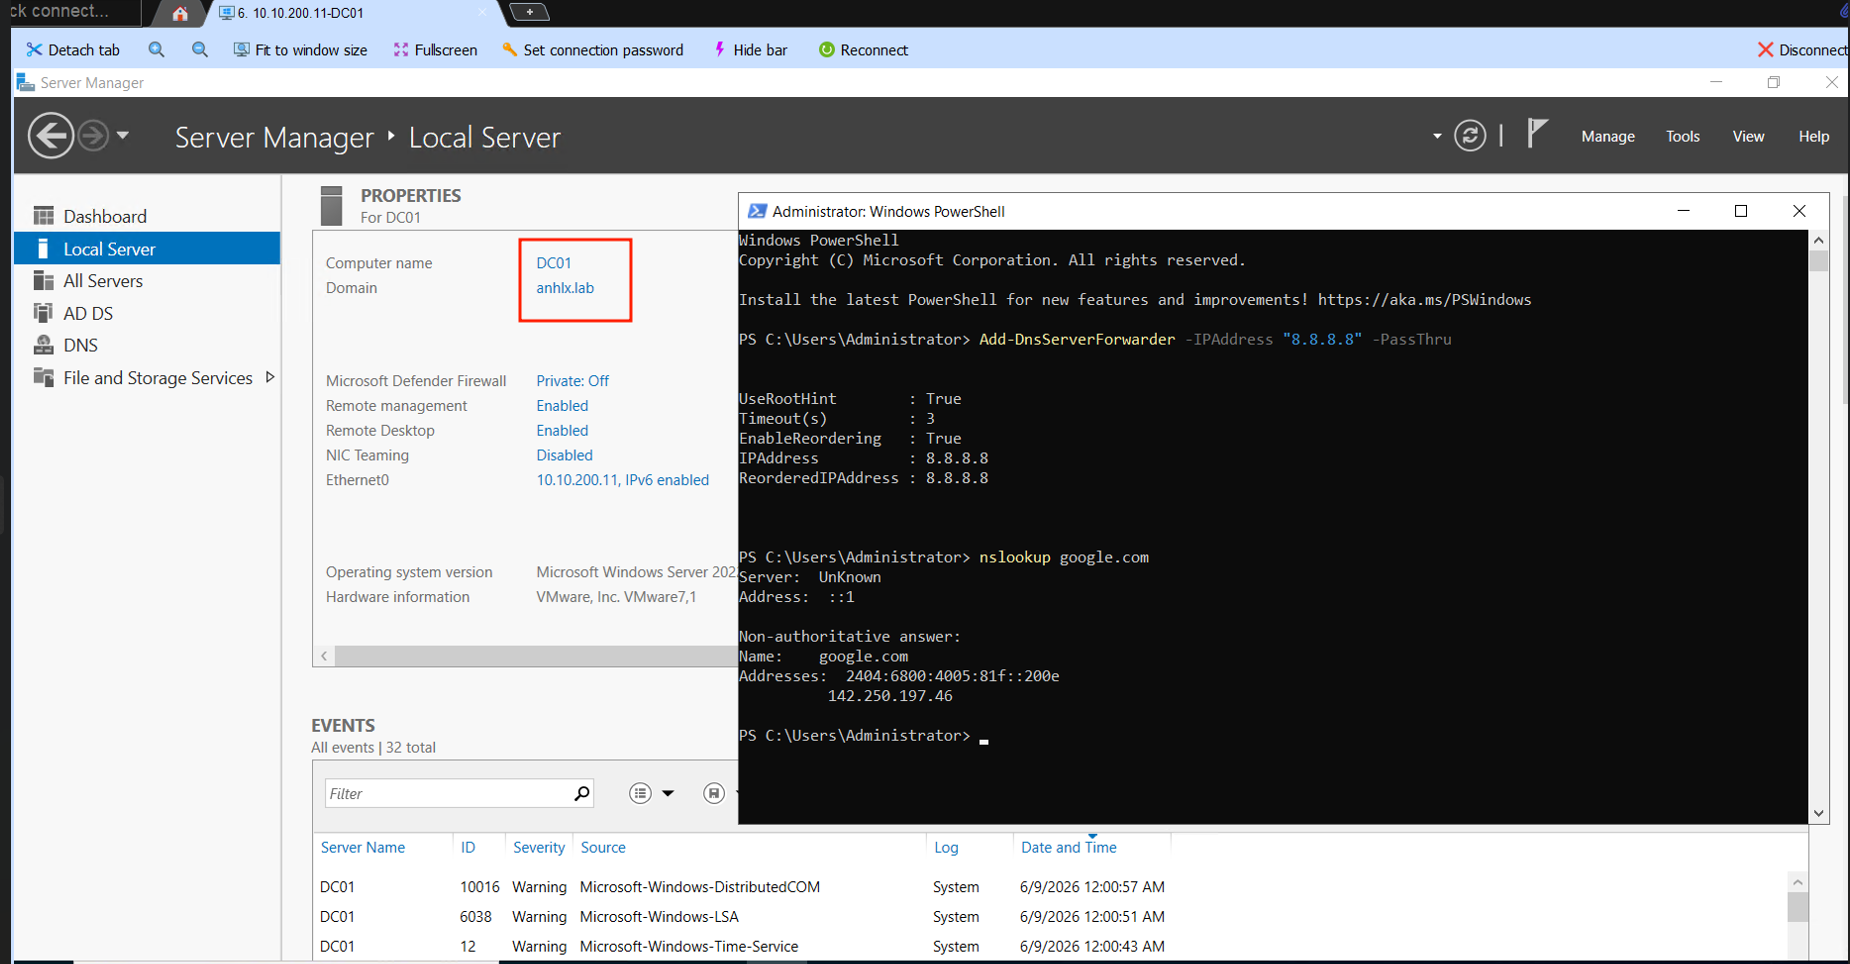
Server tự reboot sau khi promote. Sau khi boot xong, mình set DNS forwarder để DC01 resolve được tên ngoài internet.
Add-DnsServerForwarder -IPAddress "8.8.8.8" -PassThru
2.2 Cài ADCS trên DC01
Mình dựng internal CA để issue certificate cho Exchange — tránh dùng self-signed khi test Outlook client kết nối.
Install-WindowsFeature ADCS-Cert-Authority, ADCS-Web-Enrollment -IncludeManagementTools
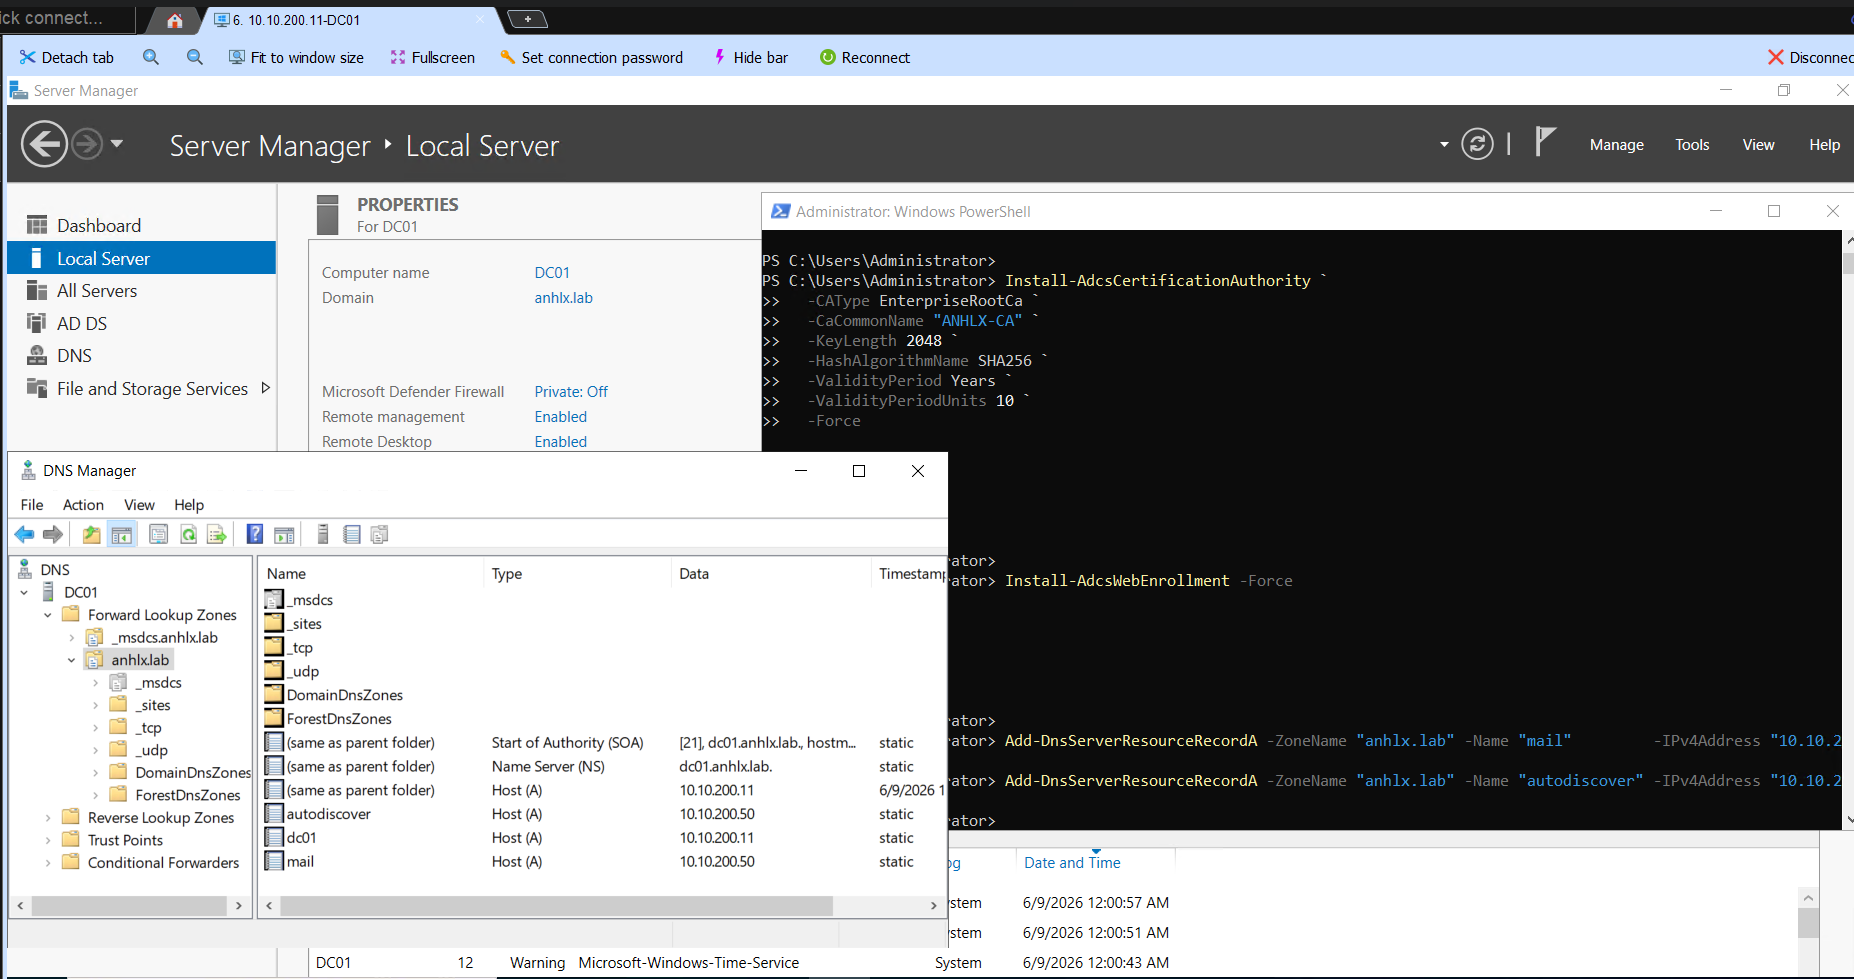
Install-AdcsCertificationAuthority `
-CAType EnterpriseRootCa `
-CaCommonName "ANHLX-CA" `
-KeyLength 2048 `
-HashAlgorithmName SHA256 `
-ValidityPeriod Years `
-ValidityPeriodUnits 10 `
-Force
Install-AdcsWebEnrollment -Force
2.3 Thêm DNS record cho Exchange namespace
Mình tạo DNS A record trỏ về VIP 10.10.200.50 — HAProxy sẽ nhận traffic và forward vào Exchange.
Add-DnsServerResourceRecordA -ZoneName "anhlx.lab" -Name "mail"         -IPv4Address "10.10.200.50"
Add-DnsServerResourceRecordA -ZoneName "anhlx.lab" -Name "autodiscover" -IPv4Address "10.10.200.50"
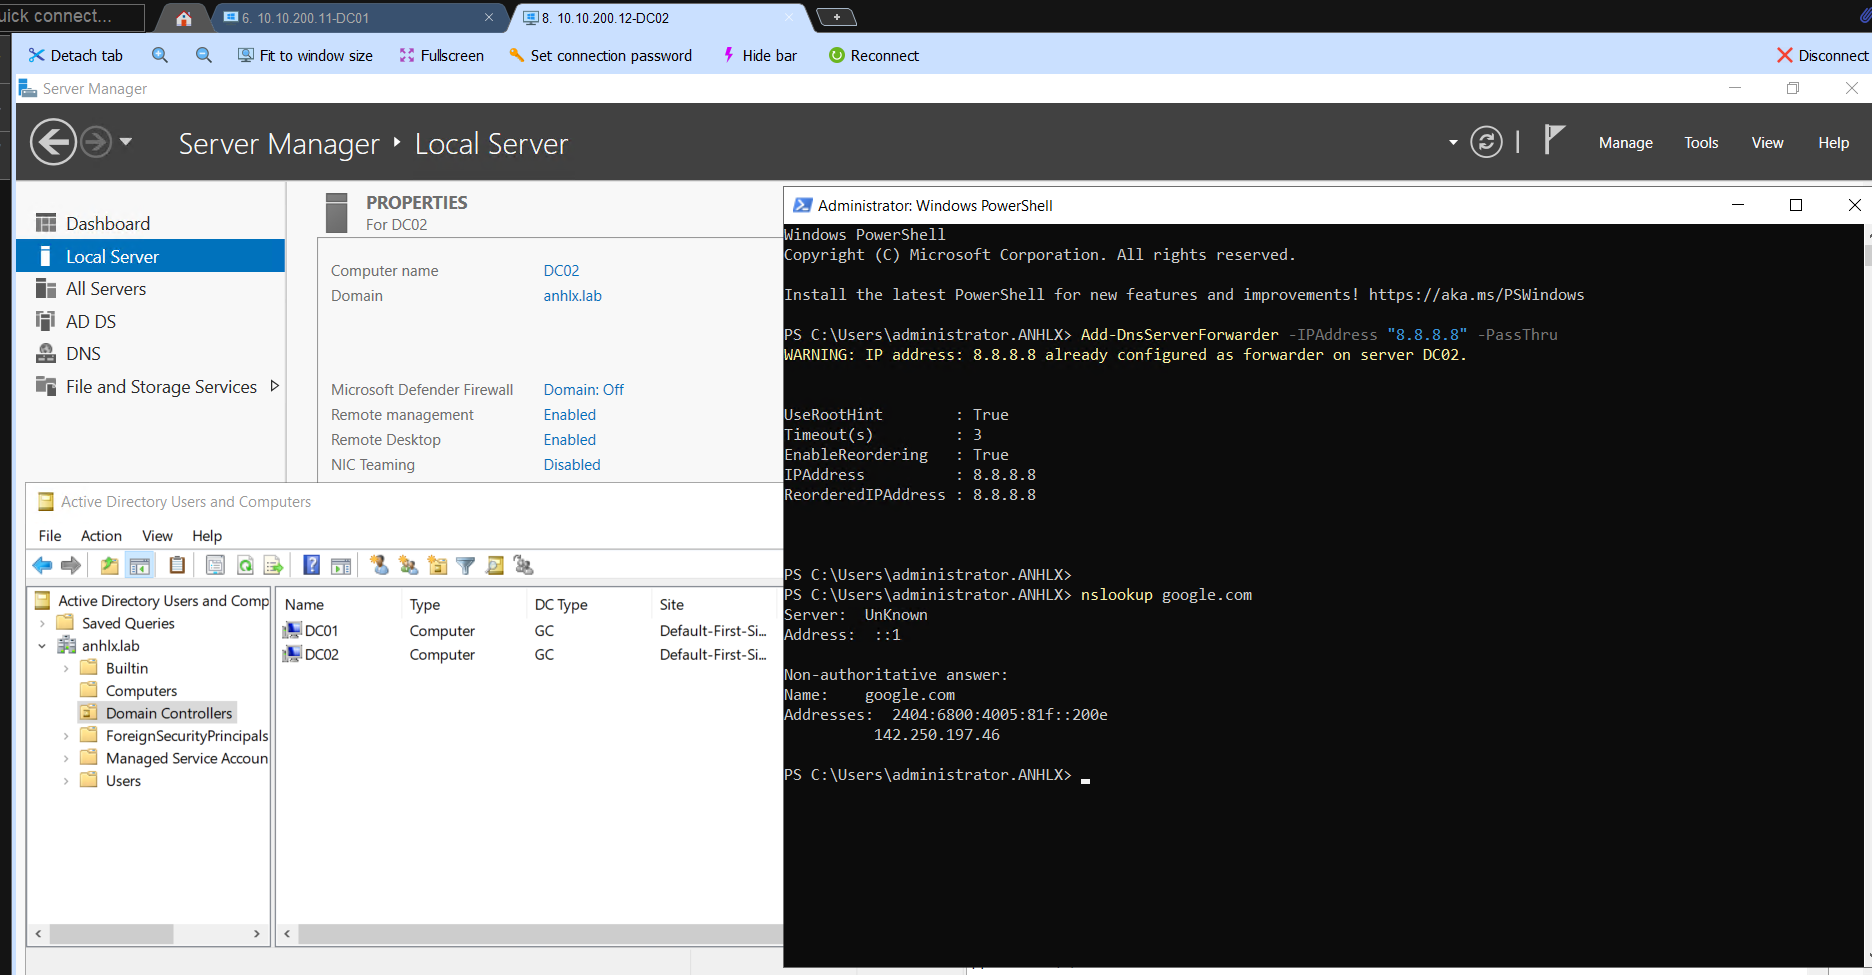
2.4 Promote DC02
Trên DC02, đặt IP tĩnh 10.10.200.12, DNS trỏ về 10.10.200.11, join domain anhlx.lab, sau đó promote thành DC phụ.
Install-WindowsFeature AD-Domain-Services, DNS -IncludeManagementTools

Install-ADDSDomainController `
  -DomainName "anhlx.lab" `
  -InstallDns `
  -Credential (Get-Credential ANHLX\Administrator) `
  -SafeModeAdministratorPassword (ConvertTo-SecureString "<SafeModePassword>" -AsPlainText -Force) `
  -Force
Sau khi DC02 reboot, mình set DNS forwarder — forwarder không replicate từ DC01, phải set riêng.
Add-DnsServerForwarder -IPAddress "8.8.8.8" -PassThru
2.5 Tạo FSW share trên DC02
DAG File Share Witness cần tồn tại trước khi tạo DAG. Ở bước này Exchange chưa được cài nên group Exchange Trusted Subsystem chưa có — mình grant cho Domain Admins trước. Sau khi Exchange được cài (bước 3.5), mình sẽ add Exchange Trusted Subsystem vào Administrators trên DC02 để DAG có thể tự quản lý FSW share.
New-Item -Path "E:\DAG-Witness" -ItemType Directory
New-SmbShare -Name "DAG-Witness" -Path "E:\DAG-Witness" -FullAccess "ANHLX\Domain Admins"
3. Cài Exchange Server SE
Trên cả EX01 và EX02, đặt IP tĩnh, DNS trỏ về 10.10.200.11, join domain anhlx.lab rồi reboot trước khi làm các bước bên dưới.
Add-Computer -DomainName "anhlx.lab" -Credential (Get-Credential ANHLX\Administrator) -Restart -Force
3.1 Prerequisites trên EX01 và EX02
Mình chạy lệnh sau trên cả hai Exchange server để cài đủ Windows feature — thiếu bất kỳ feature nào setup sẽ báo lỗi prereq.
Install-WindowsFeature `
  Server-Media-Foundation, NET-Framework-45-Features, `
  RPC-over-HTTP-proxy, RSAT-Clustering, RSAT-Clustering-CmdInterface, `
  RSAT-Clustering-Mgmt, RSAT-Clustering-PowerShell, `
  WAS-Process-Model, Web-Asp-Net45, Web-Basic-Auth, Web-Client-Auth, `
  Web-Digest-Auth, Web-Dir-Browsing, Web-Dyn-Compression, `
  Web-Http-Errors, Web-Http-Logging, Web-Http-Redirect, Web-Http-Tracing, `
  Web-ISAPI-Ext, Web-ISAPI-Filter, Web-Lgcy-Mgmt-Console, Web-Metabase, `
  Web-Mgmt-Console, Web-Mgmt-Service, Web-Net-Ext45, Web-Request-Monitor, `
  Web-Server, Web-Stat-Compression, Web-Static-Content, Web-Windows-Auth, `
  Web-WMI, Windows-Identity-Foundation, RSAT-ADDS-Tools `
  -IncludeManagementTools
Reboot sau khi cài feature. Tiếp theo cài thêm 4 gói prereq sau — Exchange SE yêu cầu đủ cả bốn, thiếu bất kỳ gói nào setup sẽ báo lỗi prereq.
| Gói | Download |
|---|---|
| Visual C++ 2012 x64 | microsoft.com/download/details.aspx?id=30679 |
| Visual C++ 2013 x64 | microsoft.com/download/details.aspx?id=40784 |
| UCMA 4.0 Runtime | microsoft.com/download/details.aspx?id=34992 |
| IIS URL Rewrite Module | iis.net/downloads/microsoft/url-rewrite |
Cài silent trên cả EX01 và EX02:
.\vcredist_x64_2012.exe /quiet /norestart
.\vcredist_x64_2013.exe /quiet /norestart
.\UcmaRuntimeSetup.exe /quiet /norestart
.\rewrite_amd64_en-US.msi /quiet /norestart
3.2 Extend AD Schema — chạy trên EX01
Mình mount ISO Exchange SE, chạy 3 lệnh PrepareSchema/PrepareAD/PrepareDomain từ EX01 với tài khoản thuộc Schema Admins và Enterprise Admins. Bước này chỉ cần chạy một lần cho toàn forest.
D:\Setup.exe /PrepareSchema /IAcceptExchangeServerLicenseTerms_DiagnosticDataOFF
D:\Setup.exe /PrepareAD /OrganizationName:"ANHLX" /IAcceptExchangeServerLicenseTerms_DiagnosticDataOFF
D:\Setup.exe /PrepareDomain /IAcceptExchangeServerLicenseTerms_DiagnosticDataOFF
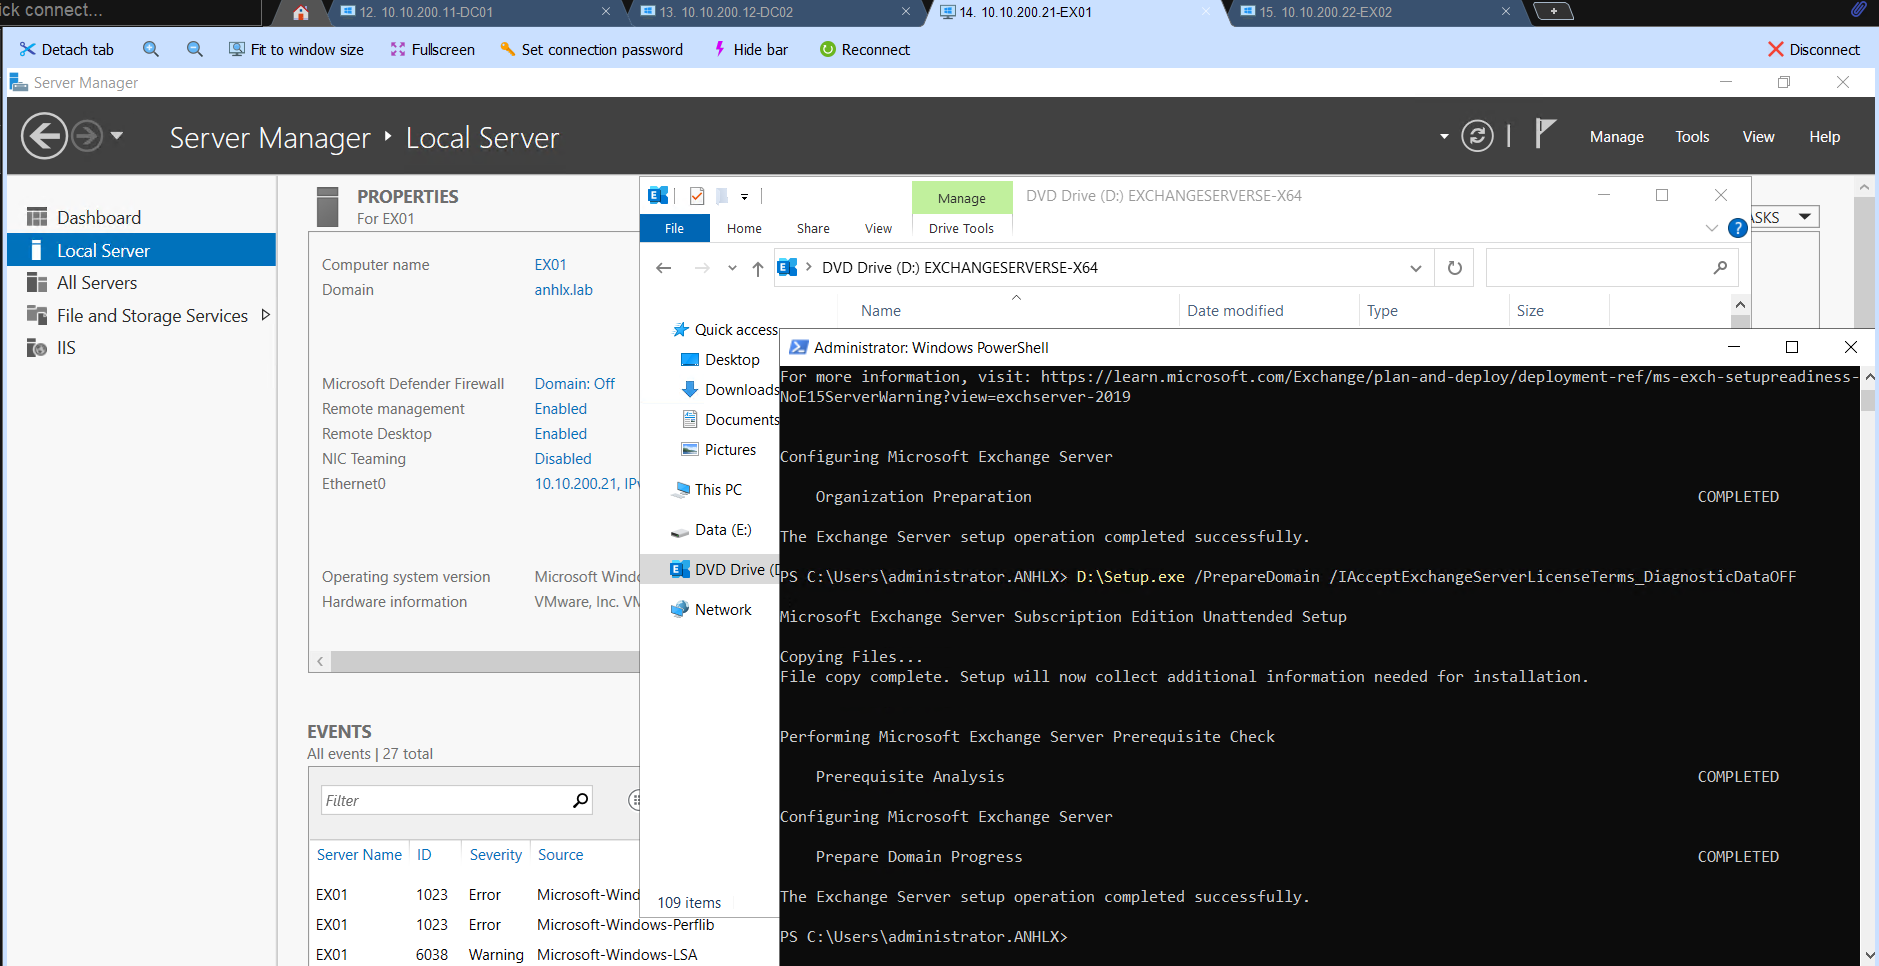
Chờ AD replication lan sang DC02 (vài phút) trước khi bước sang cài Exchange. Kiểm tra replication đã xong chưa:
repadmin /replsummary
Kết quả sạch khi cột Fails = 0 trên cả hai DC. Nếu muốn force sync ngay không cần chờ:
repadmin /syncall /AdeP
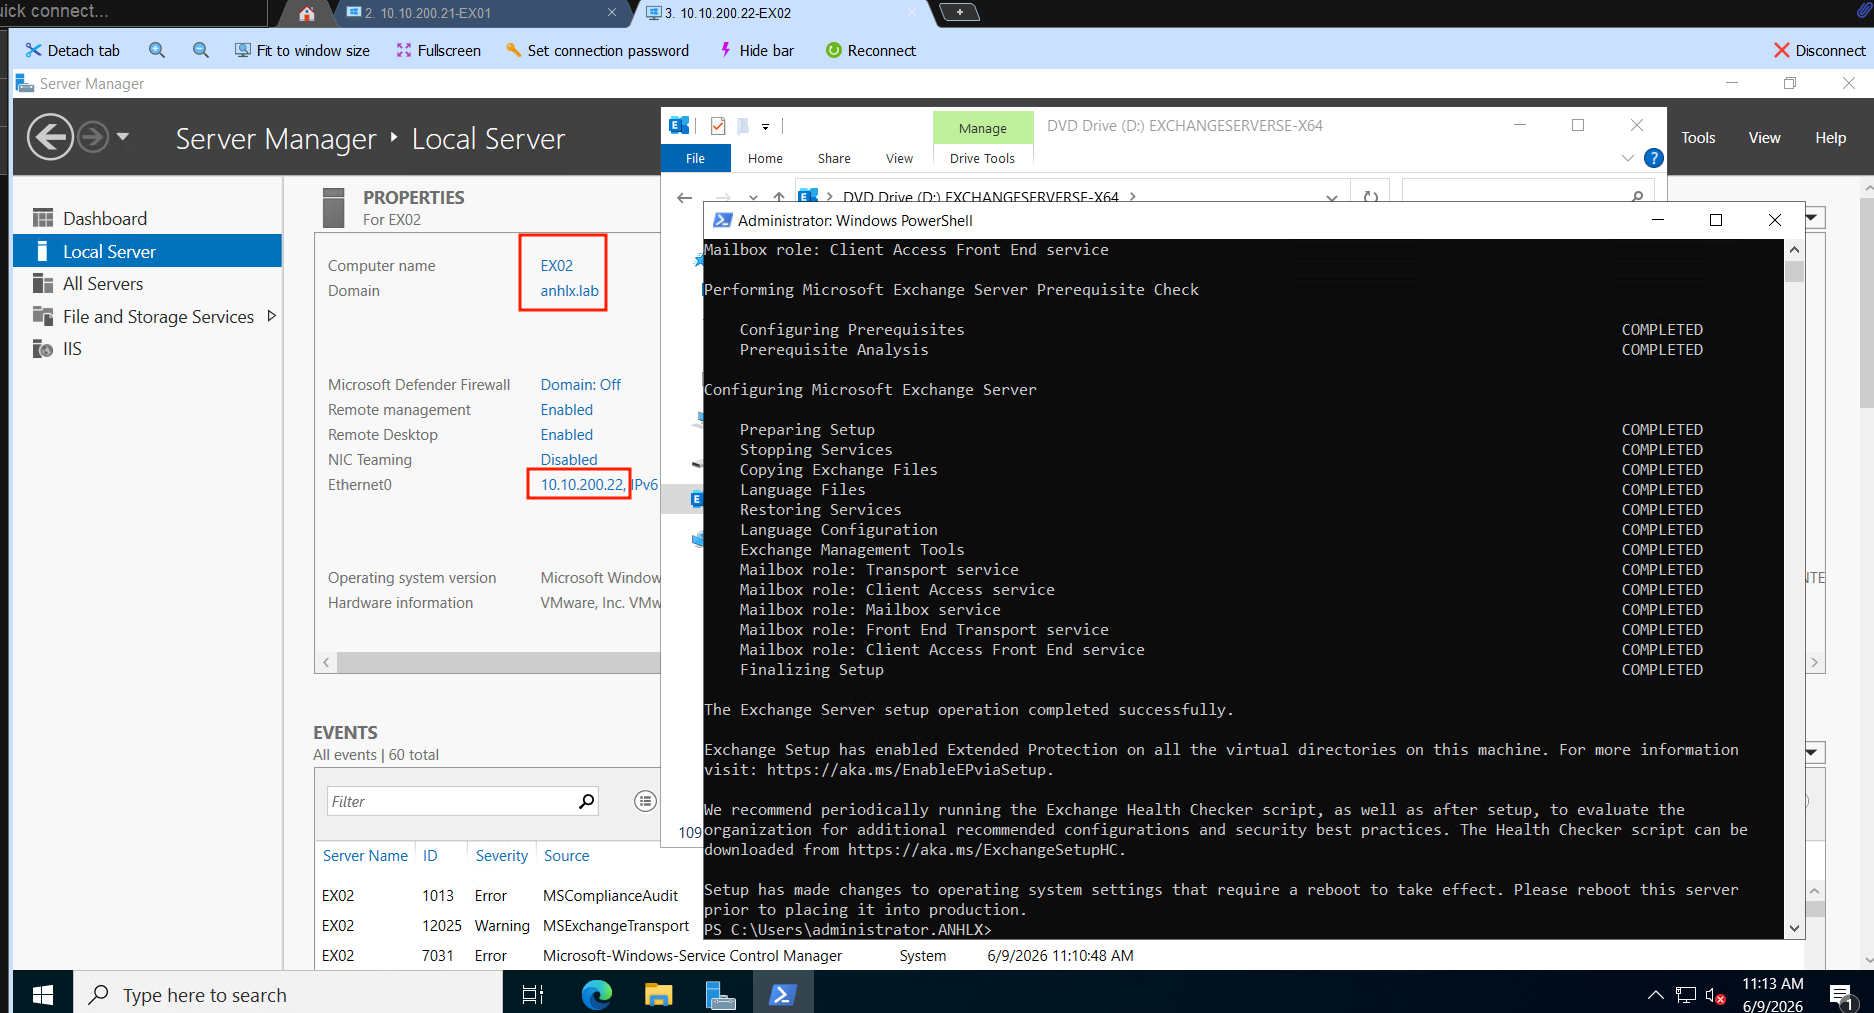
3.3 Cài Exchange SE trên EX01
D:\Setup.exe /Mode:Install /Role:Mailbox /IAcceptExchangeServerLicenseTerms_DiagnosticDataOFF
Quá trình cài mất khoảng 30–45 phút. Sau khi hoàn tất, reboot EX01 theo yêu cầu của setup.
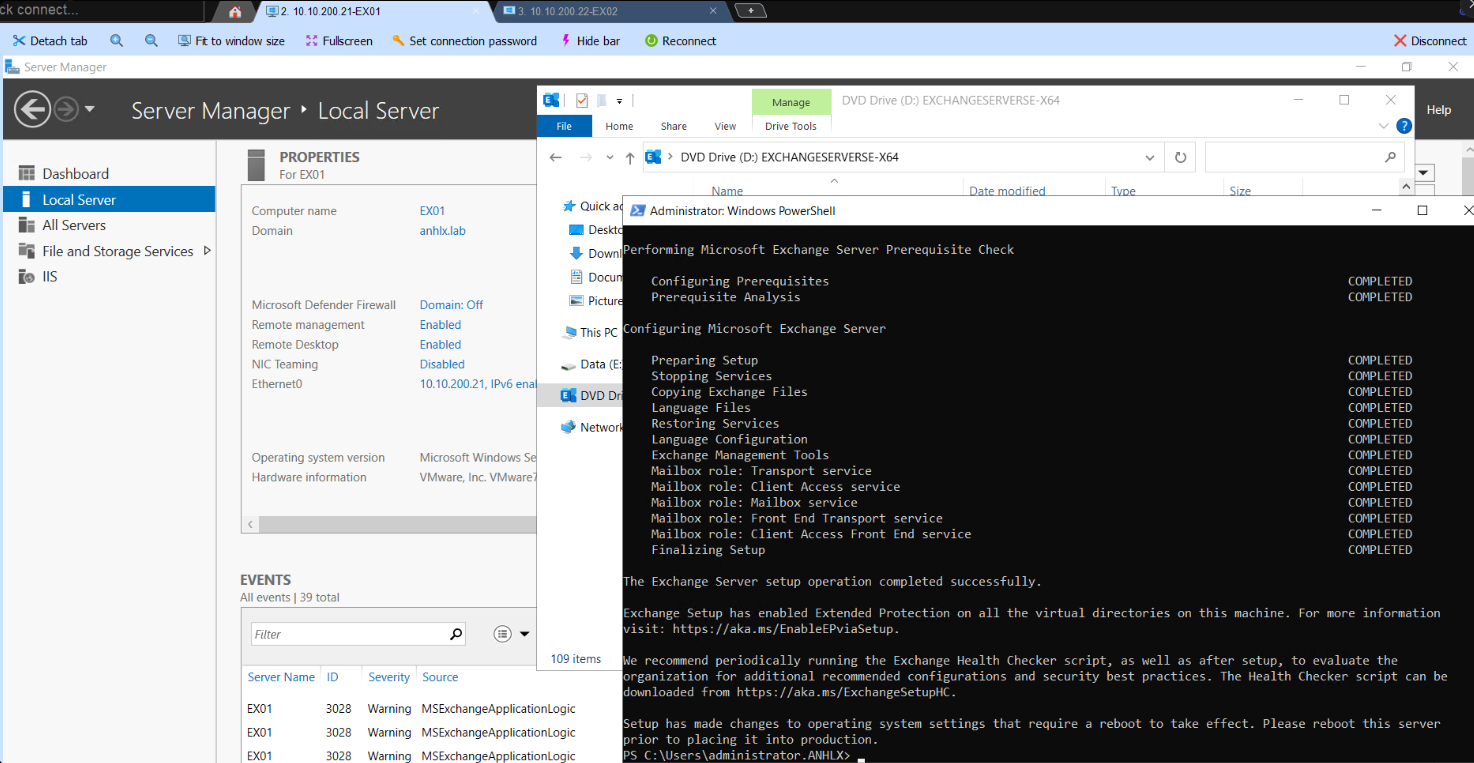
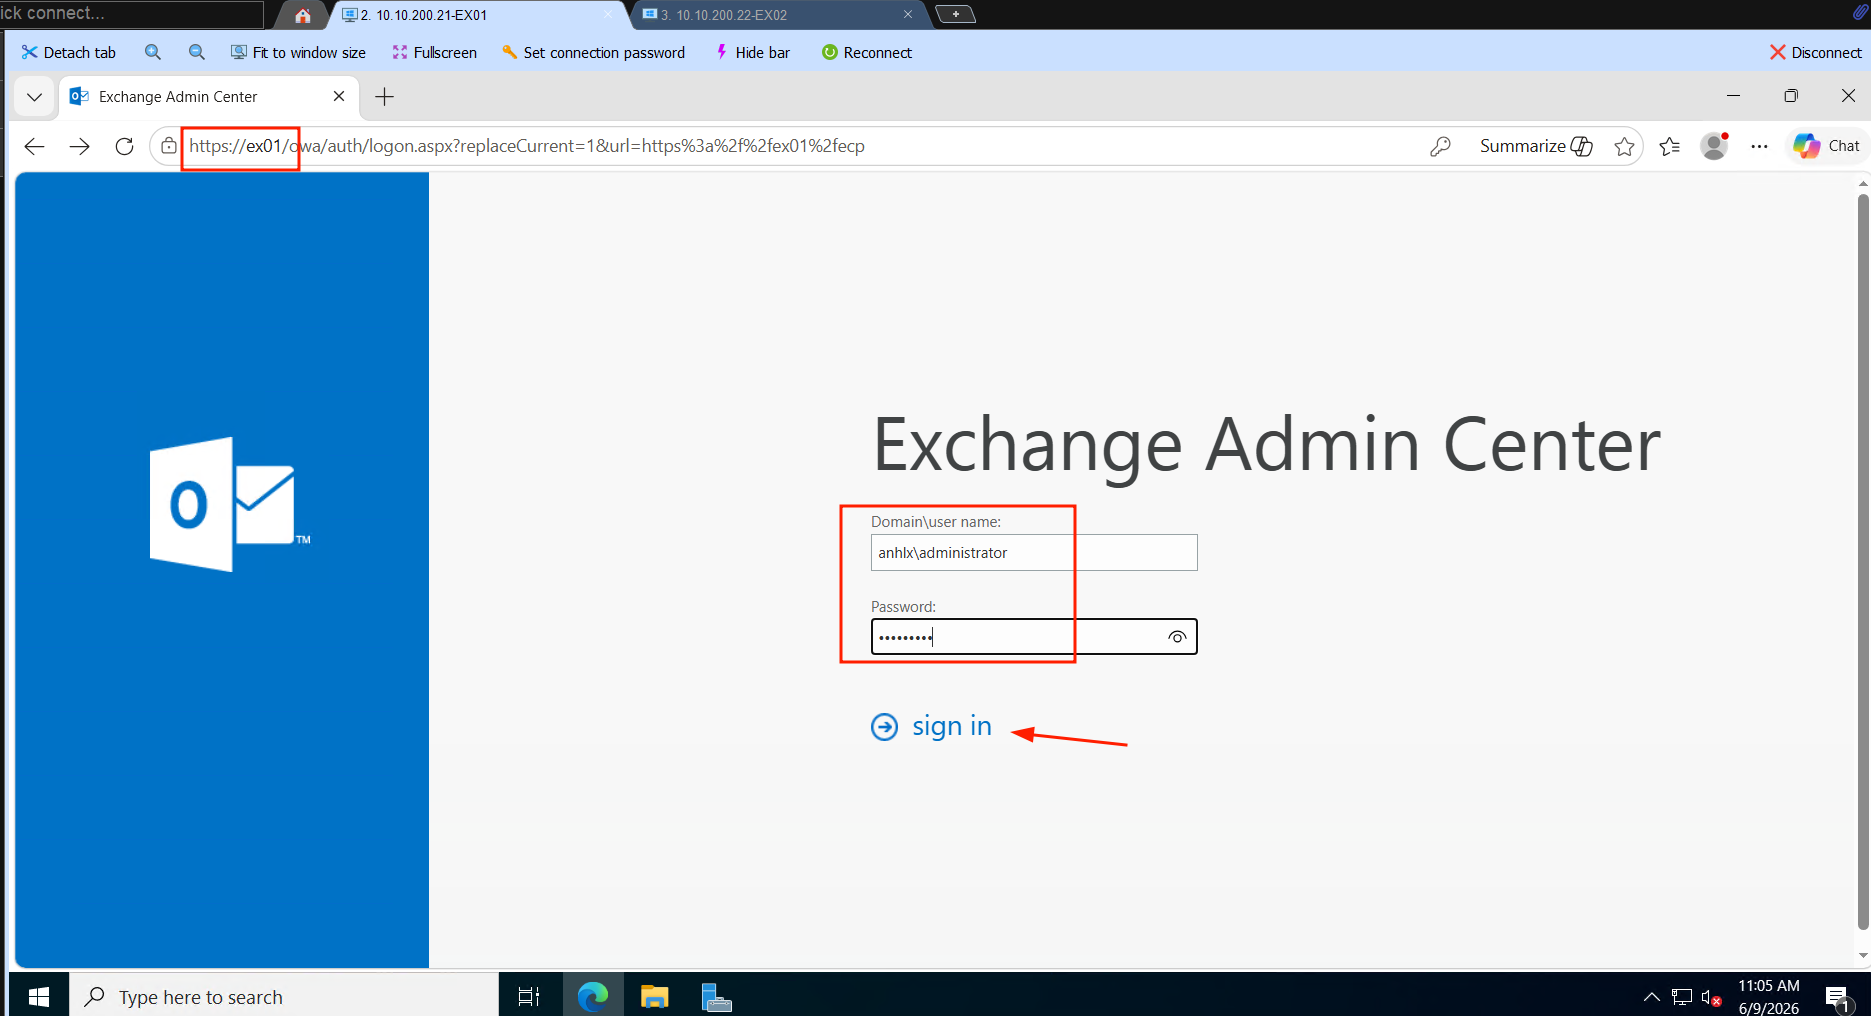
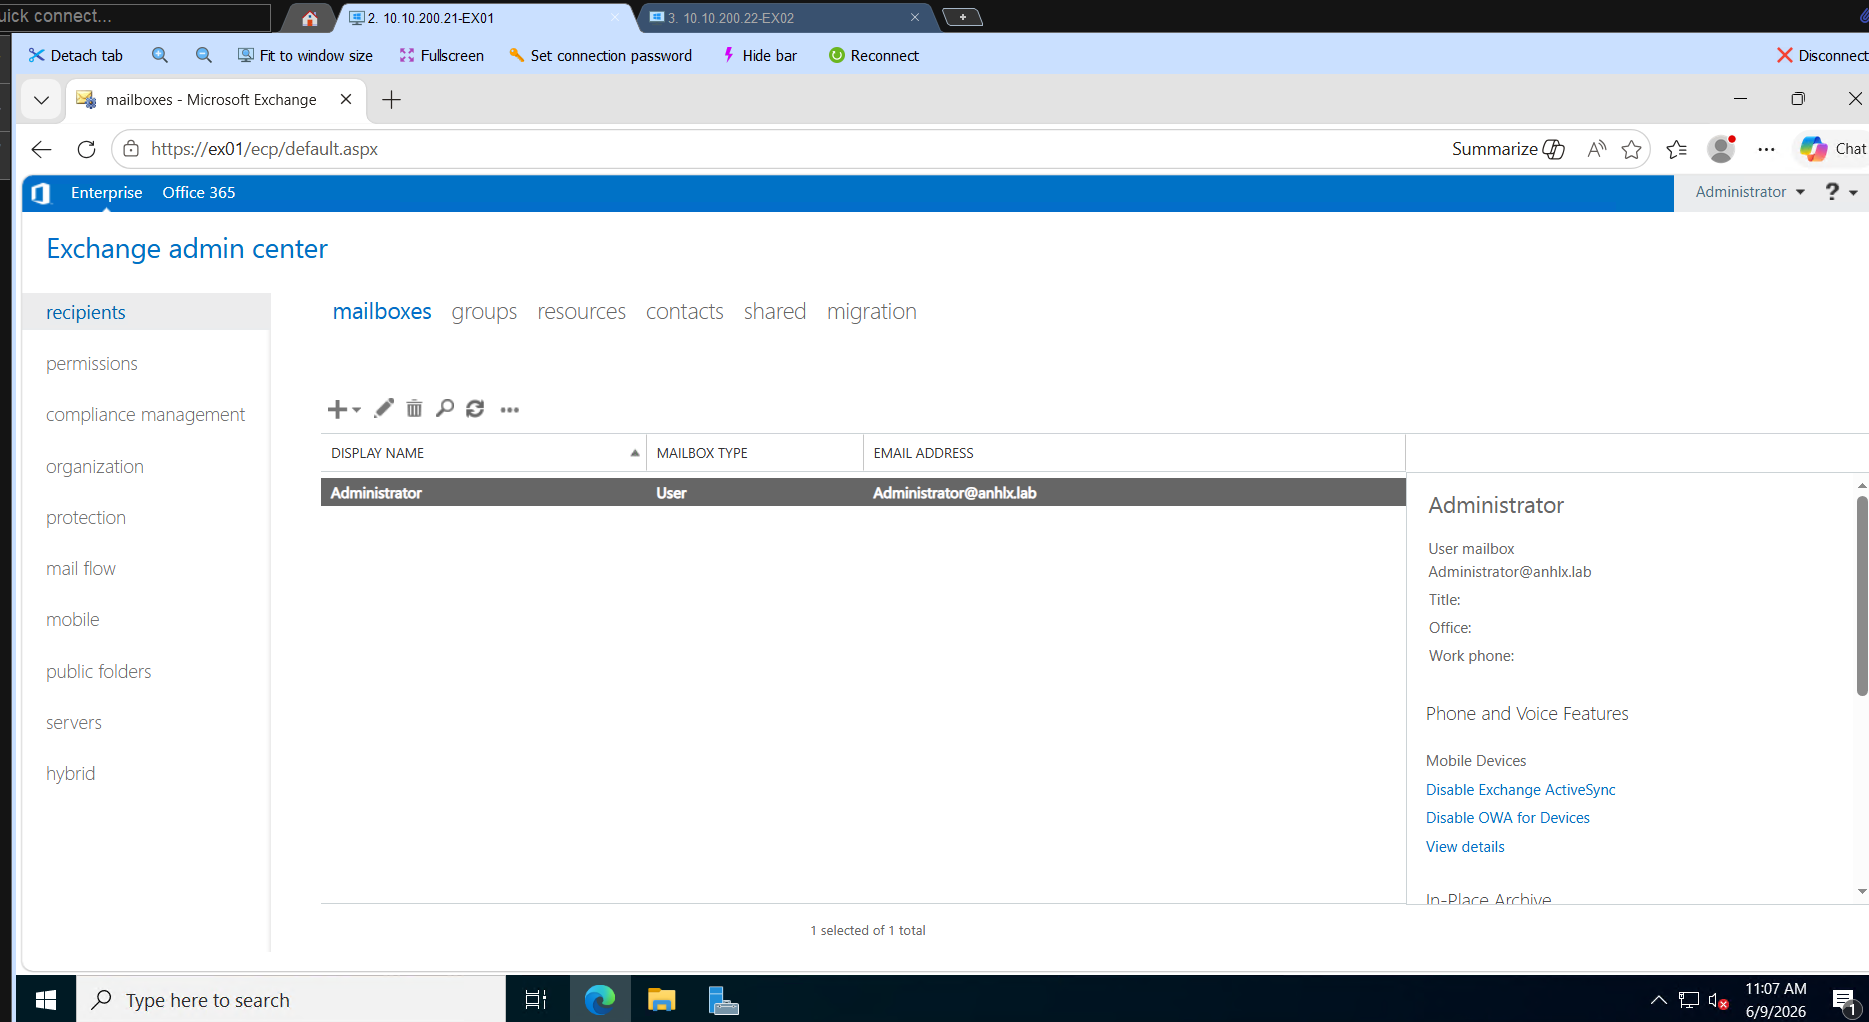
Sau khi reboot, Exchange Management Shell và Exchange Admin Center (EAC) sẵn sàng tại https://EX01/ecp.
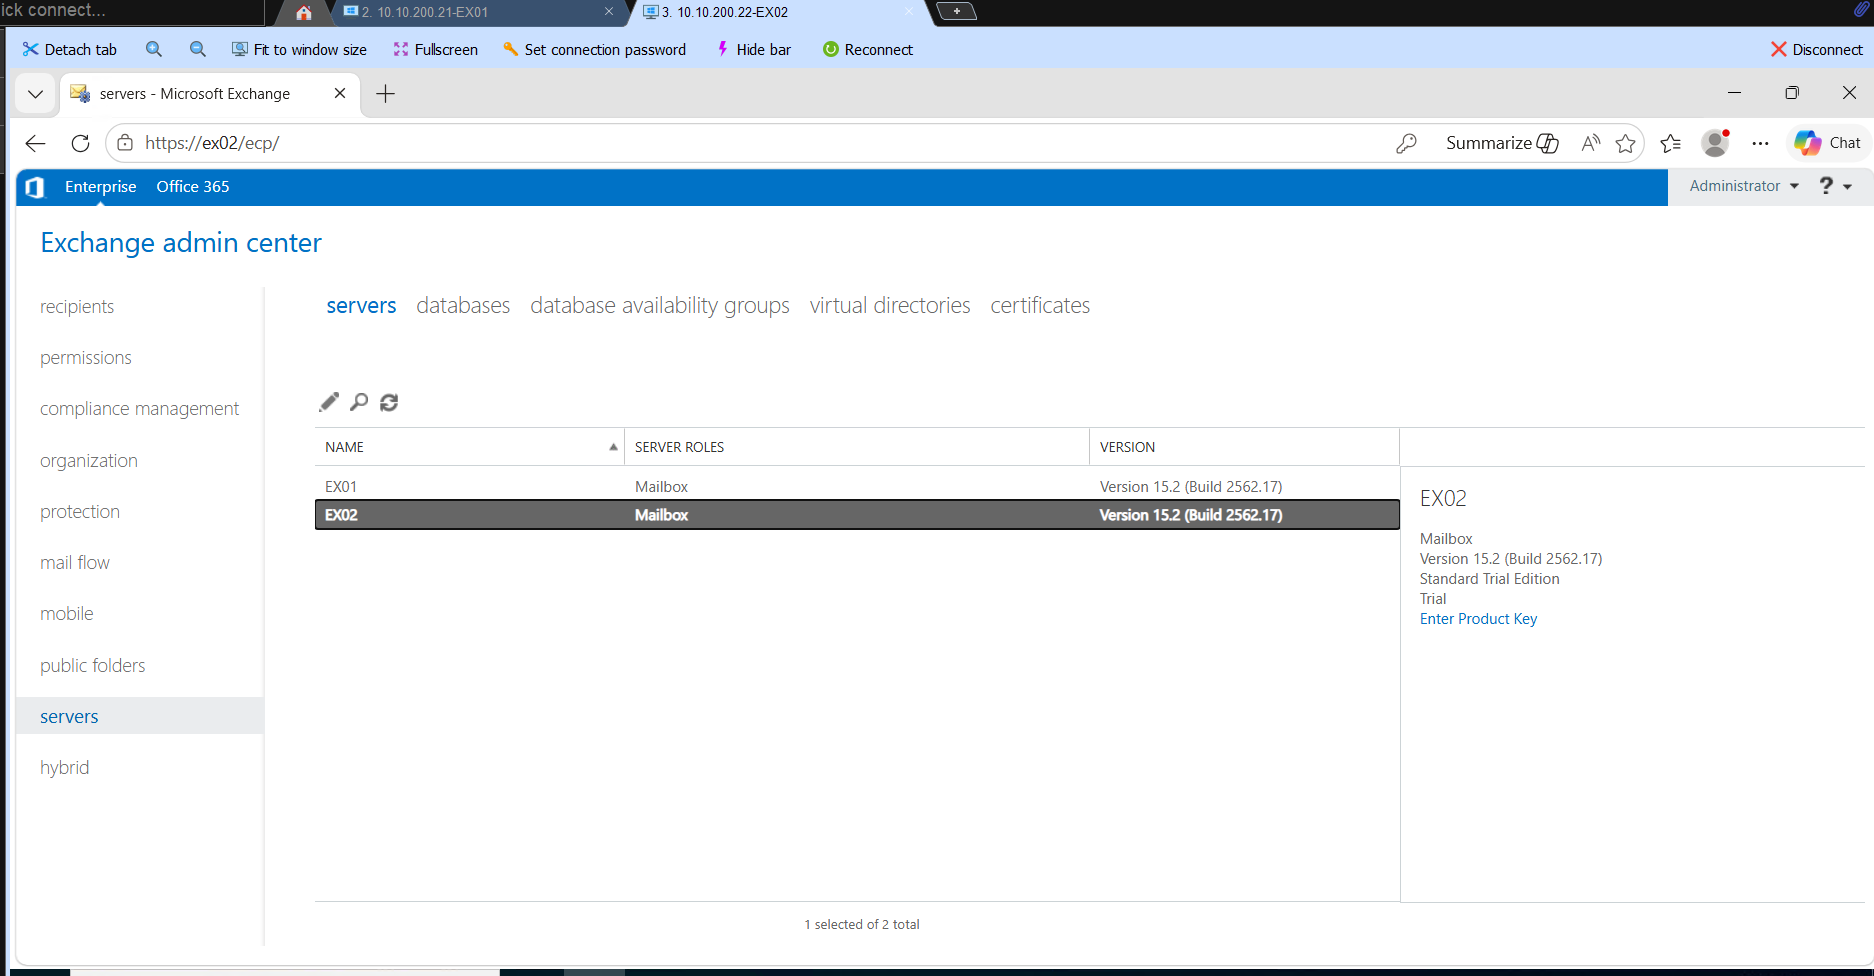
3.4 Cài Exchange SE trên EX02
Lặp lại bước 3.3 trên EX02. Đảm bảo EX02 đã join domain anhlx.lab và DNS trỏ về DC01/DC02.
3.5 Grant Exchange Trusted Subsystem quyền trên DC02
Group Exchange Trusted Subsystem được tạo trong AD ở bước PrepareAD — Exchange dùng group này để tự quản lý FSW share trên witness server. Mình add group này vào Administrators trên DC02 trước khi tạo DAG, nếu không New-DatabaseAvailabilityGroup sẽ báo “Access is denied” khi cố setup witness.
# Chạy trên DC01 hoặc DC02
Add-ADGroupMember -Identity "Administrators" -Members "Exchange Trusted Subsystem"
4. Cấu hình DAG
4.1 Tạo DAG
Mình tạo DAG từ Exchange Management Shell trên EX01. DatabaseAvailabilityGroupIpAddresses 0.0.0.0 tạo IP-less DAG — Windows Failover Cluster không tạo network name resource và không cần IP riêng cho cluster. Đây là cách được Microsoft recommend cho Exchange 2016/2019 khi tất cả DAG member nằm cùng subnet.
Lưu ý: Trong suốt quá trình cấu hình DAG, Exchange sẽ hiển thị WARNING “Network name ‘DAG-ANHLX’ is not online” — đây là expected behavior với IP-less DAG, không phải lỗi. DAG replication và failover vẫn hoạt động bình thường.
New-DatabaseAvailabilityGroup `
  -Name DAG-ANHLX `
  -WitnessServer DC02 `
  -WitnessDirectory "E:\DAG-Witness" `
  -DatabaseAvailabilityGroupIpAddresses 0.0.0.0
4.2 Add member vào DAG
Add-DatabaseAvailabilityGroupServer -Identity DAG-ANHLX -MailboxServer EX01
Add-DatabaseAvailabilityGroupServer -Identity DAG-ANHLX -MailboxServer EX02
Restart Information Store — sau khi add server vào DAG. Cần restart trên cả hai:
# Chạy trên EX01
Restart-Service MSExchangeIS

# Chạy trên EX02
Restart-Service MSExchangeIS
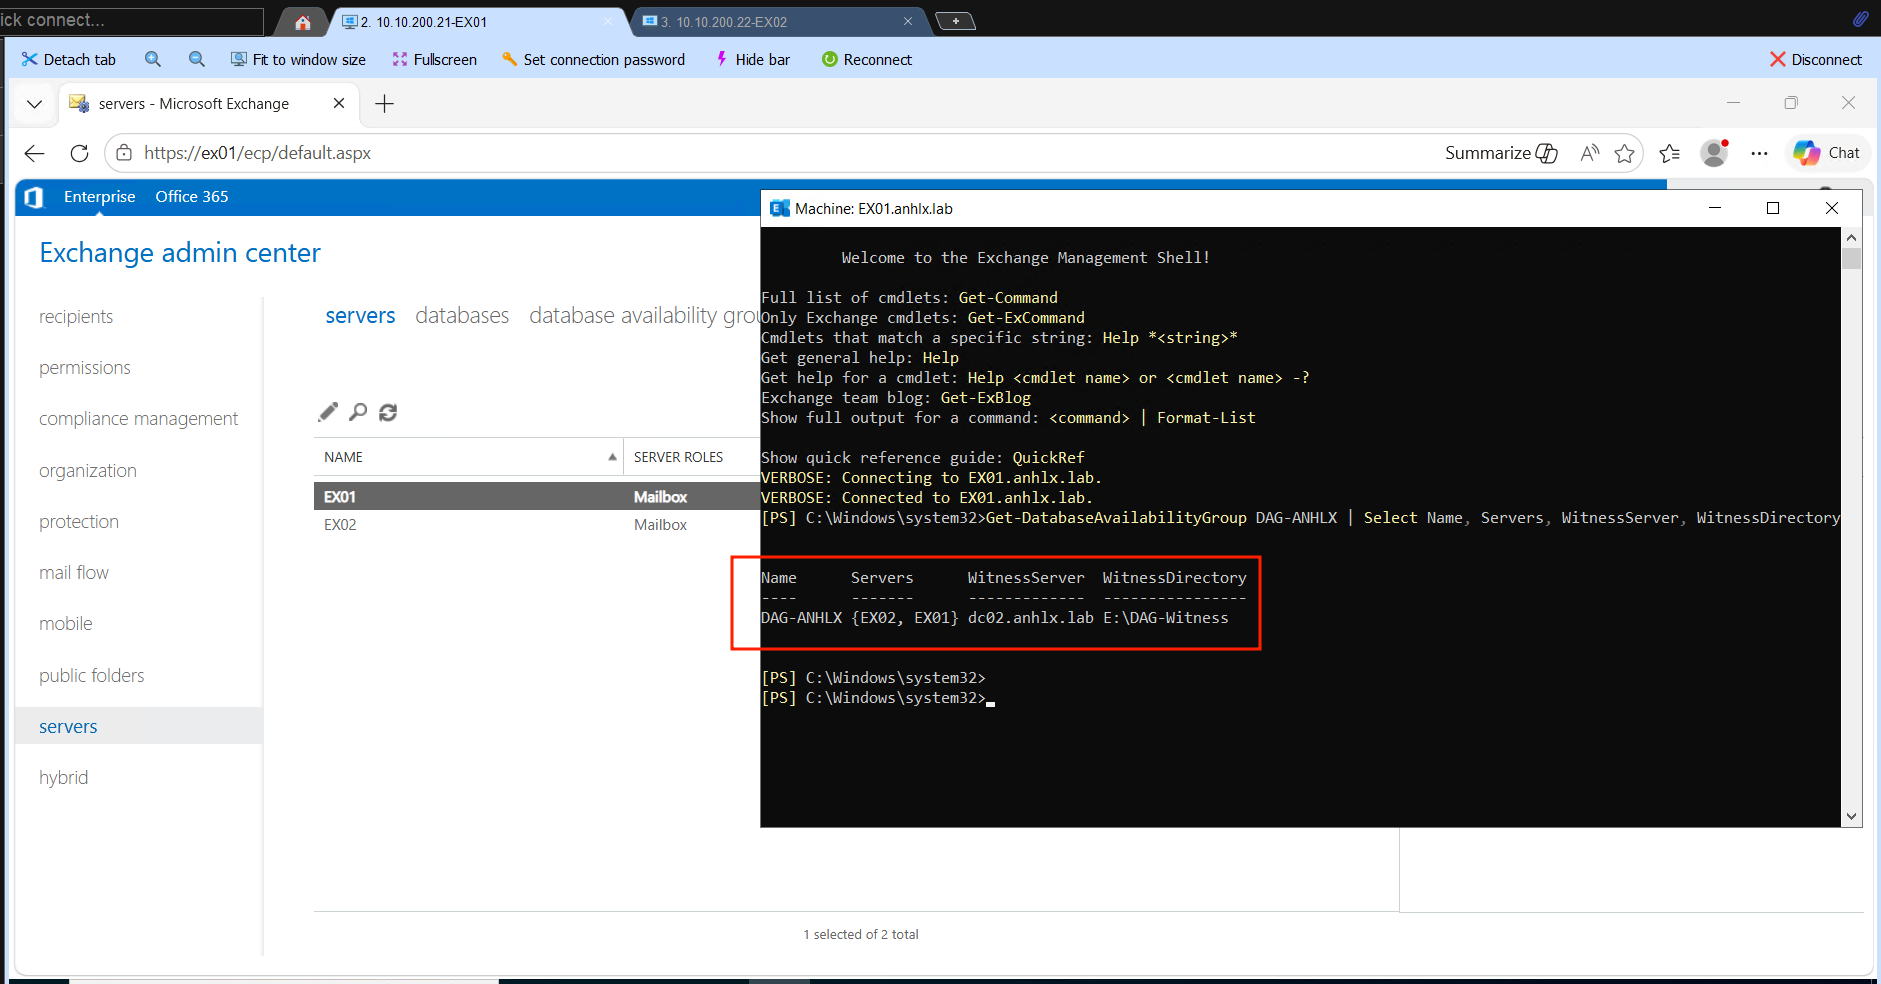
Kiểm tra DAG đã có đủ 2 member và FSW đúng chỗ:
Get-DatabaseAvailabilityGroup DAG-ANHLX | Select Name, Servers, WitnessServer, WitnessDirectory
4.3 Bật DAG Network Compression
Mình bật compression để giảm băng thông replication giữa hai Exchange server.
Set-DatabaseAvailabilityGroup DAG-ANHLX -NetworkCompression Enabled
5. Mailbox Database & DAG Copies
5.1 Tạo Mailbox Database
Exchange tạo một database mặc định khi cài. Mình tạo thêm MBDB01 trên EX01 và MBDB02 trên EX02, lưu trên disk E: — mỗi database chứa mailbox của một user khác nhau, để khi user1 gửi cho user2, mail thật sự đi qua Transport Service trên cả hai server.
New-MailboxDatabase -Name MBDB01 -Server EX01 `
  -EdbFilePath "E:\MailData\MBDB01\MBDB01.edb" `
  -LogFolderPath "E:\MailData\MBDB01\Logs"

New-MailboxDatabase -Name MBDB02 -Server EX02 `
  -EdbFilePath "E:\MailData\MBDB02\MBDB02.edb" `
  -LogFolderPath "E:\MailData\MBDB02\Logs"
Restart Information Store trên cả hai server trước khi mount — Exchange yêu cầu sau khi tạo database mới.
# Chạy trên EX01
Restart-Service MSExchangeIS

# Chạy trên EX02
Restart-Service MSExchangeIS
Mount-Database MBDB01
Mount-Database MBDB02
5.2 Thêm Database Copy vào DAG
Mỗi database có 2 bản sao — active trên 1 server, passive trên server còn lại. ActivationPreference 2 nghĩa là copy này chỉ lên active khi copy có preference 1 không available.
# MBDB01: active EX01, passive EX02
Add-MailboxDatabaseCopy -Identity MBDB01 -MailboxServer EX02 -ActivationPreference 2

# MBDB02: active EX02, passive EX01
Add-MailboxDatabaseCopy -Identity MBDB02 -MailboxServer EX01 -ActivationPreference 2
Restart Information Store trên cả hai server sau khi add DAG copy. Lưu ý: restart IS sẽ khiến DAG tự failover các database — sau đó cần move lại về đúng server preferred.
# Chạy trên EX01
Restart-Service MSExchangeIS

# Chạy trên EX02
Restart-Service MSExchangeIS
Restore active copy về đúng vị trí preferred:
Move-ActiveMailboxDatabase MBDB01 -ActivateOnServer EX01 -Confirm:$false
Move-ActiveMailboxDatabase MBDB02 -ActivateOnServer EX02 -Confirm:$false
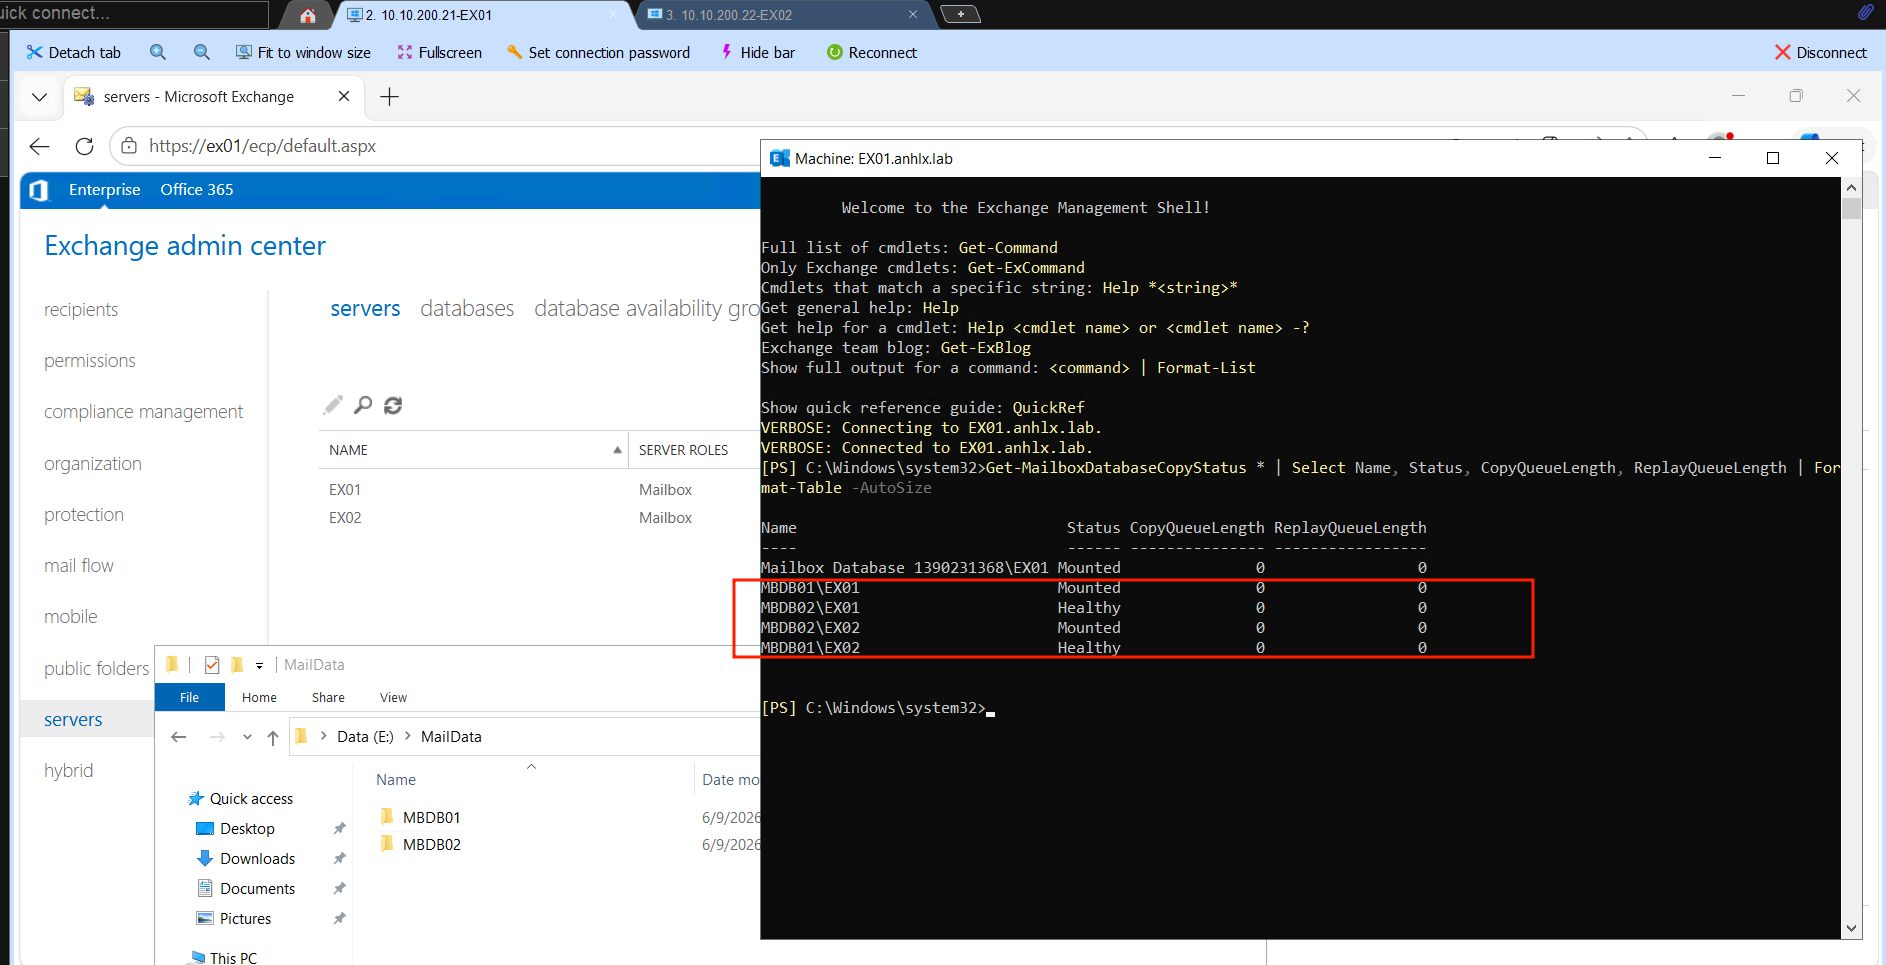
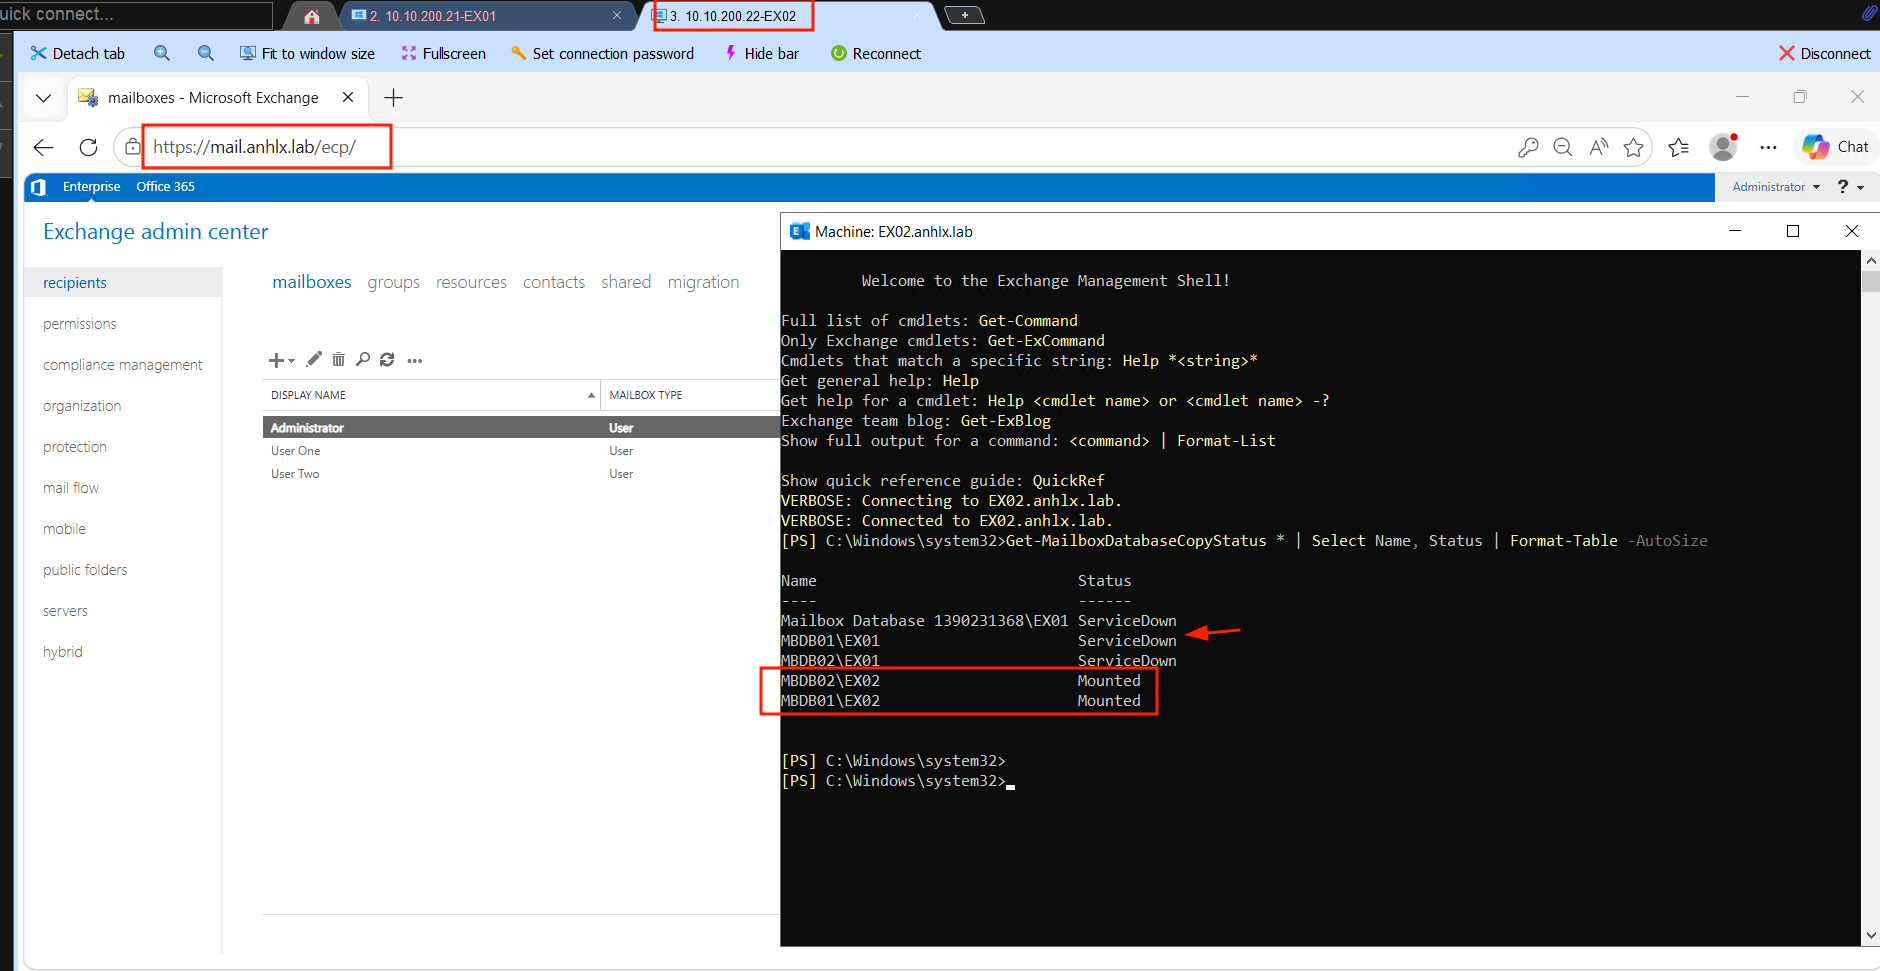
5.3 Kiểm tra replication
Get-MailboxDatabaseCopyStatus * | Select Name, Status, CopyQueueLength, ReplayQueueLength | Format-Table -AutoSize
Kết quả mong muốn: MBDB01\EX01 = Mounted, MBDB01\EX02 = Healthy, MBDB02\EX02 = Mounted, MBDB02\EX01 = Healthy, queue = 0.
6. Virtual Directories & Certificate
6.1 Cấu hình Virtual Directories
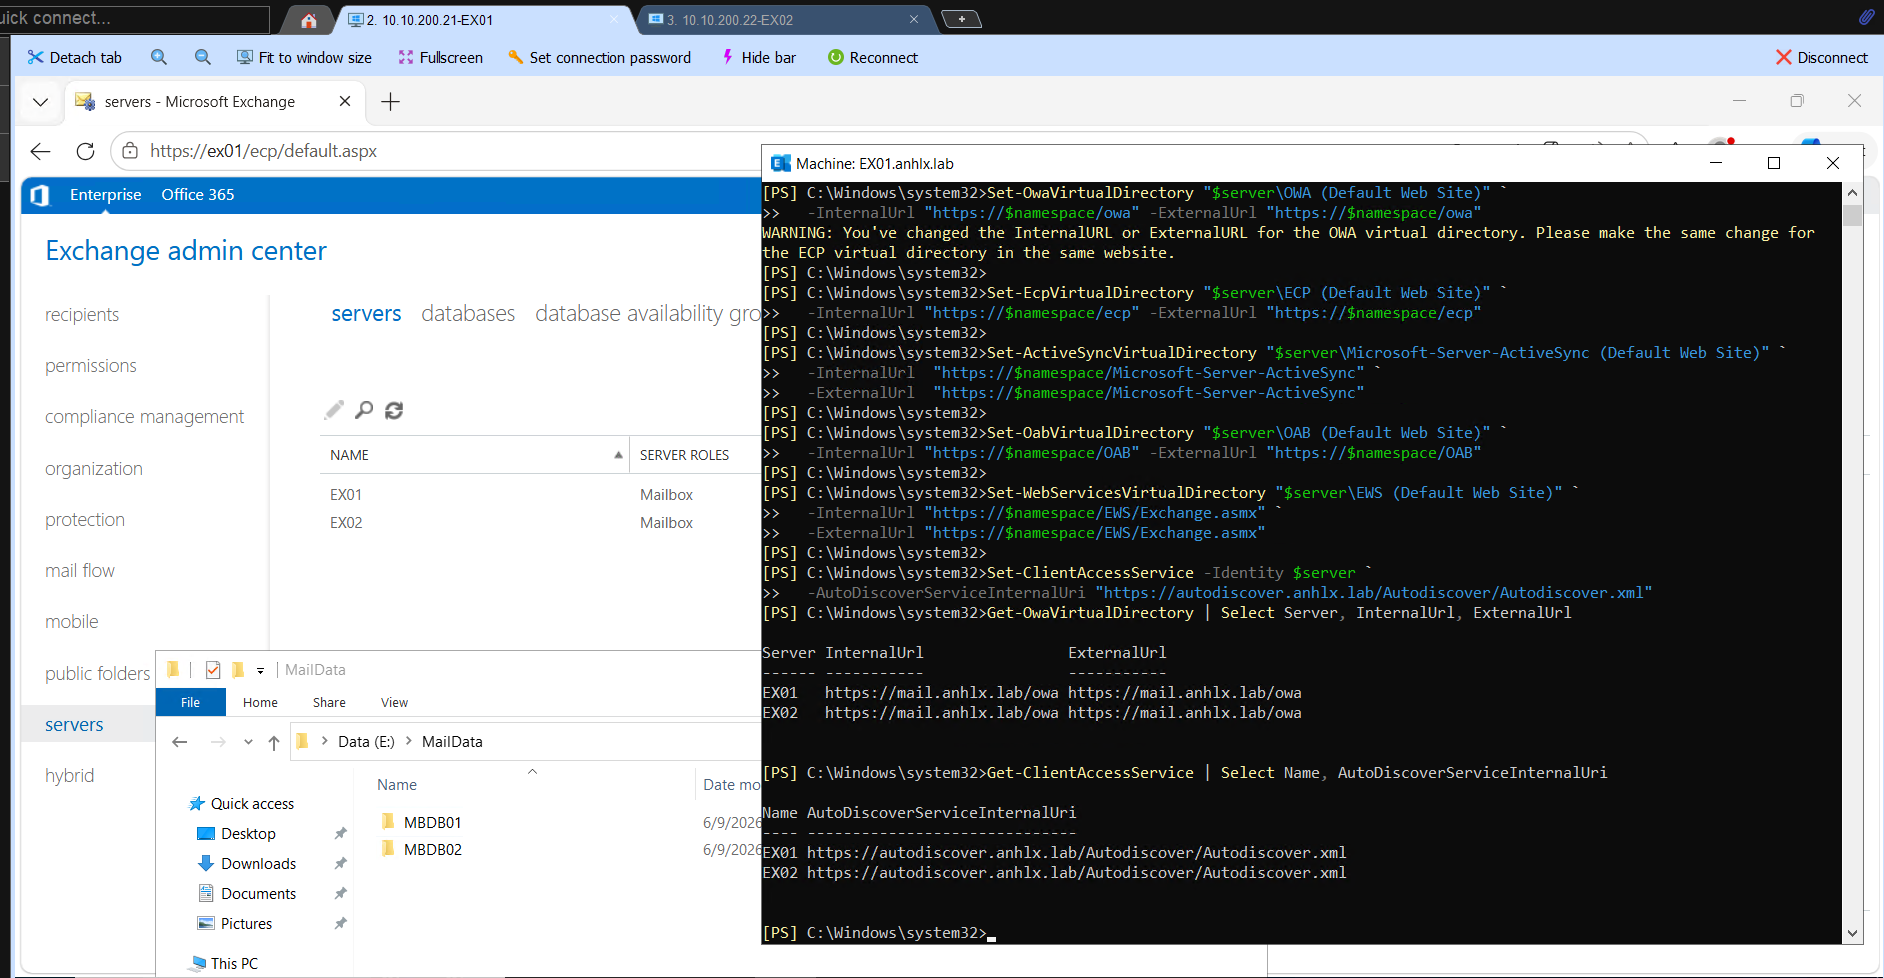
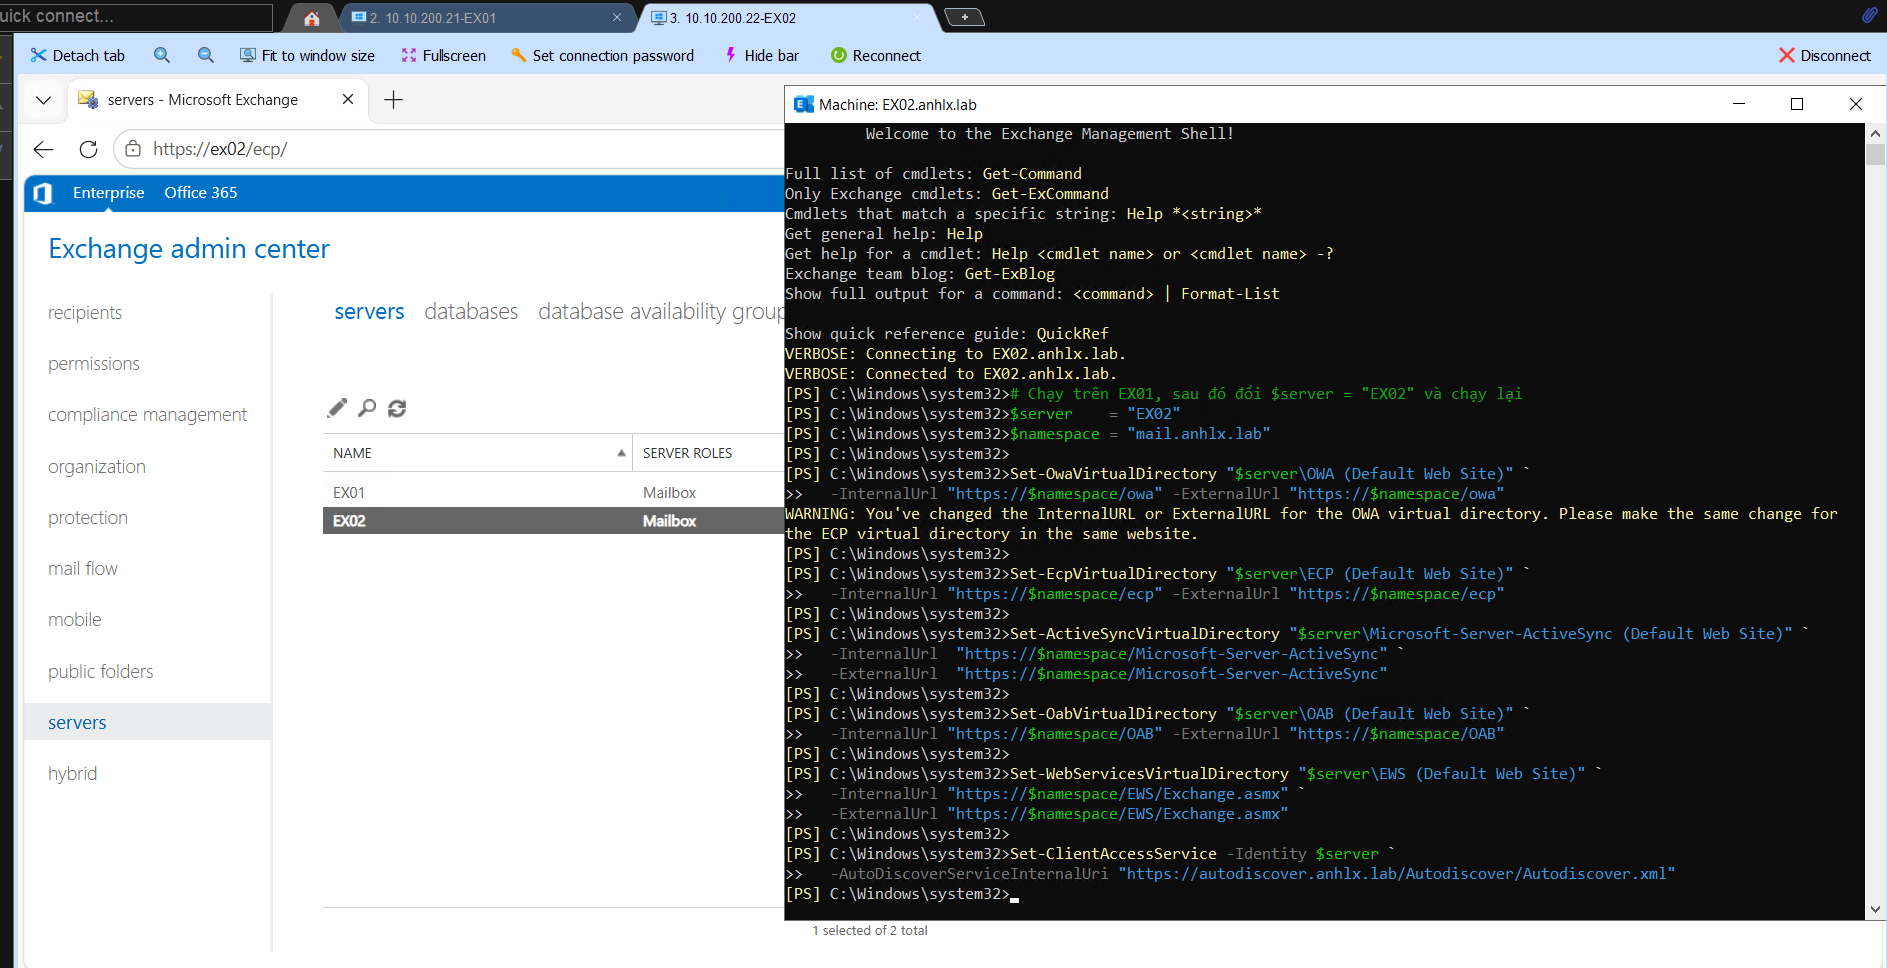
Mình set Internal và External URL cho tất cả virtual directory trên cả hai server trỏ về namespace chung mail.anhlx.lab — đây là điều kiện để Autodiscover hoạt động đúng khi client kết nối qua VIP.
# Chạy trên EX01, sau đó đổi $server = "EX02" và chạy lại
$server    = "EX01"
$namespace = "mail.anhlx.lab"

Set-OwaVirtualDirectory "$server\OWA (Default Web Site)" `
  -InternalUrl "https://$namespace/owa" -ExternalUrl "https://$namespace/owa"

Set-EcpVirtualDirectory "$server\ECP (Default Web Site)" `
  -InternalUrl "https://$namespace/ecp" -ExternalUrl "https://$namespace/ecp"

Set-ActiveSyncVirtualDirectory "$server\Microsoft-Server-ActiveSync (Default Web Site)" `
  -InternalUrl  "https://$namespace/Microsoft-Server-ActiveSync" `
  -ExternalUrl  "https://$namespace/Microsoft-Server-ActiveSync"

Set-OabVirtualDirectory "$server\OAB (Default Web Site)" `
  -InternalUrl "https://$namespace/OAB" -ExternalUrl "https://$namespace/OAB"

Set-WebServicesVirtualDirectory "$server\EWS (Default Web Site)" `
  -InternalUrl "https://$namespace/EWS/Exchange.asmx" `
  -ExternalUrl "https://$namespace/EWS/Exchange.asmx"

Set-ClientAccessService -Identity $server `
  -AutoDiscoverServiceInternalUri "https://autodiscover.anhlx.lab/Autodiscover/Autodiscover.xml"
6.2 Request Certificate từ Internal CA
Mình tạo certificate request trên EX01 với SAN cover đủ các tên Exchange cần — thiếu SAN nào Outlook sẽ báo cert warning.
New-Item -Path "C:\Temp" -ItemType Directory -Force
$req = New-ExchangeCertificate -GenerateRequest `
-SubjectName "CN=mail.anhlx.lab,O=ANHLX,C=VN" `
-DomainName "mail.anhlx.lab","autodiscover.anhlx.lab","EX01.anhlx.lab","EX02.anhlx.lab" `
-PrivateKeyExportable $true `
-FriendlyName "Exchange-SSL"
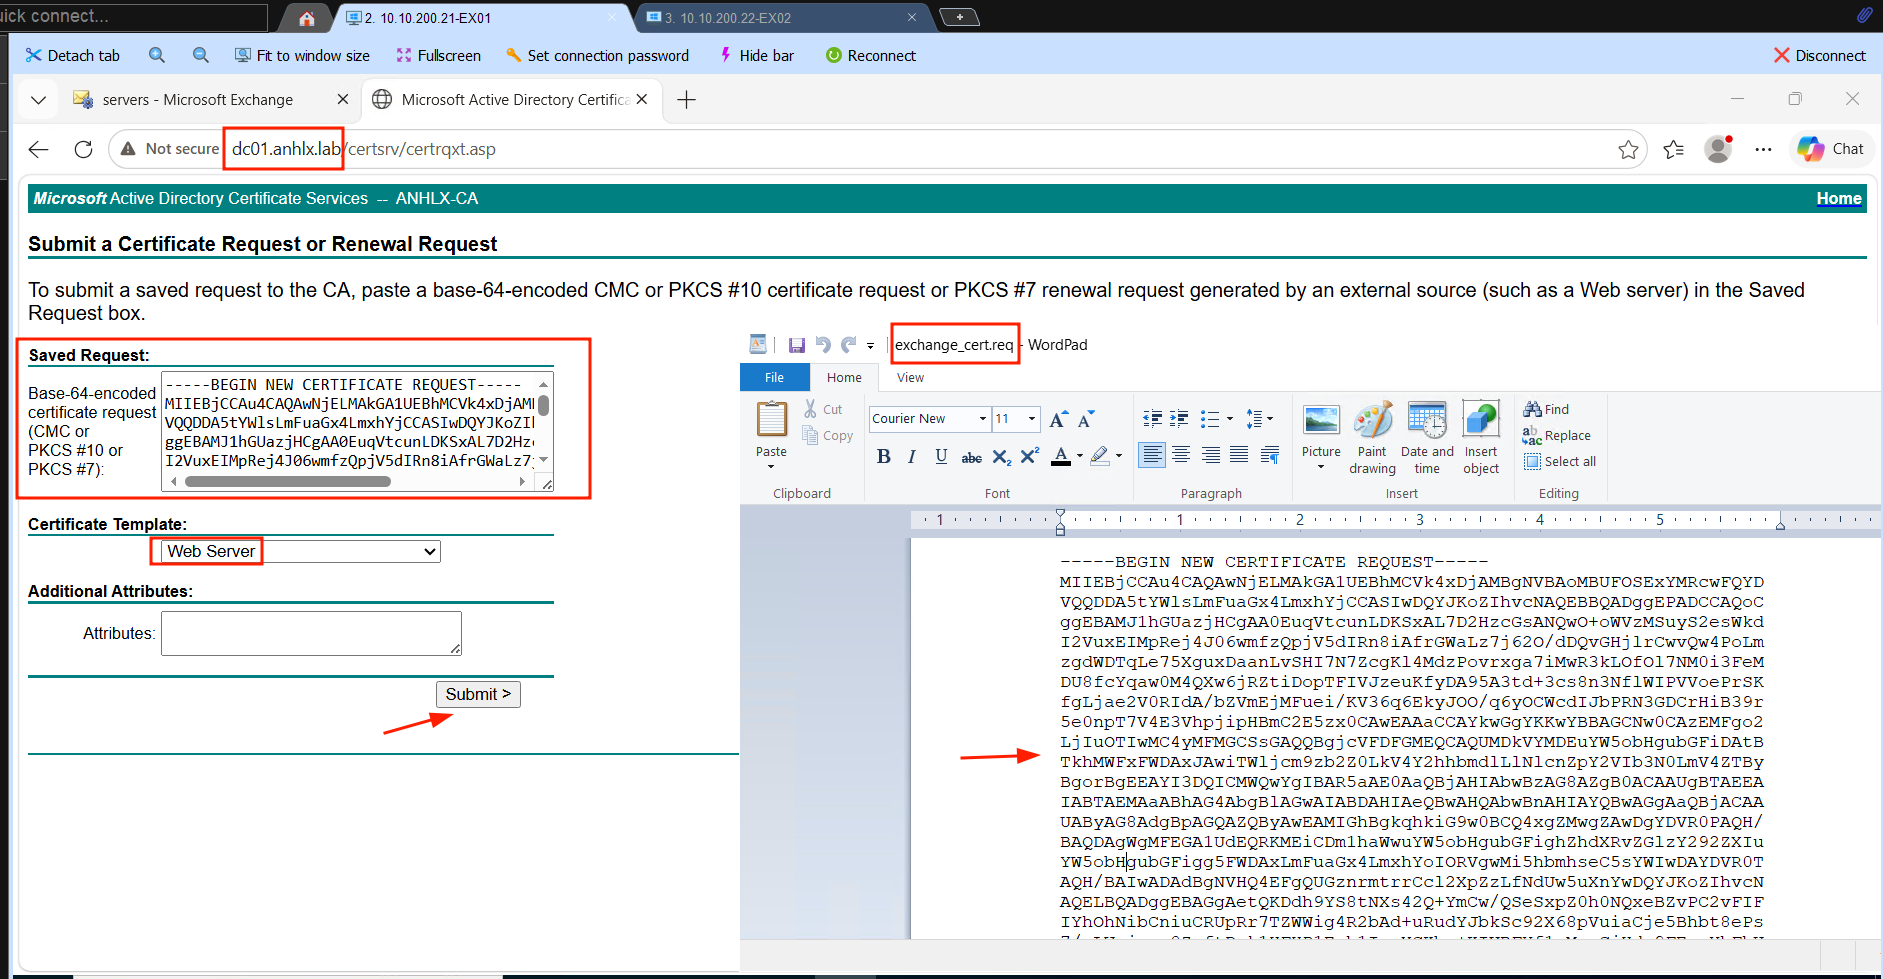
Set-Content -Path "C:\Temp\exchange_cert.req" -Value $req
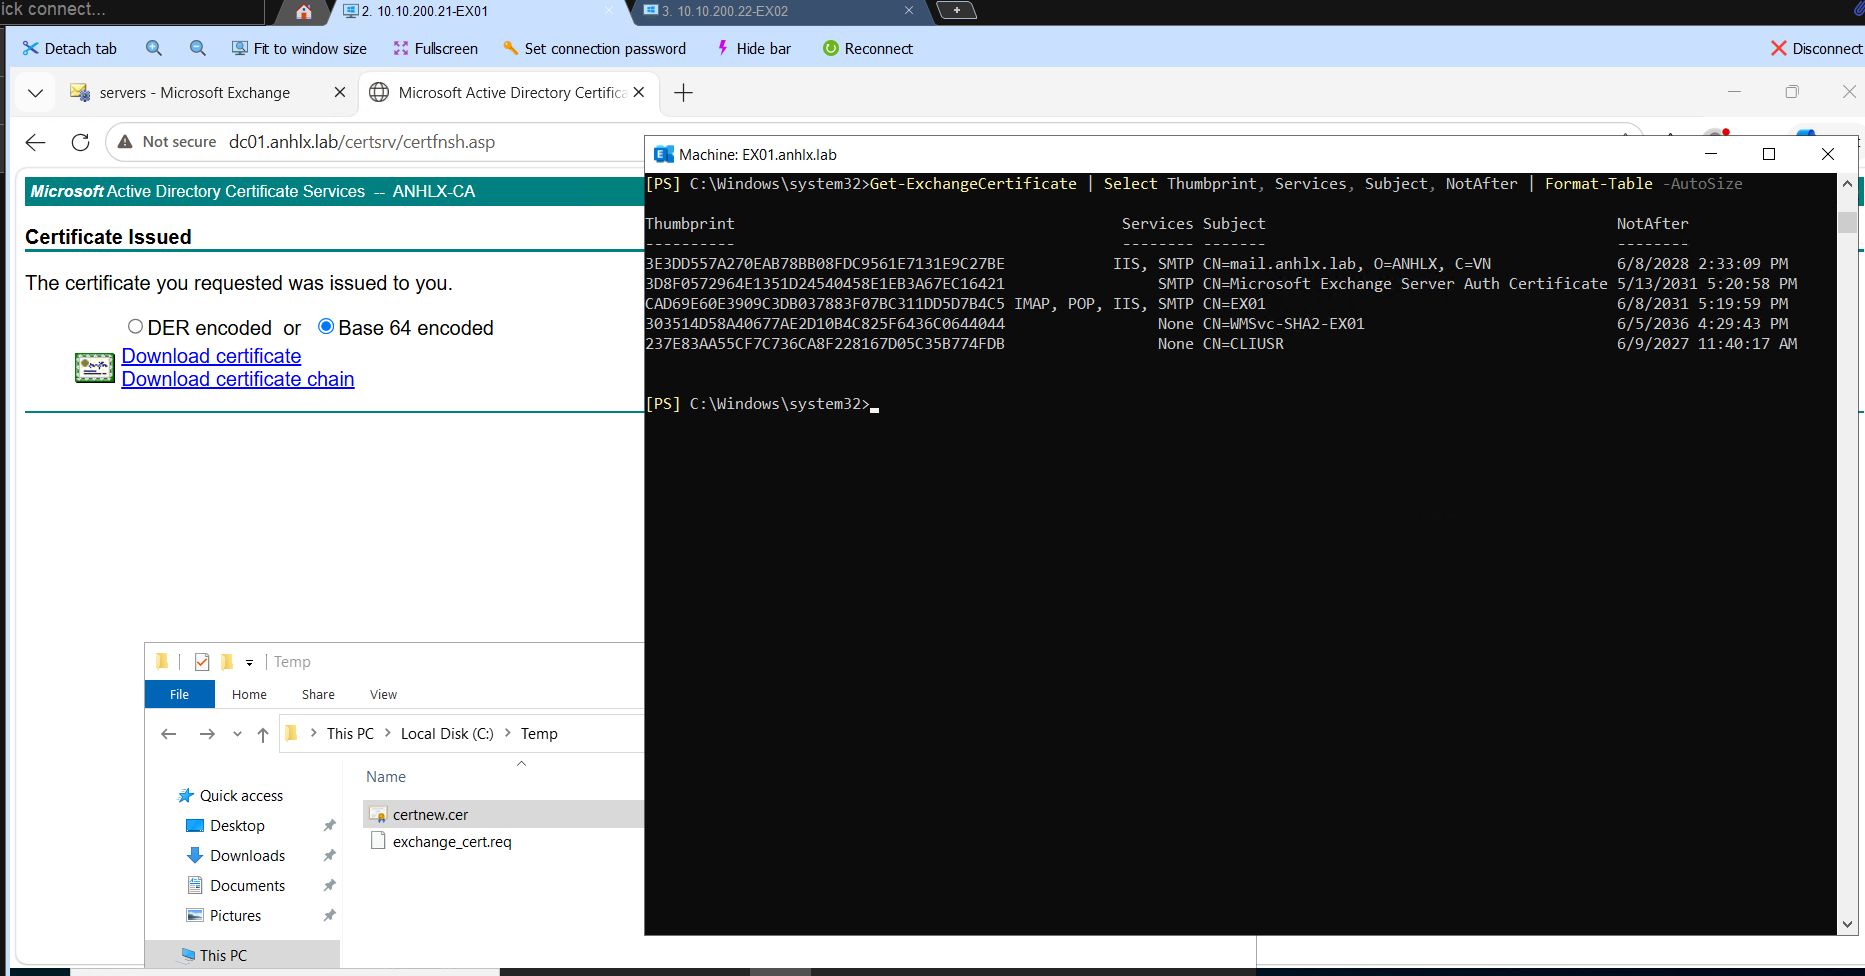
Submit file exchange_cert.req lên http://DC01.anhlx.lab/certsrv → Request a certificate → Advanced certificate request → paste nội dung file .req → chọn template Web Server → download cert dạng Base64.
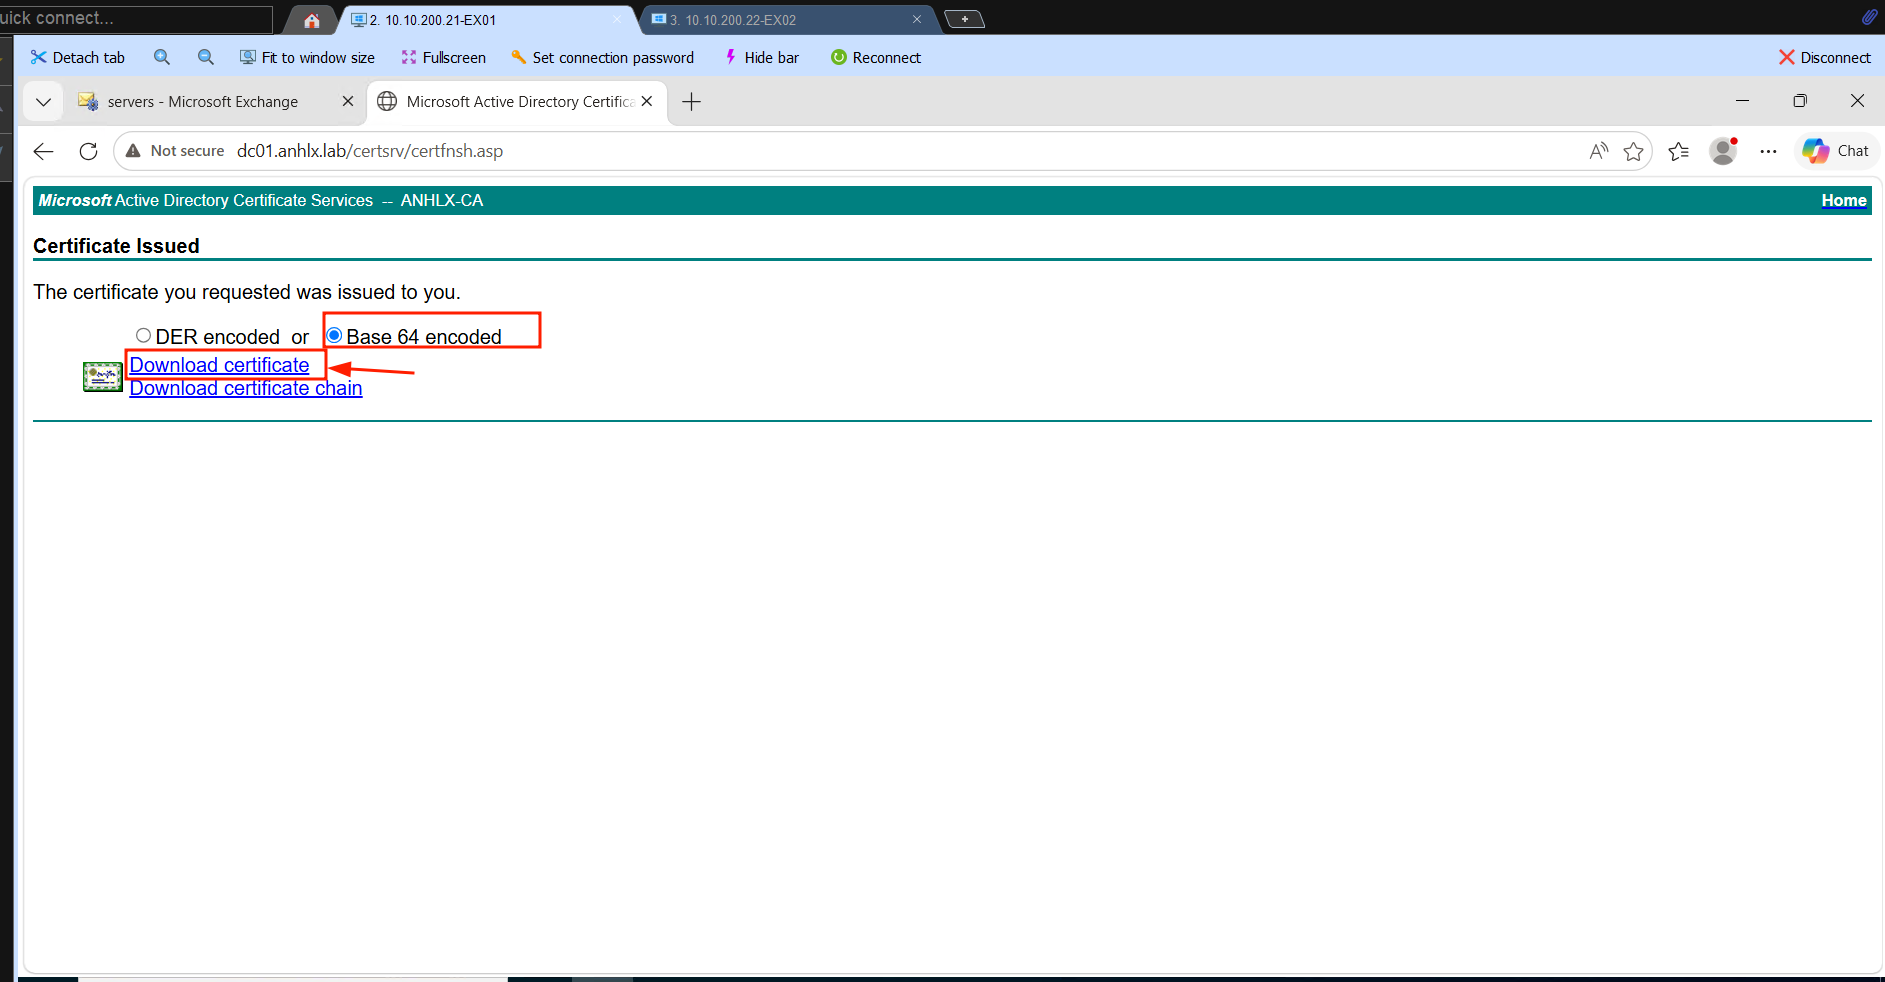
# Import cert đã download từ CA
$certData = [System.IO.File]::ReadAllBytes("C:\Temp\certnew.cer")
Import-ExchangeCertificate -FileData $certData

# Lấy thumbprint của cert vừa import
Get-ExchangeCertificate | Where { $_.FriendlyName -eq "Exchange-SSL" } | Select Thumbprint, Subject

# Bind cert vào IIS và SMTP
Enable-ExchangeCertificate -Thumbprint "<thumbprint>" -Services IIS,SMTP

# Check
Get-ExchangeCertificate | Select Thumbprint, Services, Subject, NotAfter | Format-Table -AutoSize
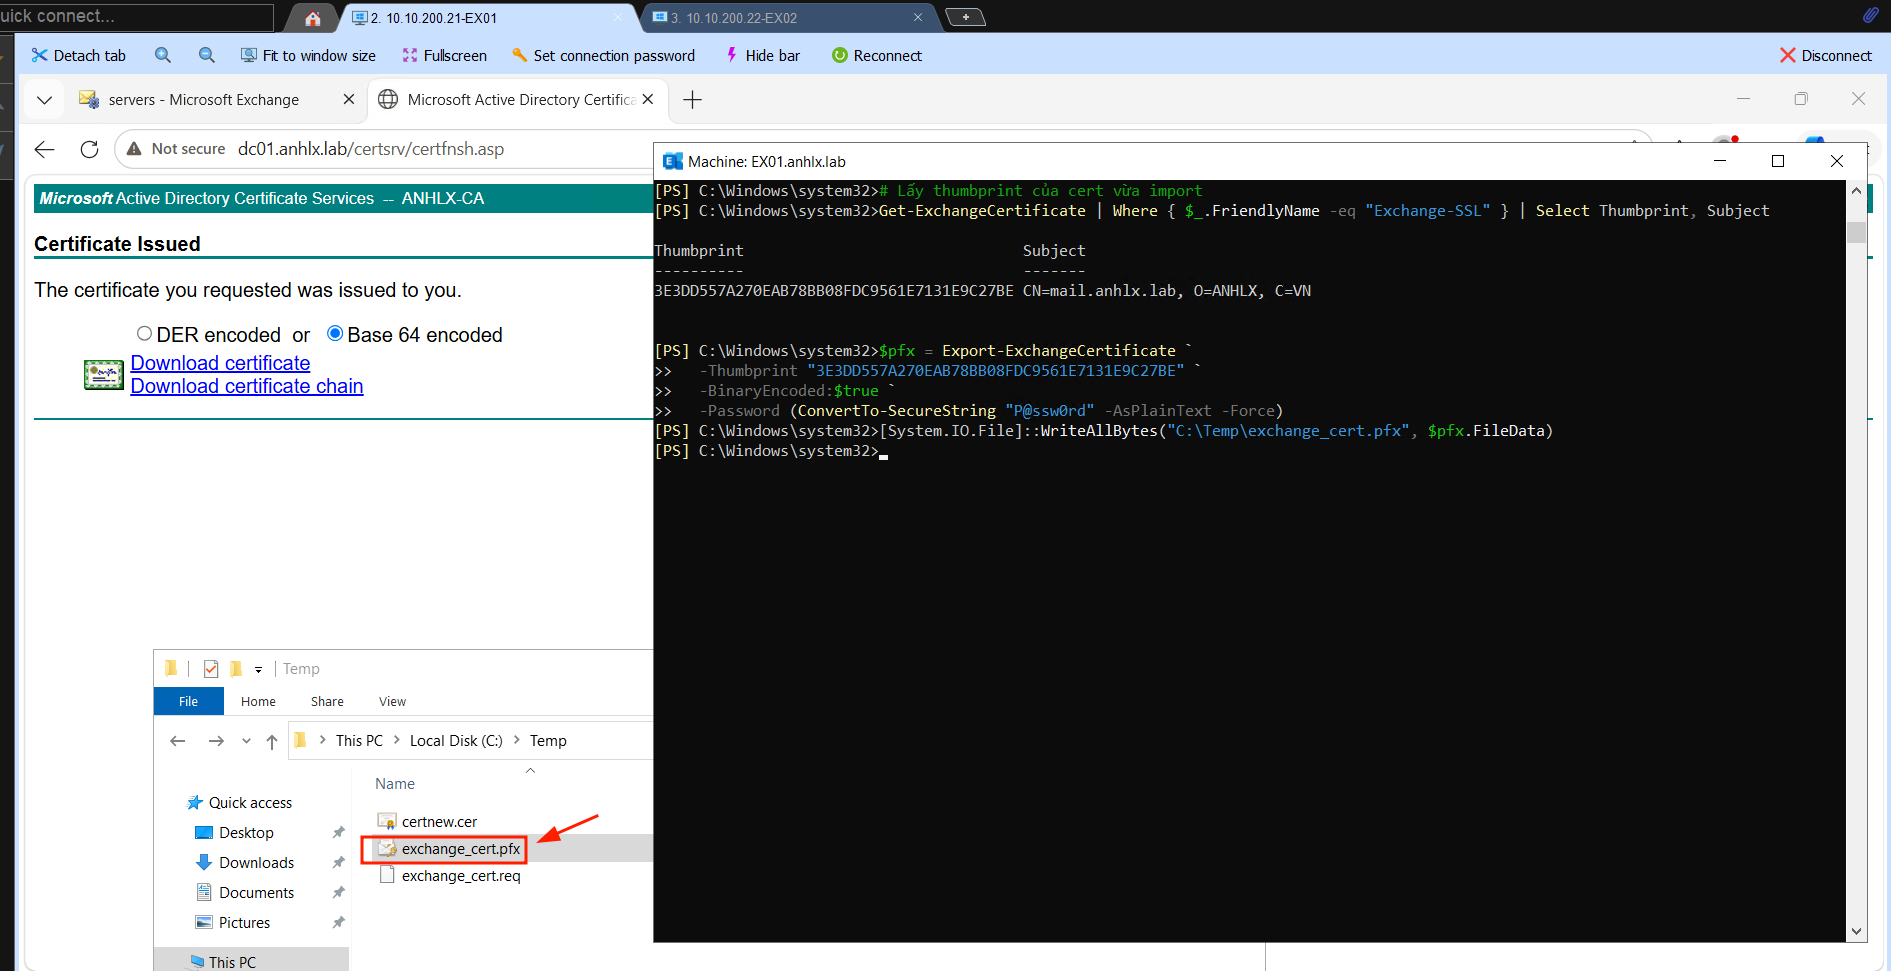
Trên EX02, mình export cert từ EX01 (cert có PrivateKeyExportable = $true) rồi import lên:
# Trên EX01 — export
$pfx = Export-ExchangeCertificate `
  -Thumbprint "<thumbprint>" `
  -BinaryEncoded:$true `
  -Password (ConvertTo-SecureString "P@ssw0rd" `
  -AsPlainText -Force)

[System.IO.File]::WriteAllBytes("C:\Temp\exchange_cert.pfx", $pfx.FileData)
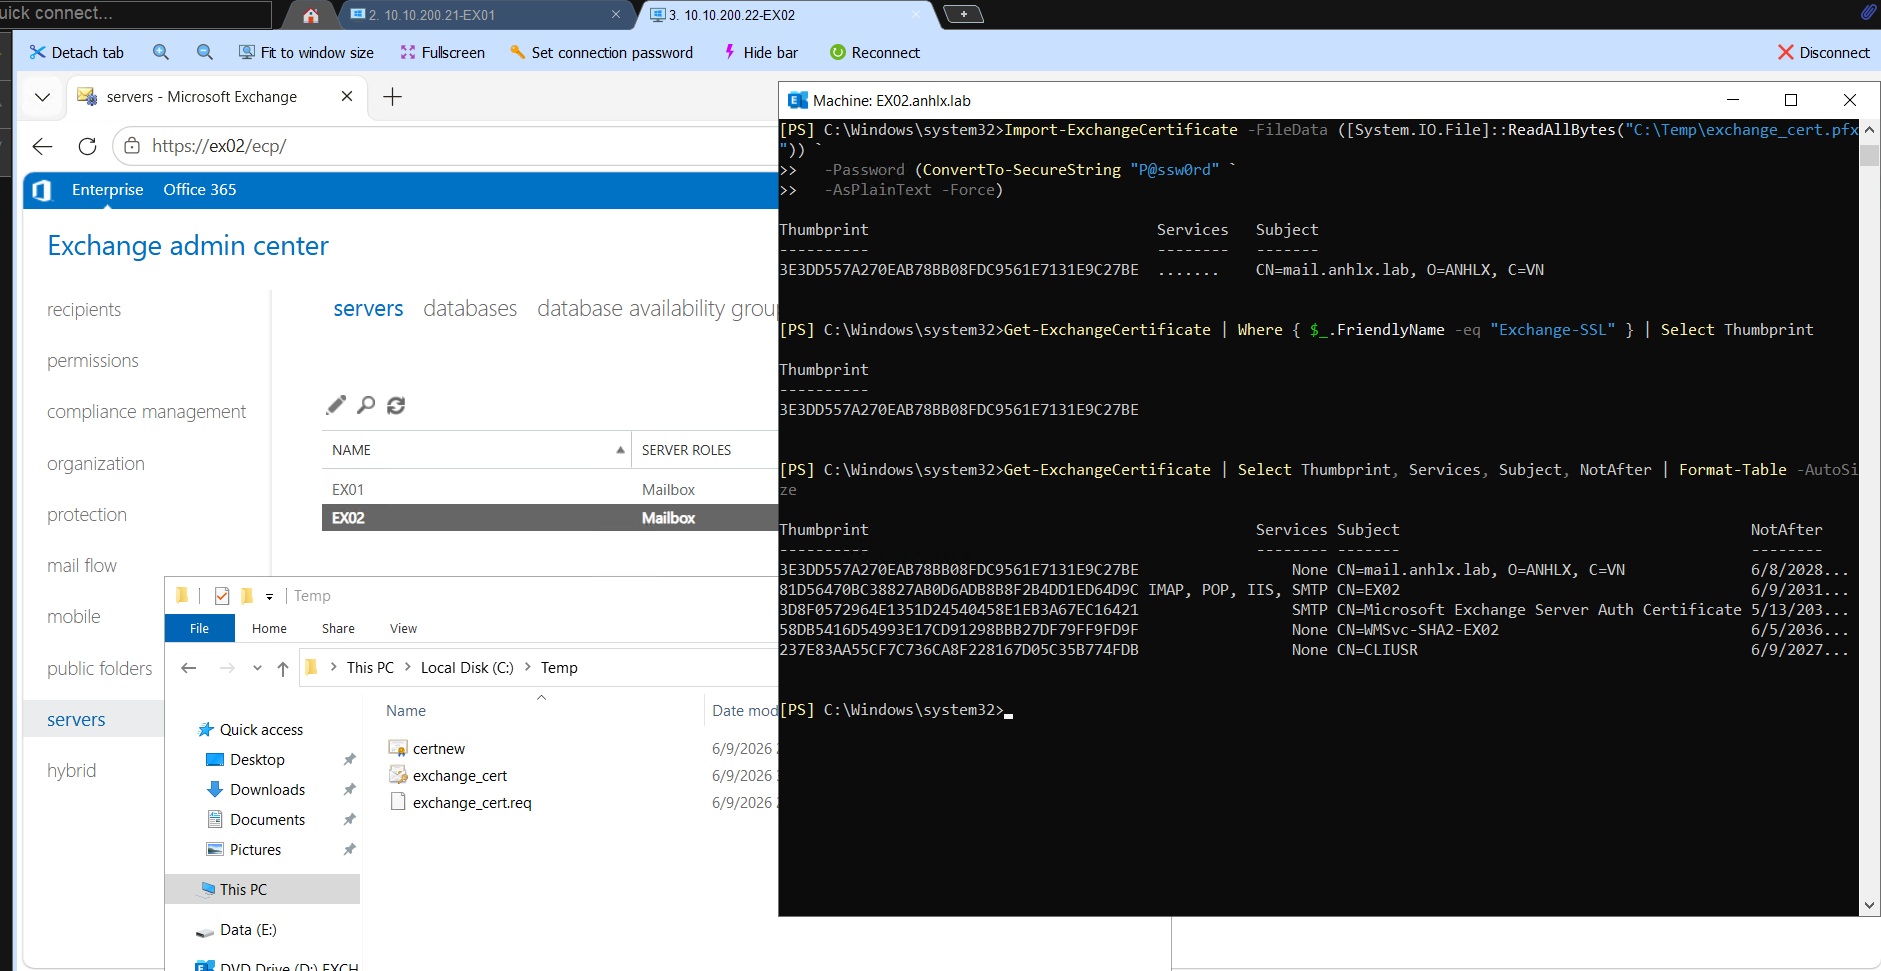
Copy file C:\Temp\exchange_cert.pfx sang EX02, sau đó trên EX02:
# Trên EX02 — import và bind
Import-ExchangeCertificate -FileData ([System.IO.File]::ReadAllBytes("C:\Temp\exchange_cert.pfx")) `
  -Password (ConvertTo-SecureString "P@ssw0rd" `
  -AsPlainText -Force)

# Lấy thumbprint vừa import
Get-ExchangeCertificate | Where { $_.FriendlyName -eq "Exchange-SSL" } | Select Thumbprint

Enable-ExchangeCertificate -Thumbprint "<thumbprint>" -Services IIS,SMTP
7. HAProxy Pair — LB01 & LB02
7.1 Cài HAProxy + Keepalived
Mình cài trên cả hai LB01 và LB02 — cùng một lệnh.
apt update && apt install -y haproxy keepalived
7.2 Cấu hình HAProxy (chạy trên cả LB01 và LB02 — config giống nhau)
Mình dùng mode tcp (Layer 4) — Exchange dùng Kerberos authentication, nếu dùng Layer 7 SSL termination sẽ break token và Outlook liên tục bị yêu cầu đăng nhập lại.
HAProxy bind trên VIP 10.10.200.50 — cần bật ip_nonlocal_bind để LB02 (khi chưa có VIP) vẫn start được HAProxy mà không lỗi bind.
# Bật nonlocal bind trên cả hai LB
echo "net.ipv4.ip_nonlocal_bind=1" >> /etc/sysctl.conf
sysctl -p
cat > /etc/haproxy/haproxy.cfg << 'EOF'
global
log /dev/log local0
maxconn 4096
defaults
log global
mode tcp
option tcplog
timeout connect 5s
timeout client 50s
timeout server 50s
frontend exchange_https
bind 10.10.200.50:443
default_backend exchange_pool
frontend exchange_http
bind 10.10.200.50:80
default_backend exchange_http_pool
backend exchange_pool
balance roundrobin
option tcp-check
server EX01 10.10.200.21:443 check inter 5s rise 2 fall 3
server EX02 10.10.200.22:443 check inter 5s rise 2 fall 3
backend exchange_http_pool
balance roundrobin
server EX01 10.10.200.21:80 check inter 5s
server EX02 10.10.200.22:80 check inter 5s
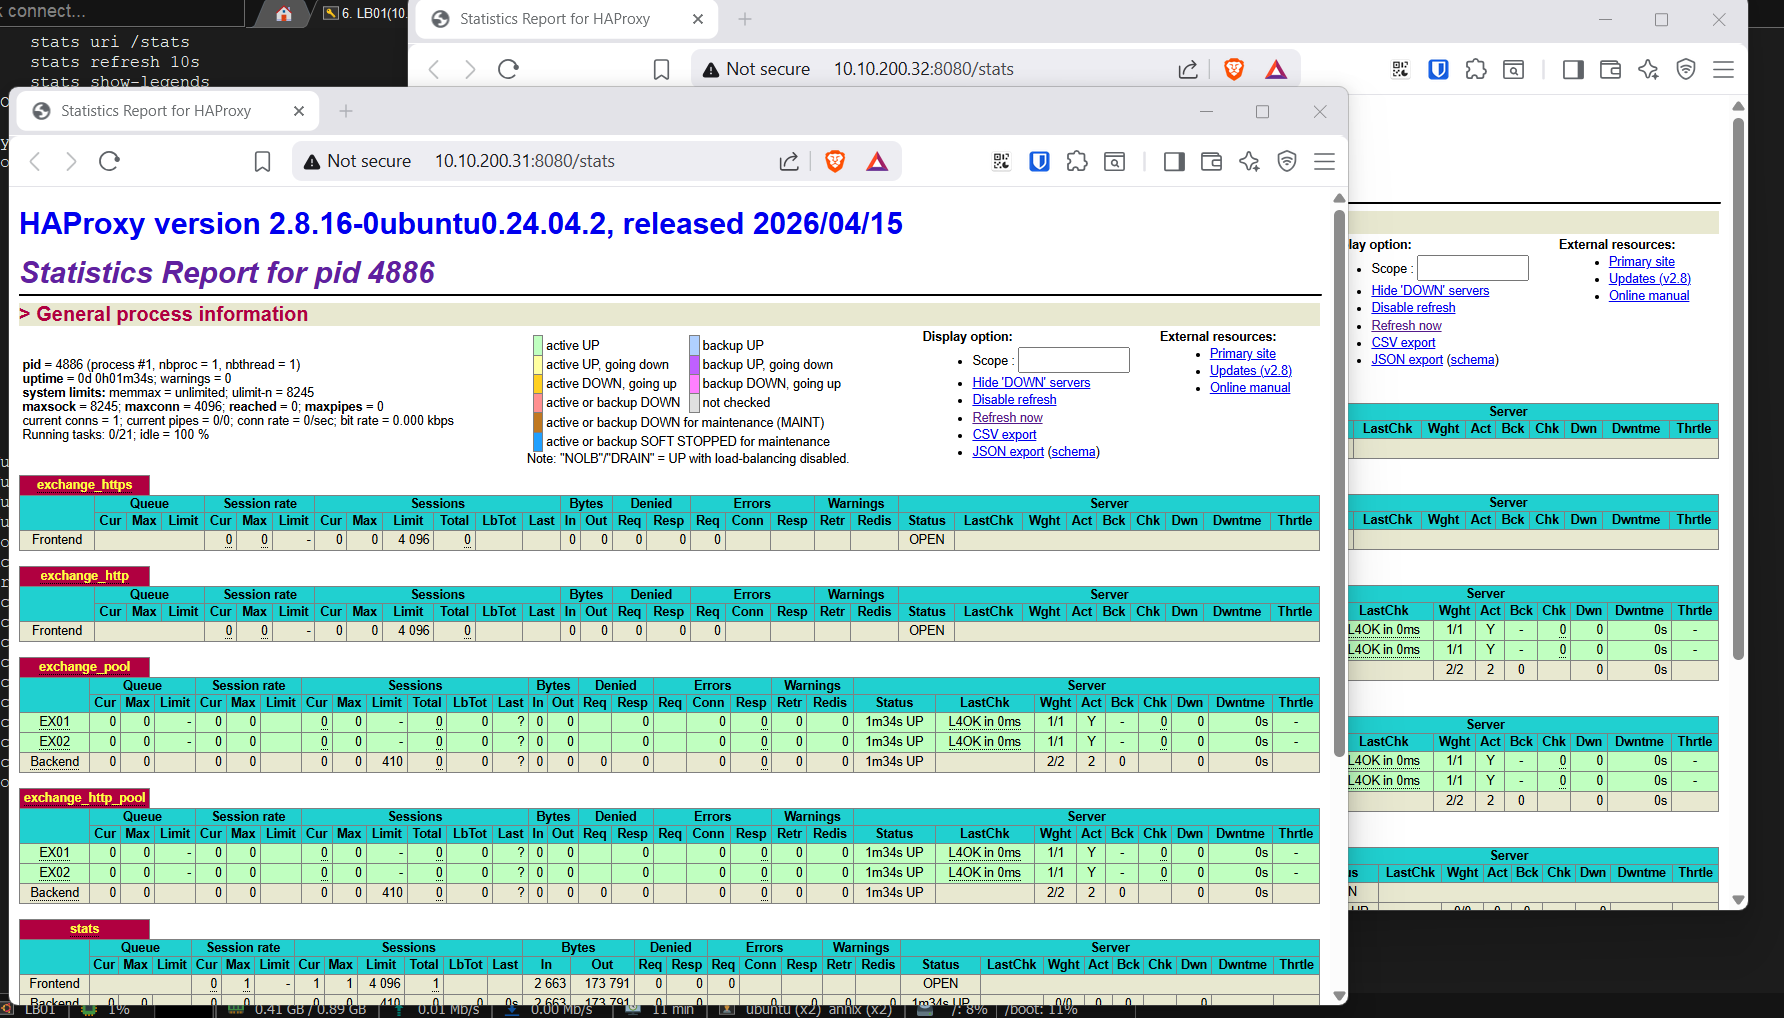
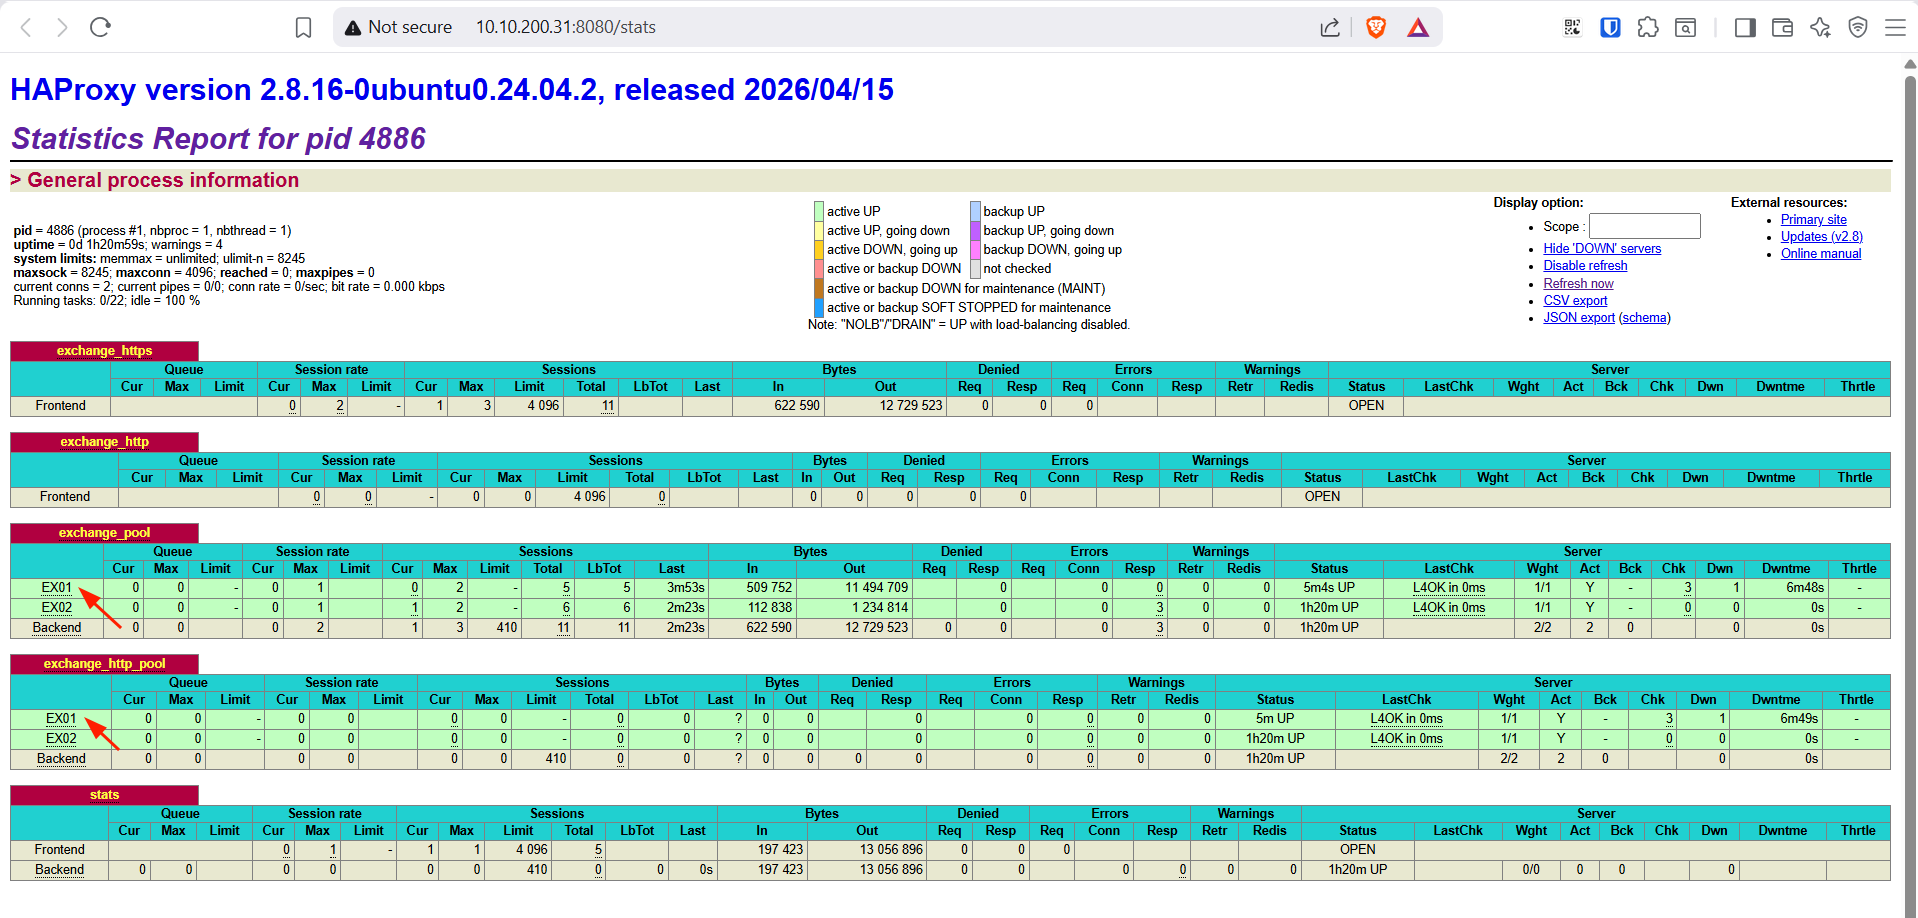
listen stats
bind *:8080
mode http
stats enable
stats uri /stats
stats refresh 10s
stats show-legends
EOF
systemctl restart haproxy
systemctl enable haproxy
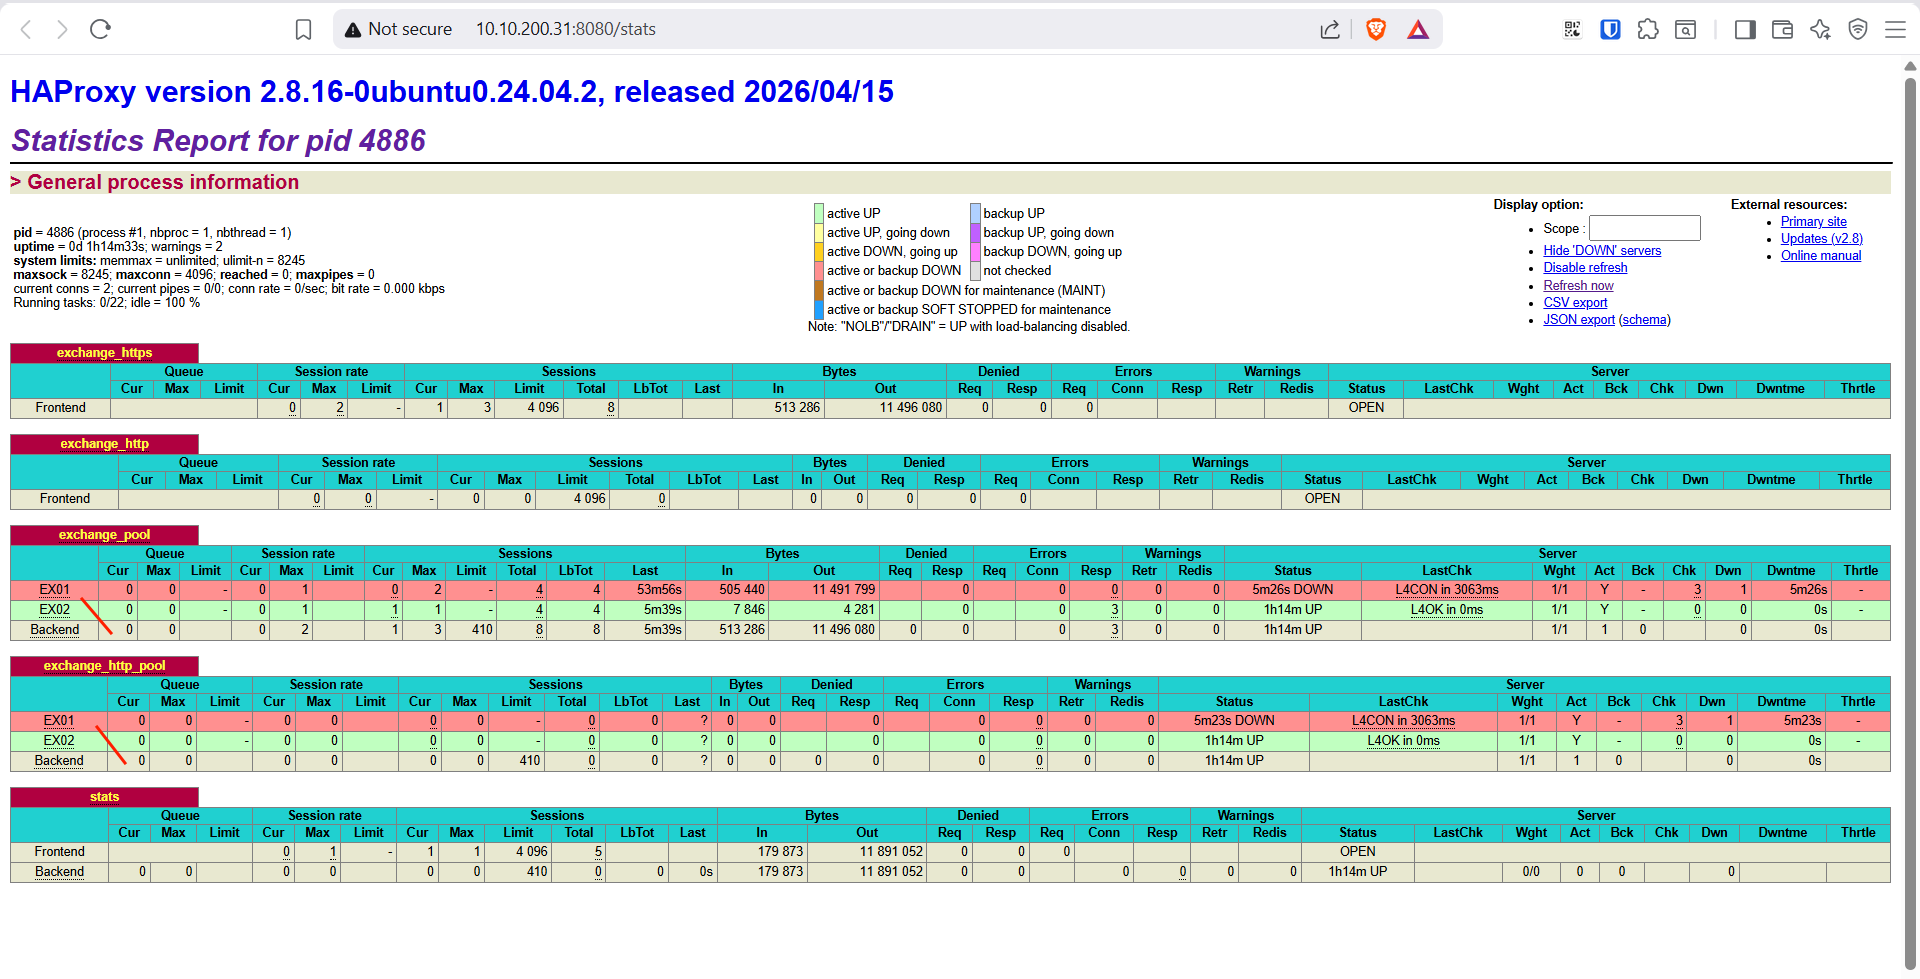
Stats page: http://10.10.200.31:8080/stats (LB01) và http://10.10.200.32:8080/stats (LB02).
7.3 Keepalived — LB01 (MASTER)
Keepalived quản lý VIP 10.10.200.50 bằng VRRP. LB01 là MASTER, priority 100. Nếu HAProxy trên LB01 chết, script trả về fail → priority tự giảm xuống 50 (100−50), thấp hơn LB02’s 90 → LB02 lên MASTER và lấy VIP.
cat > /etc/keepalived/keepalived.conf << 'EOF'
global_defs {
  router_id LB01
}

vrrp_script chk_haproxy {
  script "systemctl is-active haproxy"
  interval 2
  weight -50
}

vrrp_instance VI_EXCHANGE {
  state MASTER
  interface ens160
  virtual_router_id 51
  priority 100
  advert_int 1
  authentication {
    auth_type PASS
    auth_pass <KeepalivedSecret>
  }
  virtual_ipaddress {
    10.10.200.50/24 dev ens160
  }
  track_script {
    chk_haproxy
  }
}
EOF

systemctl restart keepalived
systemctl enable keepalived
7.4 Keepalived — LB02 (BACKUP)
cat > /etc/keepalived/keepalived.conf << 'EOF'
global_defs {
  router_id LB02
}

vrrp_script chk_haproxy {
  script "systemctl is-active haproxy"
  interval 2
  weight -50
}

vrrp_instance VI_EXCHANGE {
  state BACKUP
  interface ens160
  virtual_router_id 51
  priority 90
  advert_int 1
  authentication {
    auth_type PASS
    auth_pass <KeepalivedSecret>
  }
  virtual_ipaddress {
    10.10.200.50/24 dev ens160
  }
  track_script {
    chk_haproxy
  }
}
EOF

systemctl restart keepalived
systemctl enable keepalived
7.5 Kiểm tra VIP và test failover LB
Xác nhận LB01 đang giữ VIP:
ip addr show ens160 | grep "10.10.200.50"
Test failover — stop HAProxy trên LB01, Keepalived phát hiện sau 2 giây và chuyển VIP sang LB02:
# Trên LB01
systemctl stop haproxy

# Trên LB02 — kiểm tra sau ~3 giây
ip addr show ens160 | grep "10.10.200.50"
LB02 phải hiển thị inet 10.10.200.50/24. Truy cập https://mail.anhlx.lab/owa vẫn hoạt động — Keepalived đã chuyển VIP trong suốt quá trình.
8. Tạo Mailbox & Test Mail Flow
8.1 Tạo mailbox
Mình tạo user1 trên MBDB01 (active EX01) và user2 trên MBDB02 (active EX02) — hai mailbox nằm trên hai server khác nhau để mail flow thật sự đi qua Transport Service của cả hai.
New-Mailbox -UserPrincipalName user1@anhlx.lab -Alias user1 `
  -Name "User One" -FirstName "User" -LastName "One" `
  -Password (ConvertTo-SecureString "<Password>" -AsPlainText -Force) `
  -ResetPasswordOnNextLogon $false `
  -Database MBDB01

New-Mailbox -UserPrincipalName user2@anhlx.lab -Alias user2 `
  -Name "User Two" -FirstName "User" -LastName "Two" `
  -Password (ConvertTo-SecureString "<Password>" -AsPlainText -Force) `
  -ResetPasswordOnNextLogon $false `
  -Database MBDB02
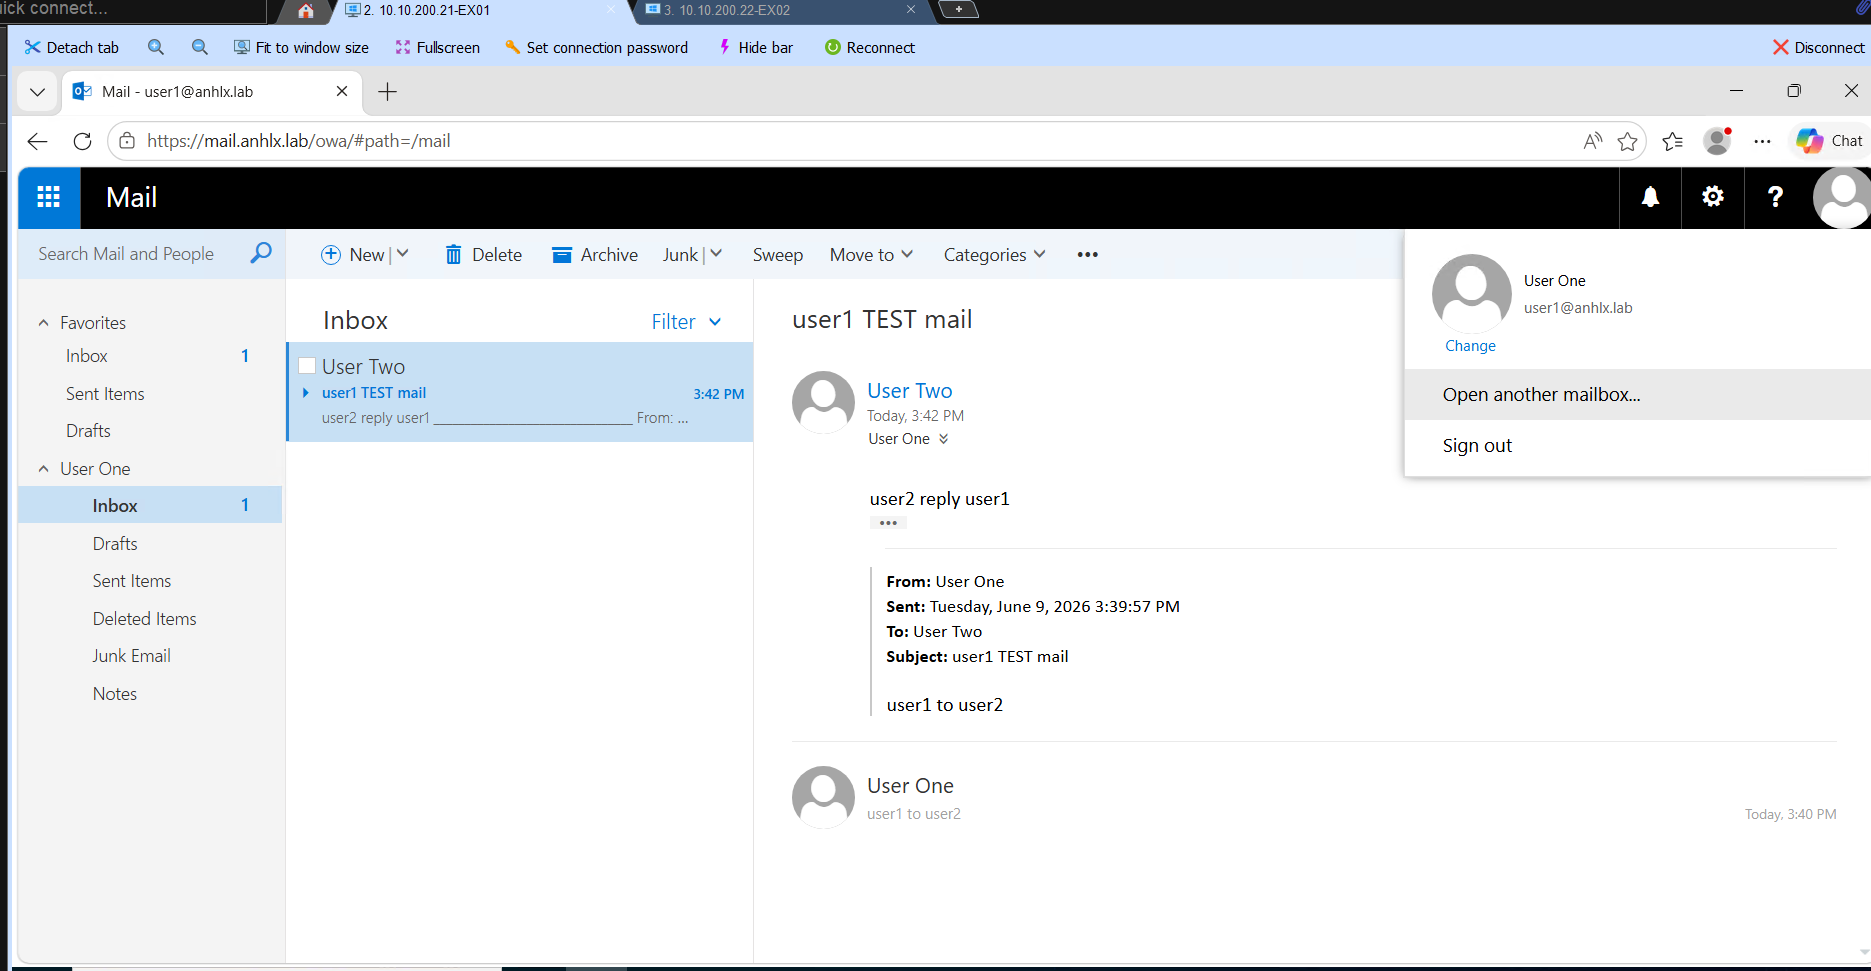
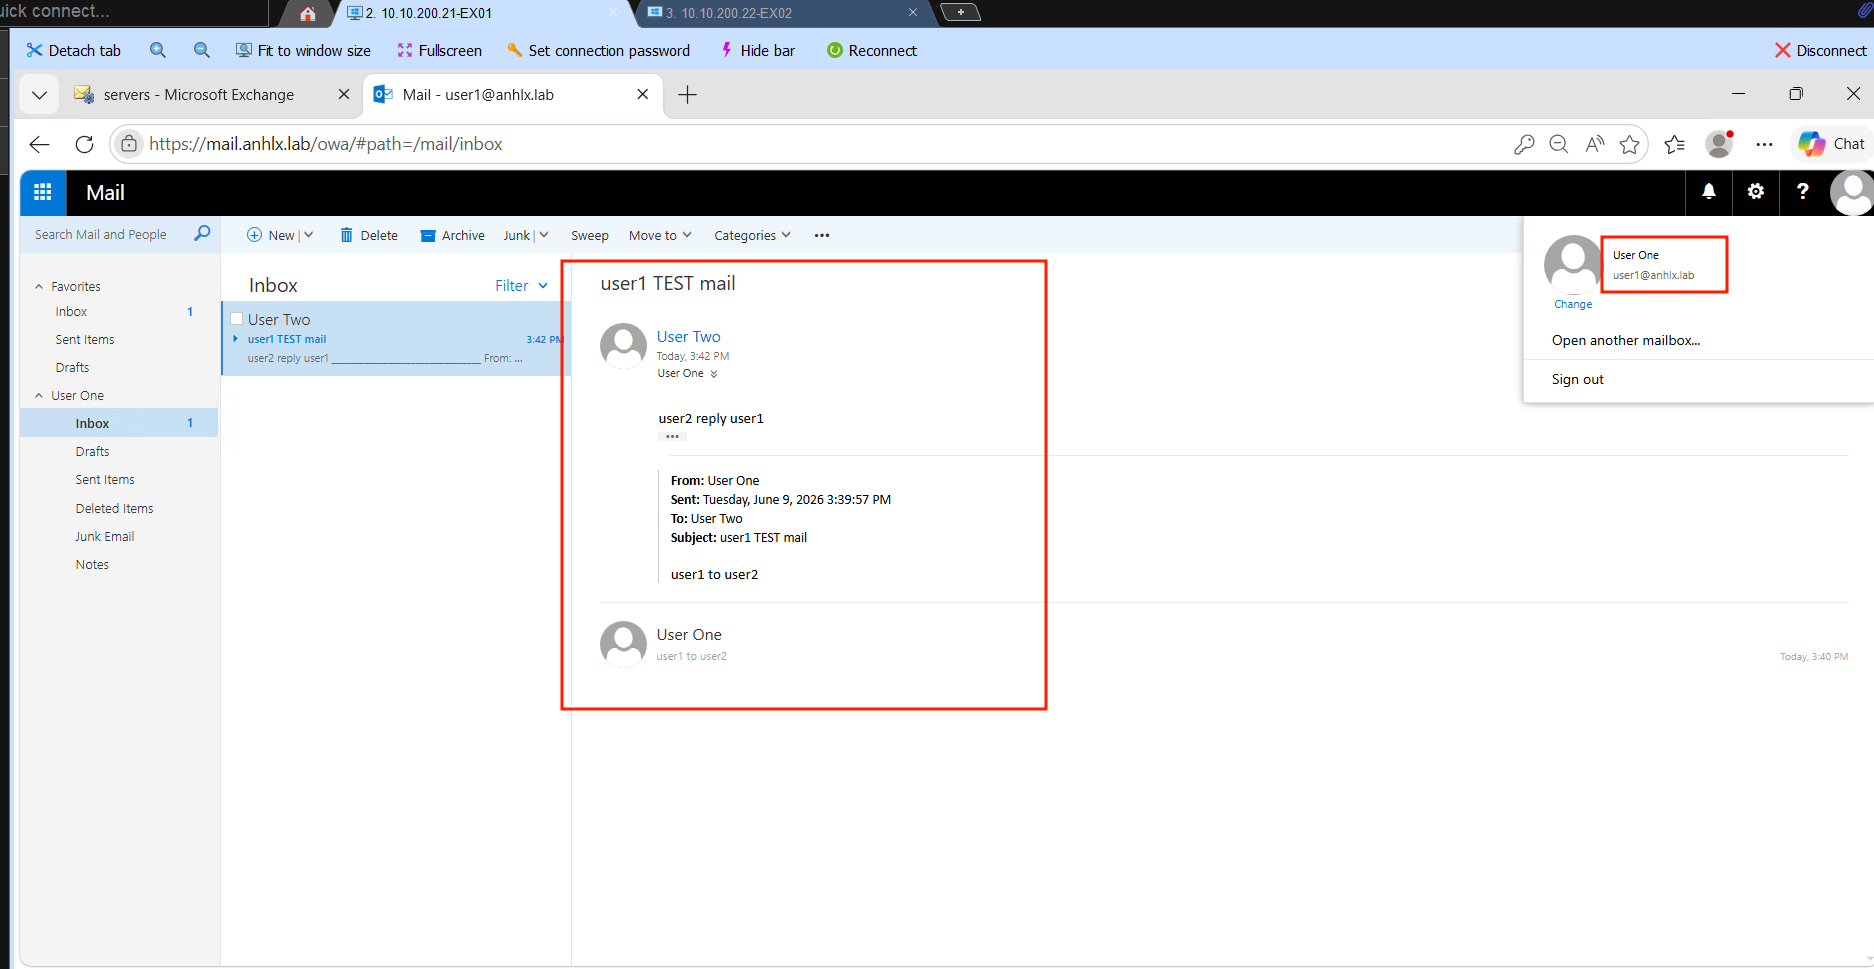
8.2 Gửi nhận mail qua OWA
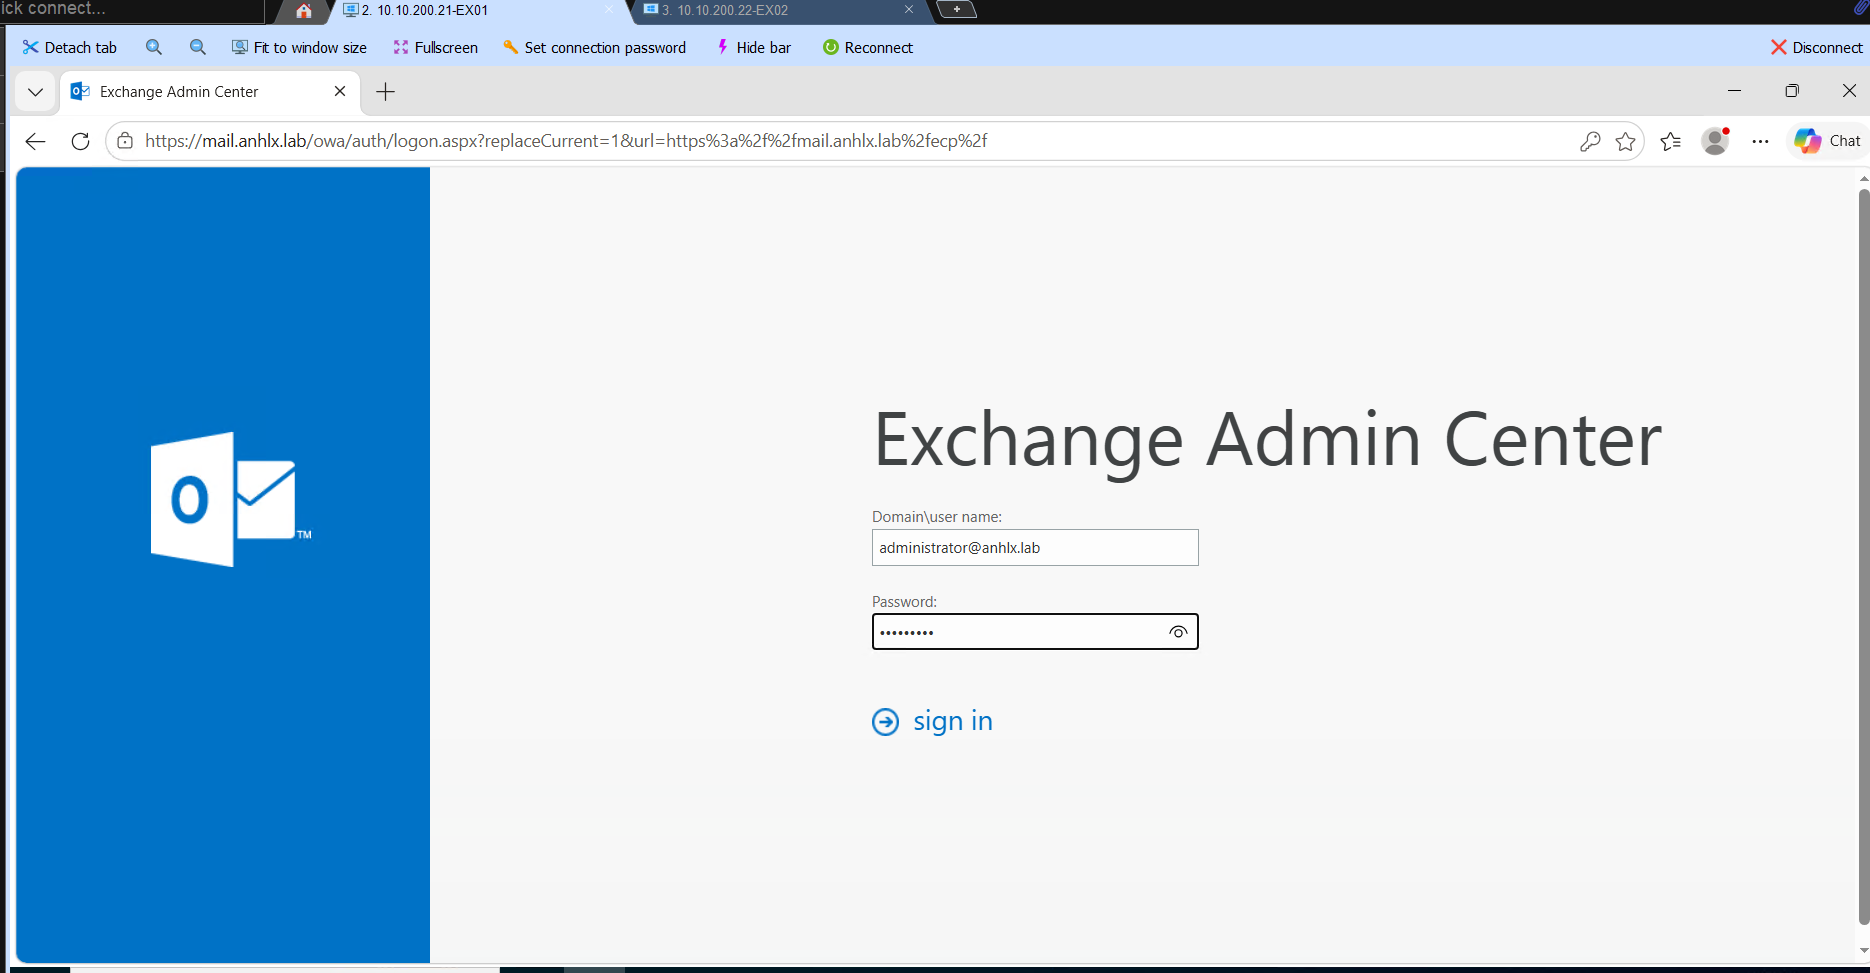
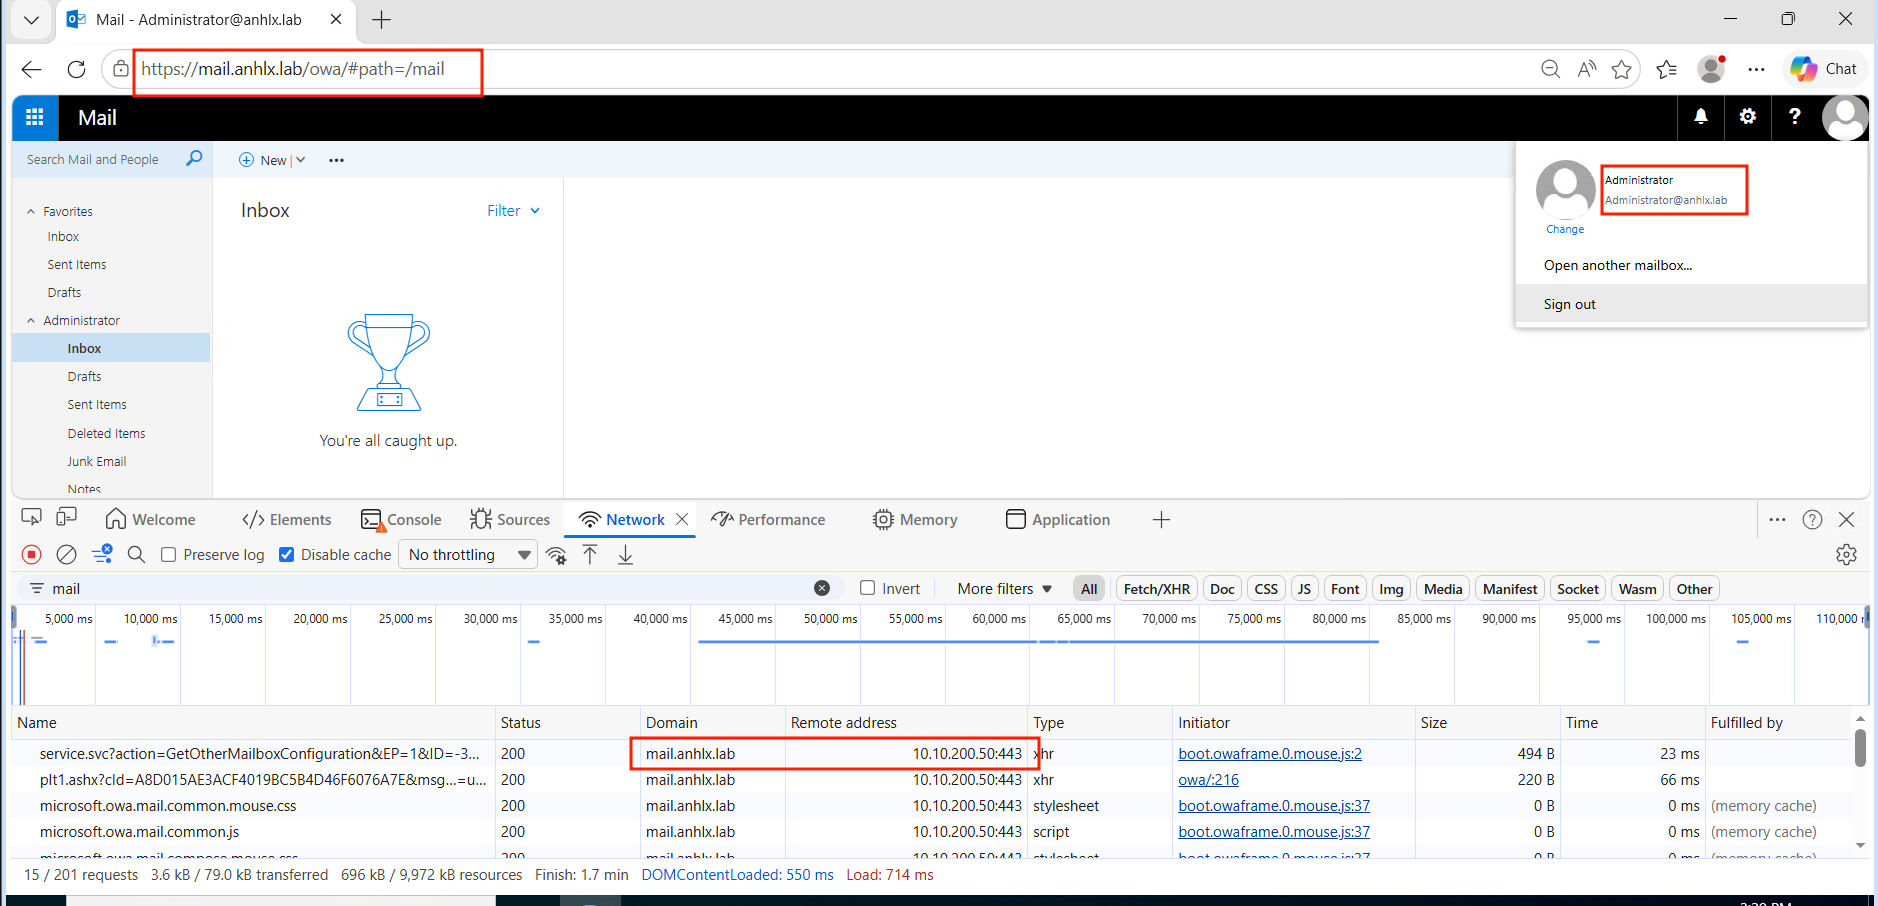
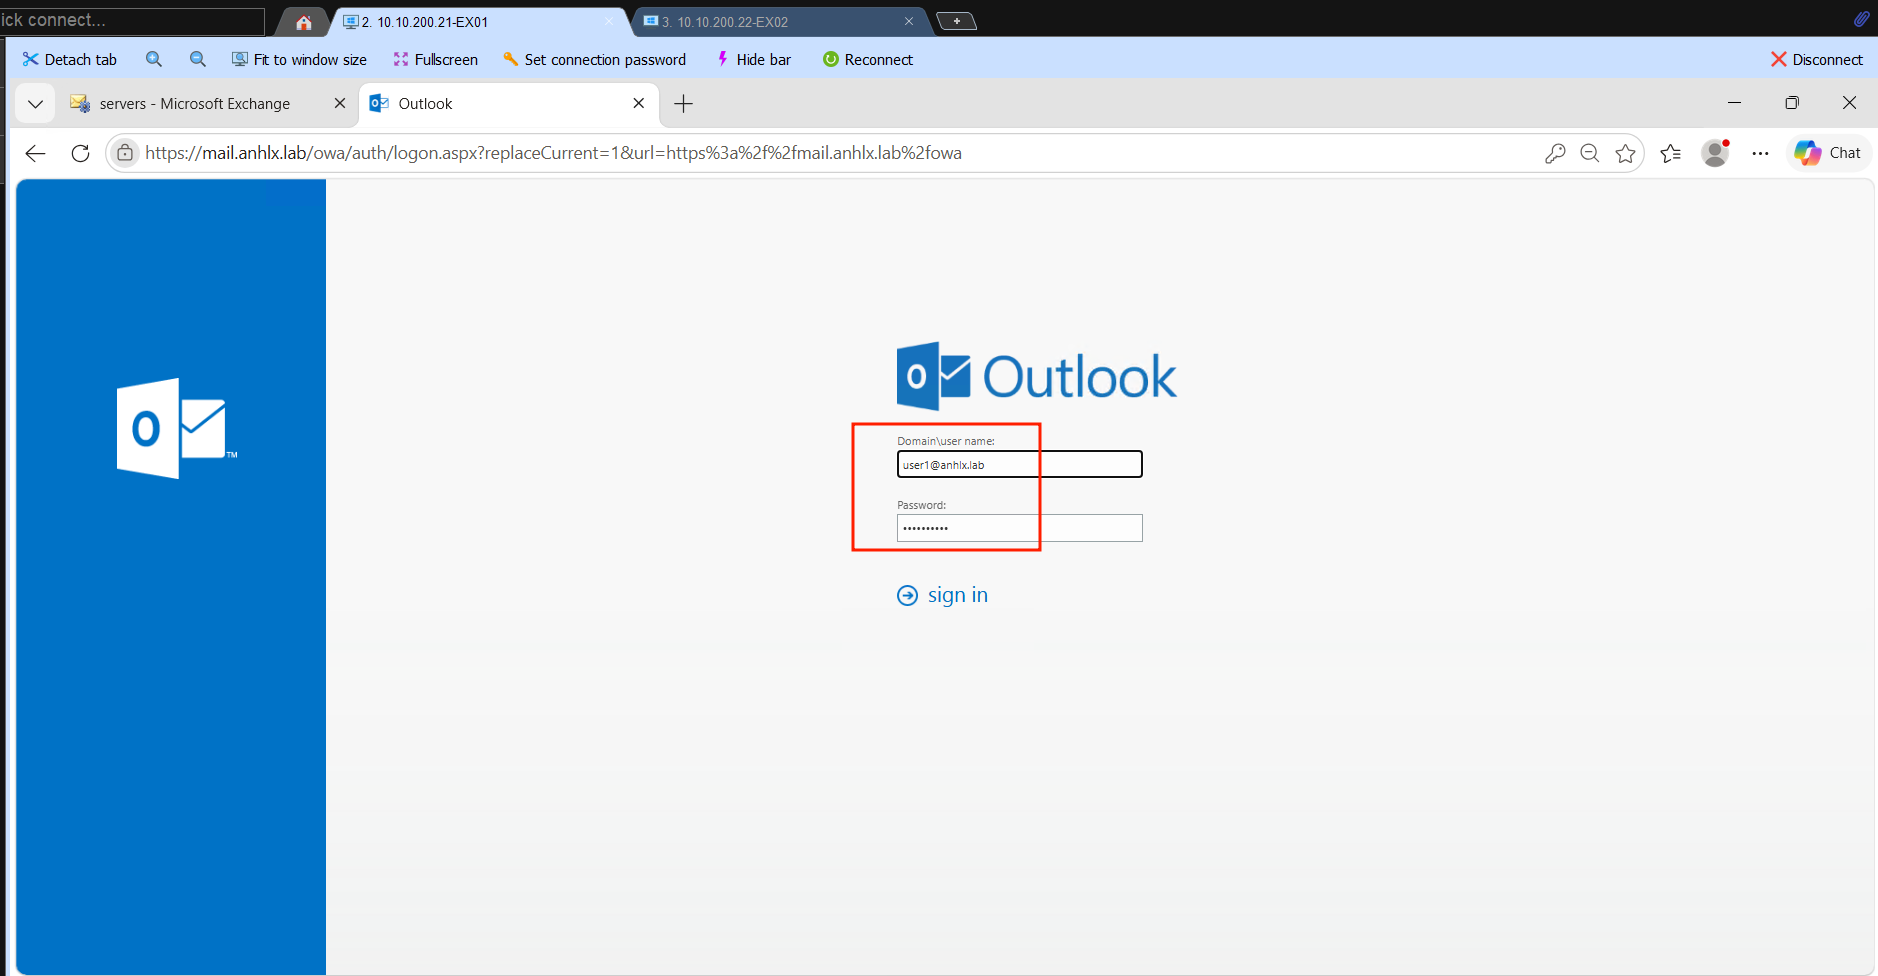
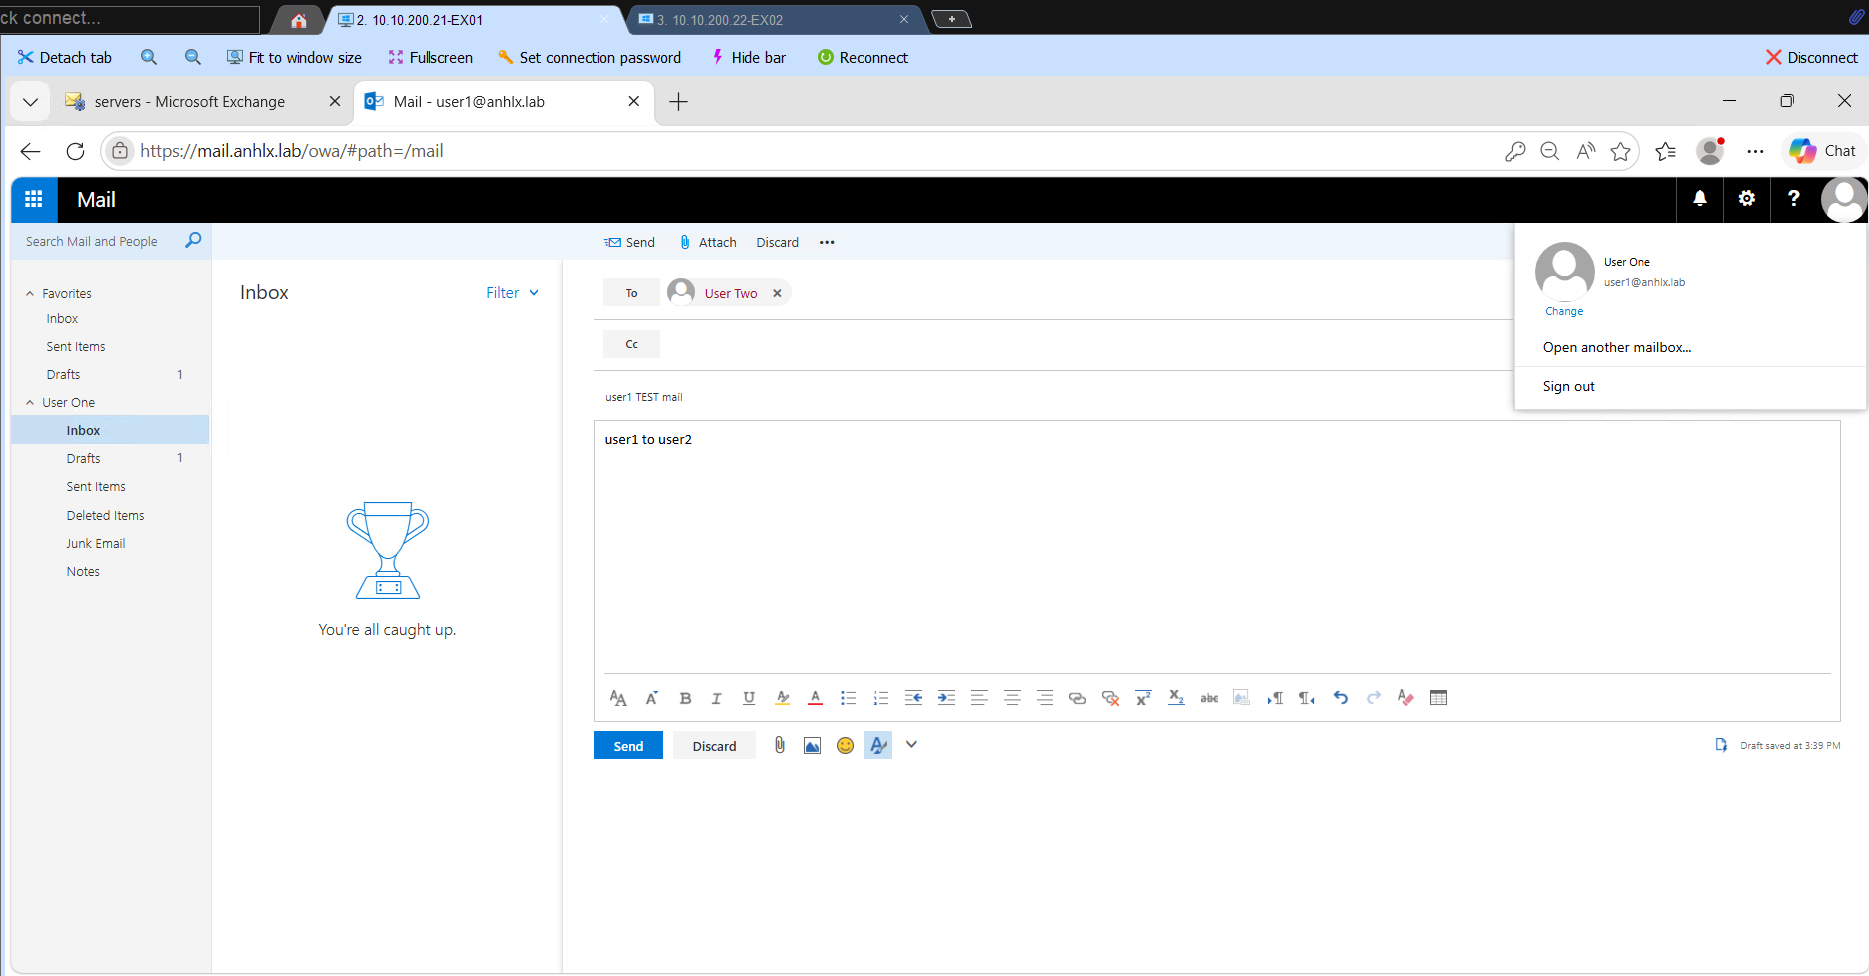
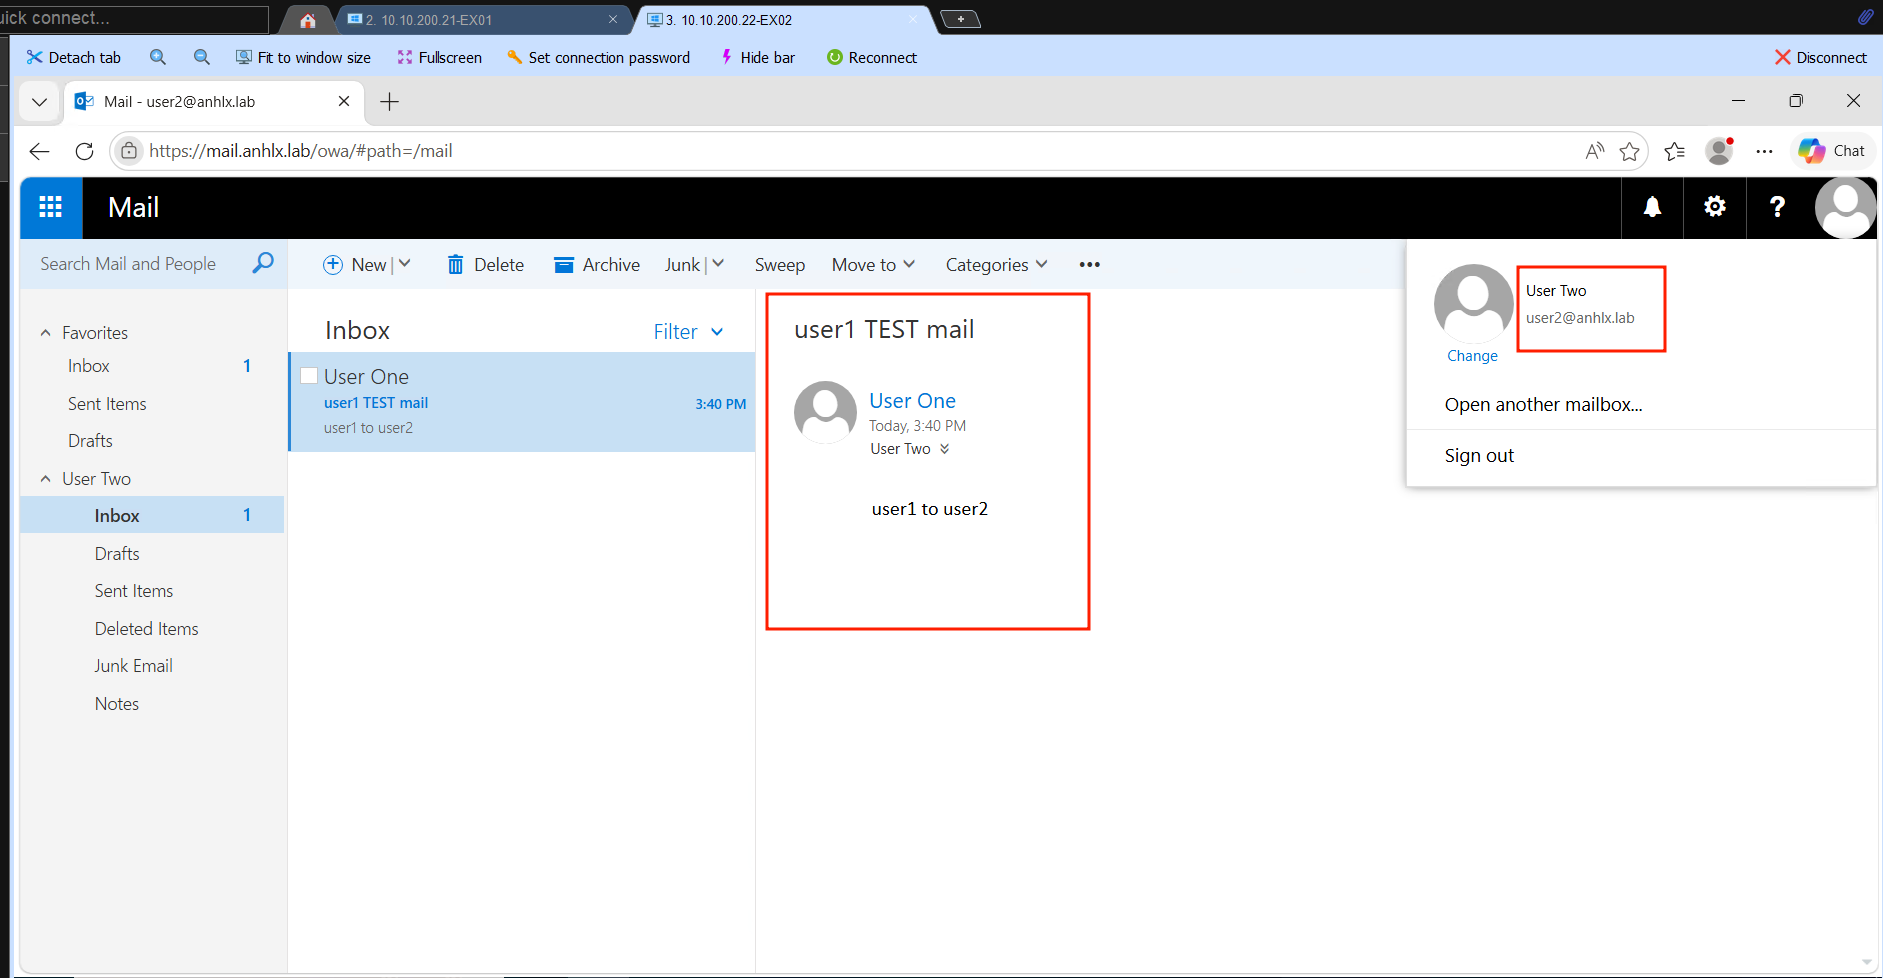
Trỏ browser đến https://mail.anhlx.lab/owa, login user1@anhlx.lab → New message → gửi cho user2@anhlx.lab. Login user2 để confirm nhận được, reply lại.
Luồng mail qua các thành phần Exchange:
[OWA user1] ──HTTPS──► VIP 10.10.200.50 ──► HAProxy ──► EX01
                                                           │
                                               [Client Access Front End]
                                               nhận HTTPS, proxy vào backend
                                                           │
                                               [Mailbox Backend — EX01]
                                               OWA submit mail vào Outbox
                                                           │
                                               [Mailbox Transport Submission]
                                               lấy mail từ Outbox → Transport pipeline
                                                           │
                                               [Transport Service + Categorizer]
                                               lookup recipient → user2 ∈ MBDB02 on EX02
                                                           │
                                                          ▼
                                                         EX02
                                               [Mailbox Transport Delivery]
                                               deliver mail vào MBDB02
                                                           │
                                               [user2 nhận notification OWA]
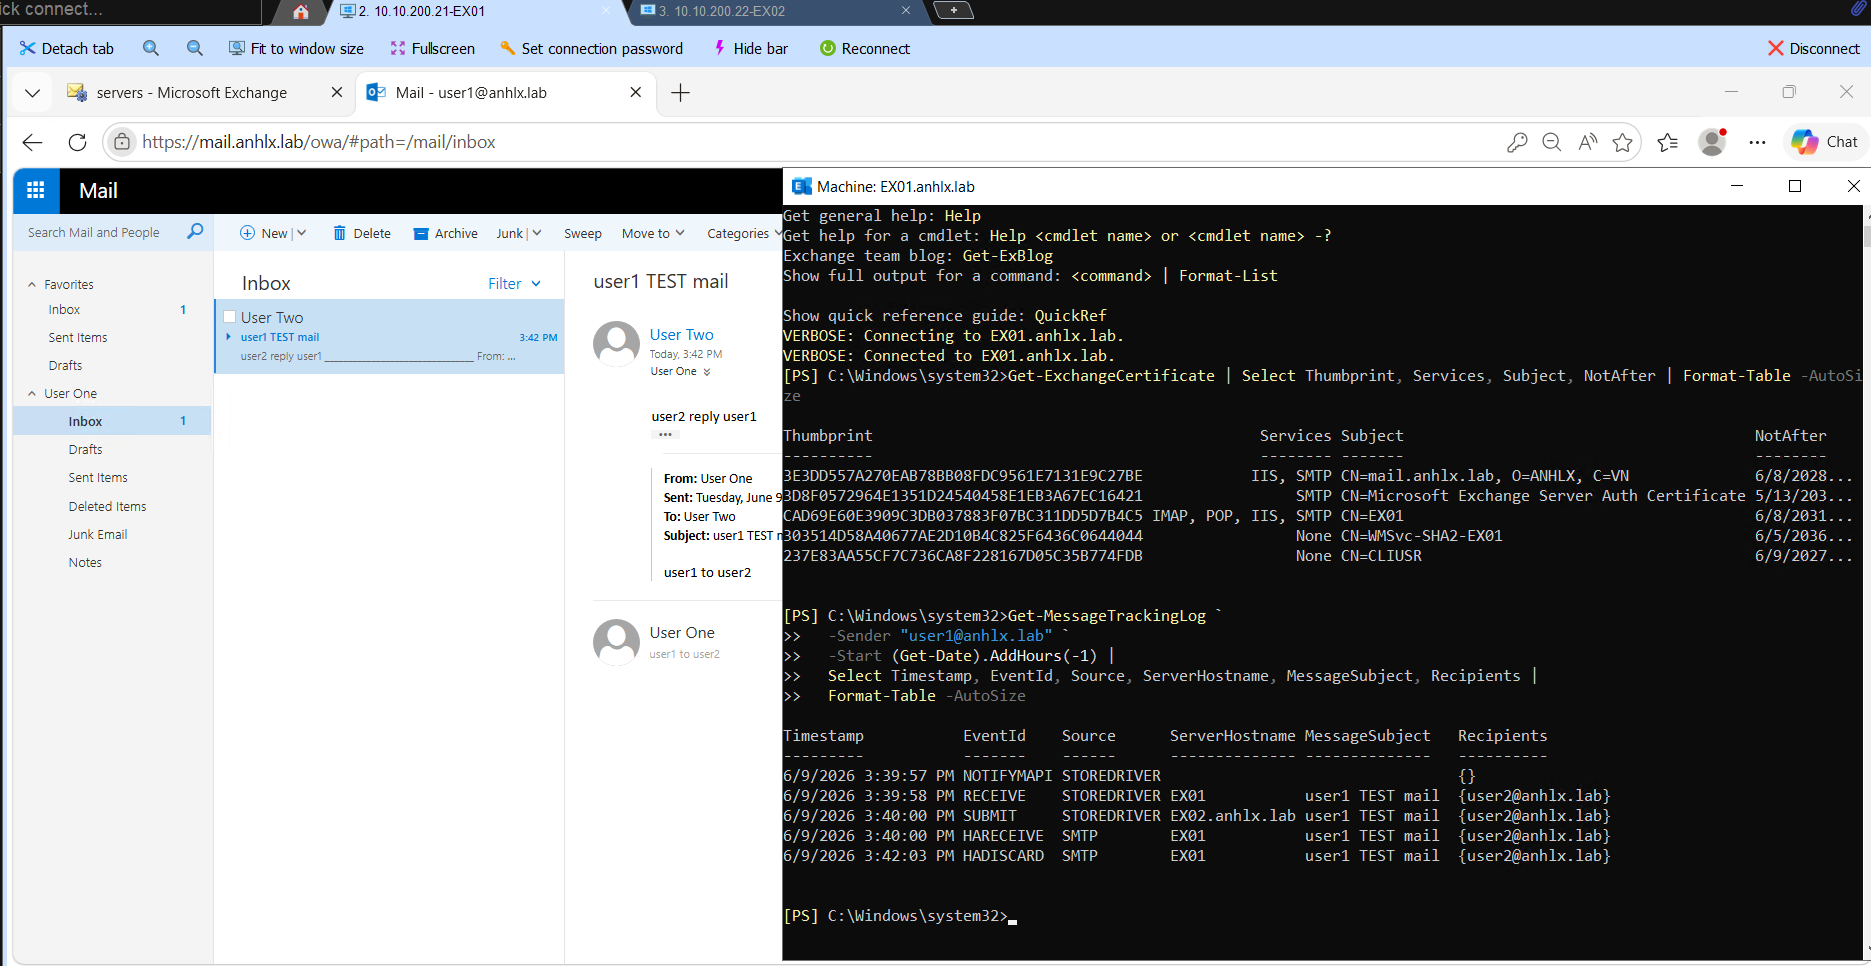
8.3 Message Tracking
Mình trace mail để thấy từng event trong Transport pipeline — SUBMIT, RECEIVE, DELIVER.
Get-MessageTrackingLog `
  -Sender "user1@anhlx.lab" `
  -Start (Get-Date).AddHours(-1) |
  Select Timestamp, EventId, Source, ServerHostname, MessageSubject, Recipients |
  Format-Table -AutoSize
Chú ý các event trong output:
RECEIVEtrên EX01 — transport nhận mail từ mailbox store của user1SUBMITtrên EX02 — cross-server submission, Exchange route sang EX02 để deliverHARECEIVE/HADISCARDtrên EX01 — DAG shadow copy events, xác nhận replication đang hoạt động
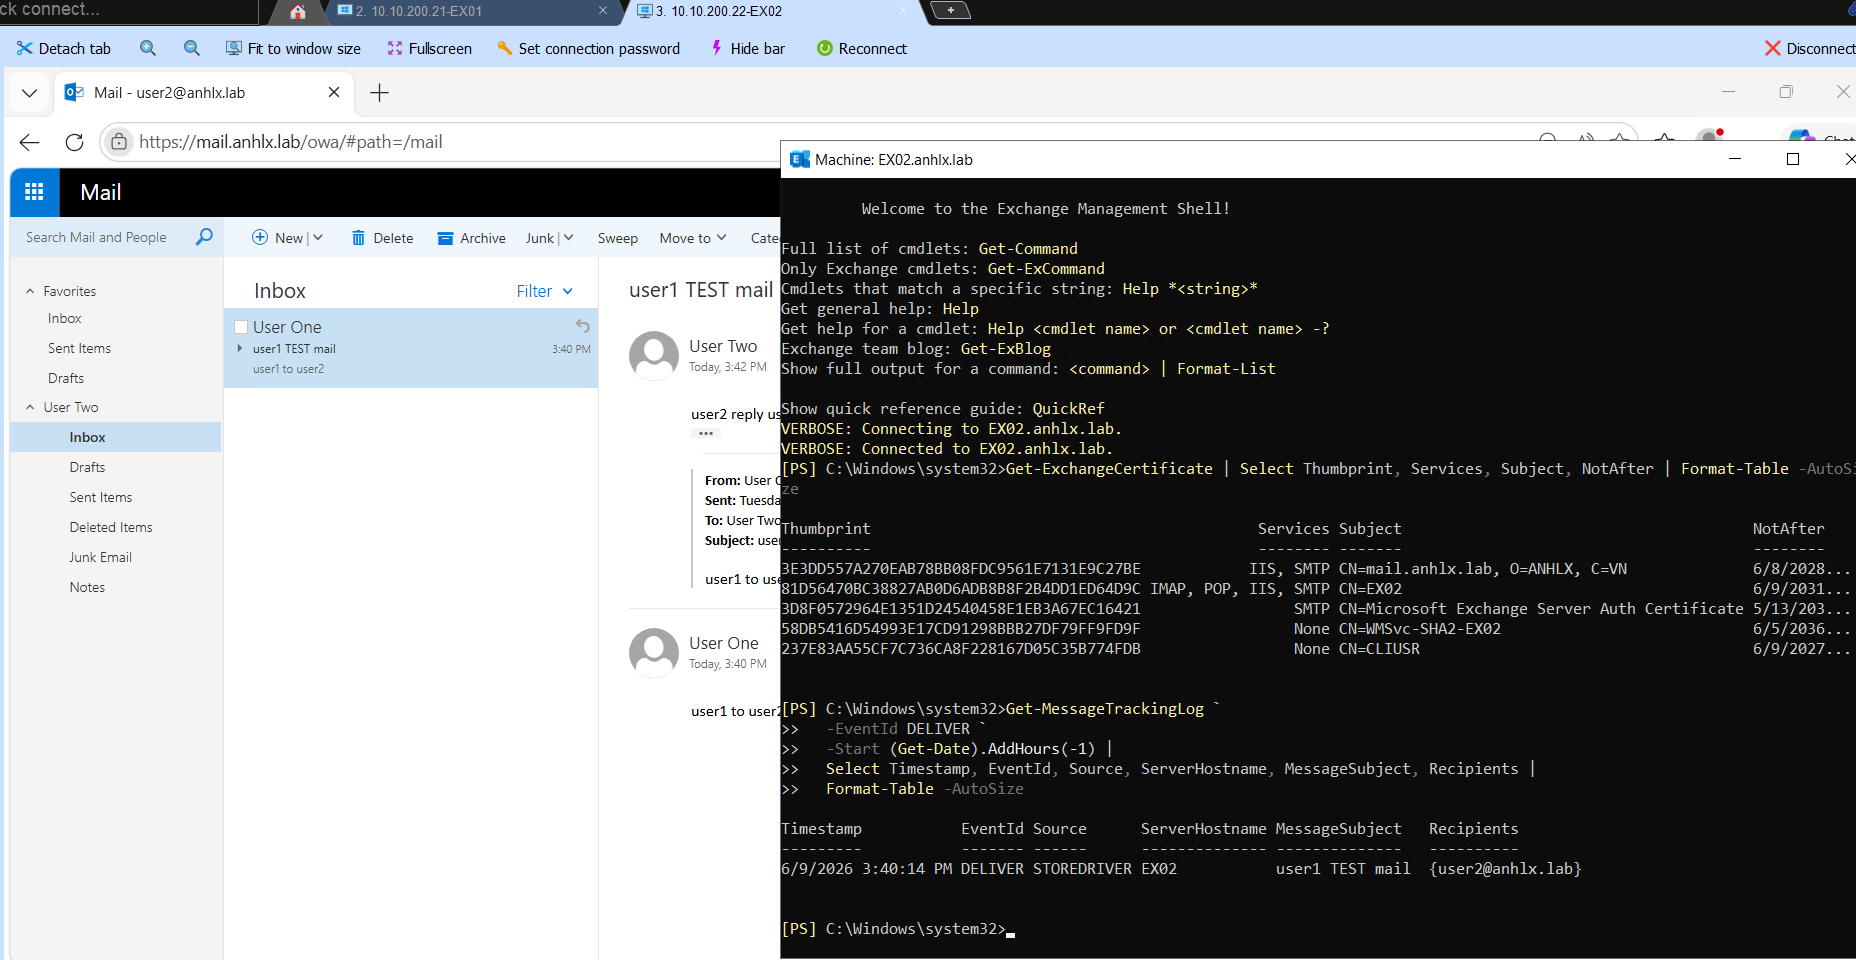
Event DELIVER nằm trên EX02 — chạy thêm lệnh sau trên EX02 để thấy:
# Chạy trên EX02
Get-MessageTrackingLog `
  -EventId DELIVER `
  -Start (Get-Date).AddHours(-1) |
  Select Timestamp, EventId, Source, ServerHostname, MessageSubject, Recipients |
  Format-Table -AutoSize
9. Test DAG Failover
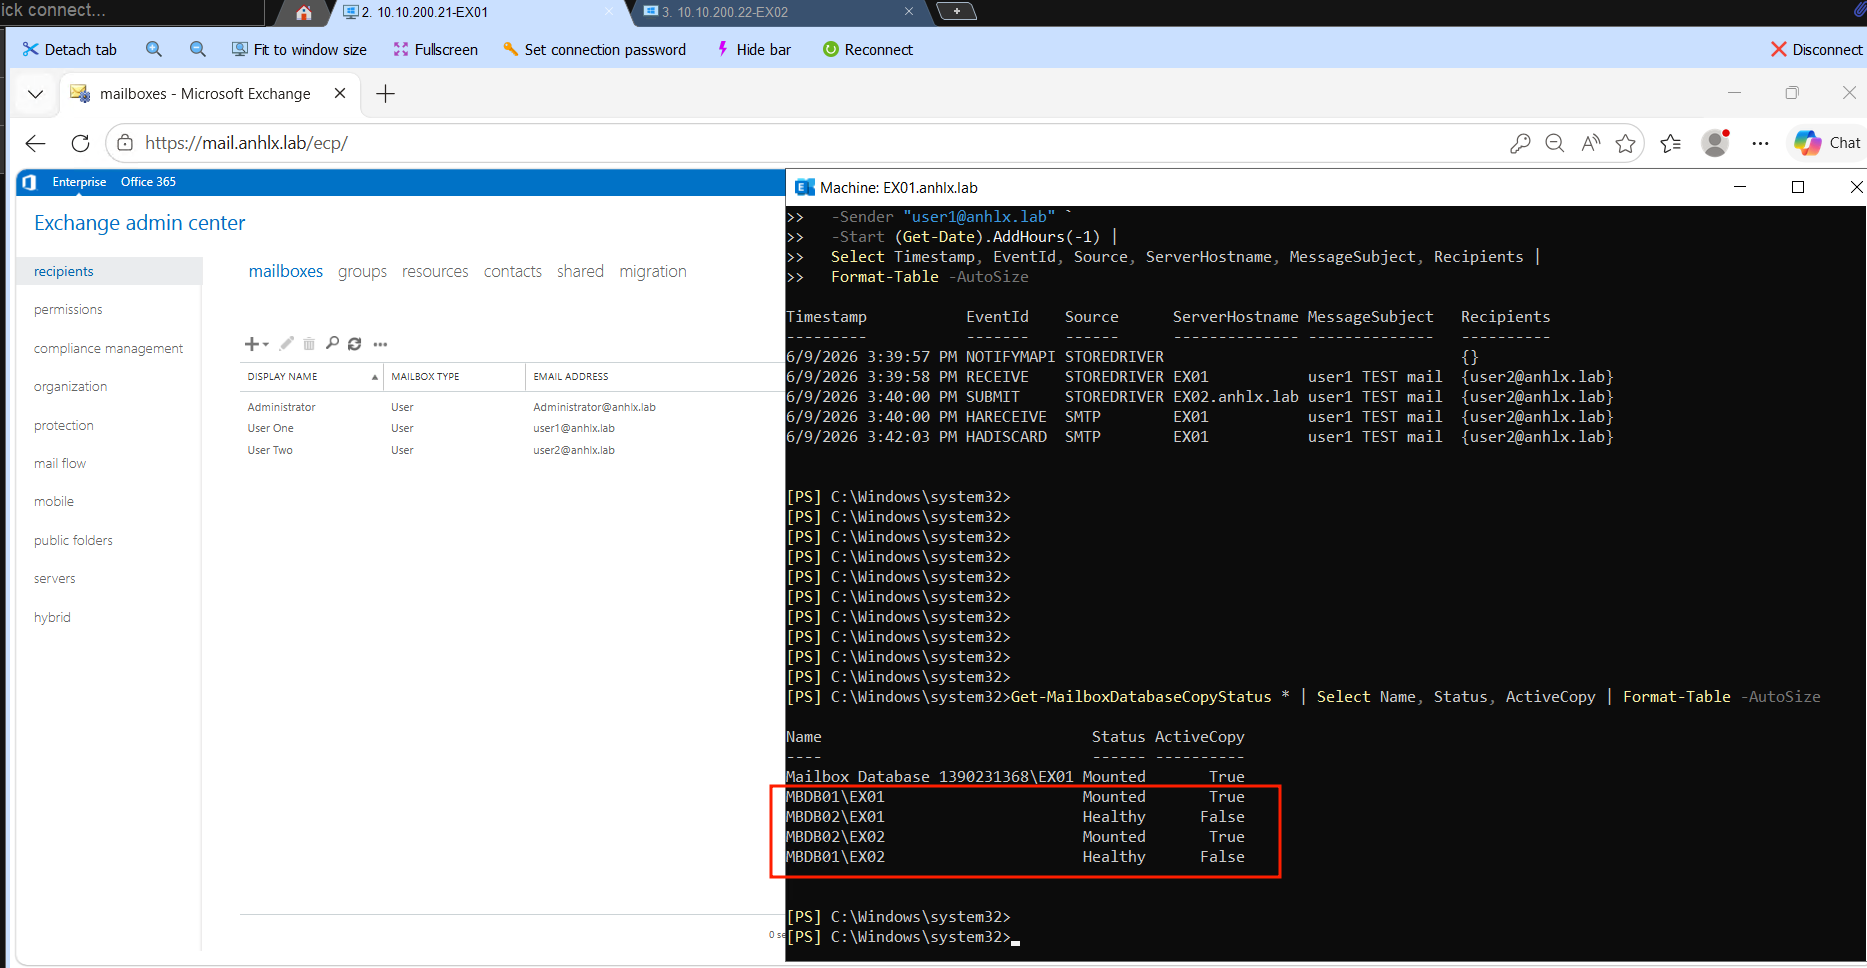
9.1 Kiểm tra trạng thái trước khi test
Get-MailboxDatabaseCopyStatus * | Select Name, Status, ActiveCopy | Format-Table -AutoSize
Kết quả ban đầu: MBDB01\EX01 = Mounted, MBDB02\EX02 = Mounted — active copy đúng server preferred; passive copies Healthy, queue = 0.
9.2 Shutdown EX01
Tắt VM EX01 từ ESXi console. Chờ khoảng 30–60 giây để DAG phát hiện node down và trigger failover tự động.
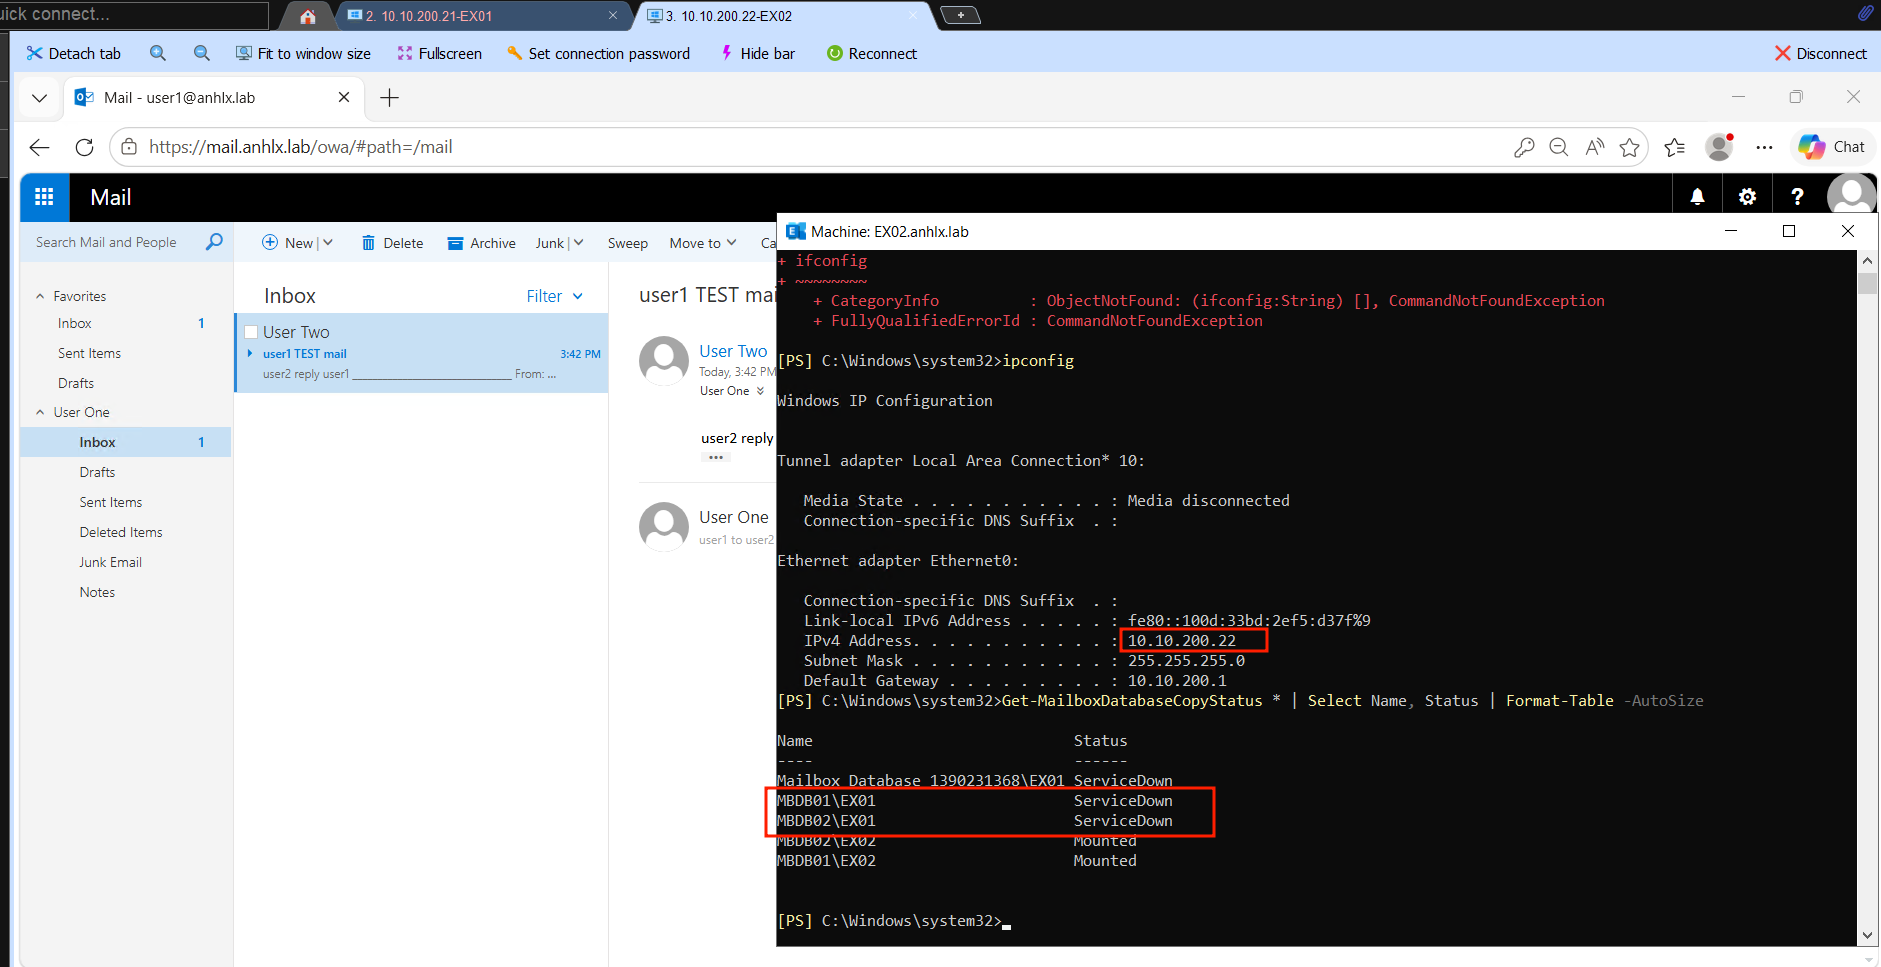
9.3 Xác nhận failover
# Chạy trên EX02
Get-MailboxDatabaseCopyStatus * | Select Name, Status | Format-Table -AutoSize
Kết quả mong muốn: MBDB01\EX02 đã đổi từ Healthy → Mounted — database failover thành công.
Mình mở OWA https://mail.anhlx.lab/owa, login user1@anhlx.lab — vẫn vào được bình thường. HAProxy đã tự remove EX01 khỏi pool sau 3 lần tcp-check fail liên tiếp (fall 3), toàn bộ traffic chuyển sang EX02.
9.4 Bật lại EX01 — kiểm tra resync
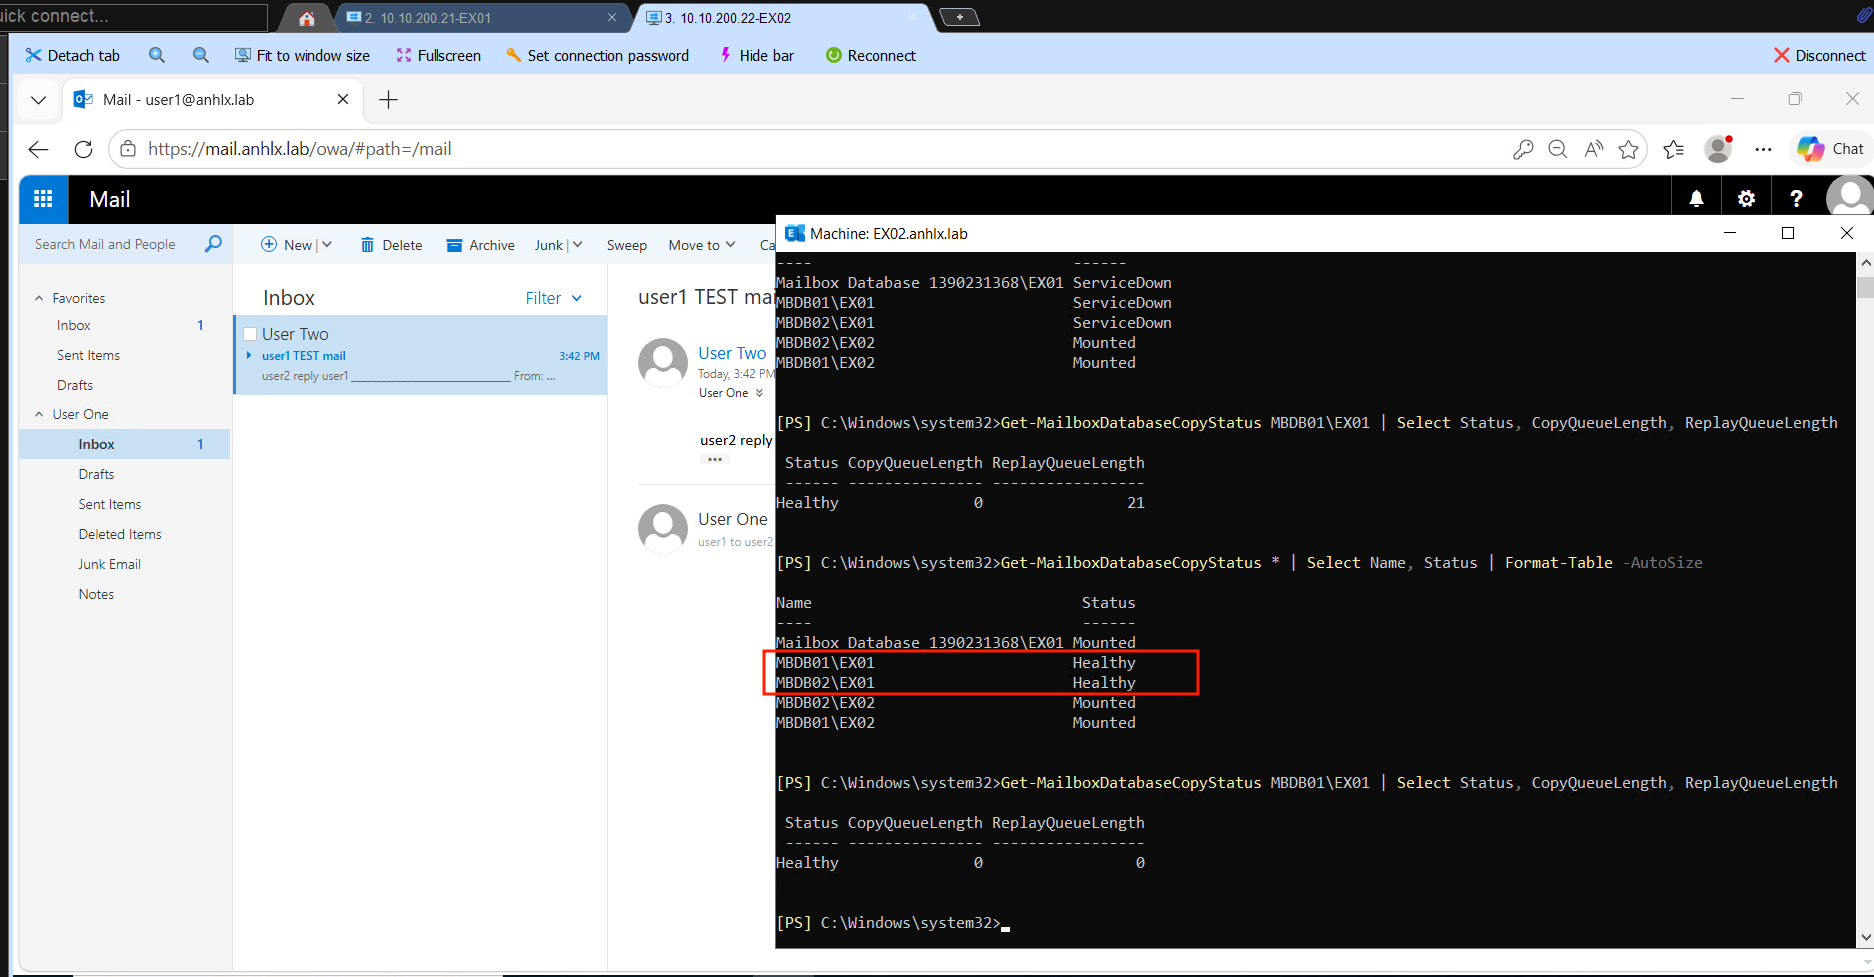
Sau khi start lại EX01, DAG tự đồng bộ transaction log còn thiếu. Theo dõi quá trình catch-up:
Get-MailboxDatabaseCopyStatus MBDB01\EX01 | Select Status, CopyQueueLength, ReplayQueueLength
Khi cả CopyQueueLength lẫn ReplayQueueLength về 0 là EX01 đã sync hoàn toàn, status trở về Healthy. HAProxy tự add EX01 trở lại pool sau 2 lần tcp-check thành công liên tiếp (rise 2).
Lưu ý: DAG không tự failback — sau khi EX01 recover, MBDB01 vẫn active trên EX02 (nơi nó đã failover sang). Đây là thiết kế cố ý để tránh “bounce back” liên tục. Muốn restore placement ban đầu thì move thủ công:
Move-ActiveMailboxDatabase MBDB01 -ActivateOnServer EX01 -Confirm:$false
Move-ActiveMailboxDatabase MBDB02 -ActivateOnServer EX02 -Confirm:$false
Lời kết
Mình đã dựng xong Exchange Server SE on-premises với DAG 2 node, FSW trên DC02, HAProxy Layer 4 làm load balancer — đủ để POC và nghiên cứu các thành phần core của Exchange trong môi trường doanh nghiệp. Phần thú vị nhất là khi trace Message Tracking, thấy rõ mail từ user1 đi qua Transport Service trên EX01 rồi được deliver qua Mailbox Transport Delivery trên EX02, và DAG tự failover khi tắt EX01 mà OWA không bị gián đoạn. Bước tiếp theo có thể thêm Edge Transport Server vào DMZ để lab mail flow với internet, hoặc cấu hình Exchange Hybrid với Microsoft 365 để thực hành lộ trình migrate mailbox lên cloud.